Still scrolling through Polar Express Christmas decorations and saving photos you never quite recreate? You’re not alone — a train running under the tree is the most-saved holiday vignette on Pinterest right now, and it’s also the one people abandon fastest. We spent serious time browsing Etsy, HomeGoods, Target, and Michaels to bring you only what’s worth your attention this year, across a price range from about $6 for a felt ornament to $450 for a full village setup. Inside: 27 curated ideas, from nostalgic model-train vignettes and vintage gingerbread displays to warm gold-and-red traditional styling and handmade felt ornaments — with budget and luxury versions compared side by side, and every idea shoppable with direct product links. In 2026 the shift is toward slower, story-driven decor: displays you build over a weekend rather than buy in one cart, warm 2700K lighting, and pieces that survive storage year after year. And stay until the end — we break down the most common mistakes that can ruin these looks. 📌 Save this to Pinterest for later — you’ll want to revisit these ideas.
1. A Gift-Wrapped Train Parked on a Faux-Fur Snowdrift
Here’s what it actually costs to build this vignette from scratch:
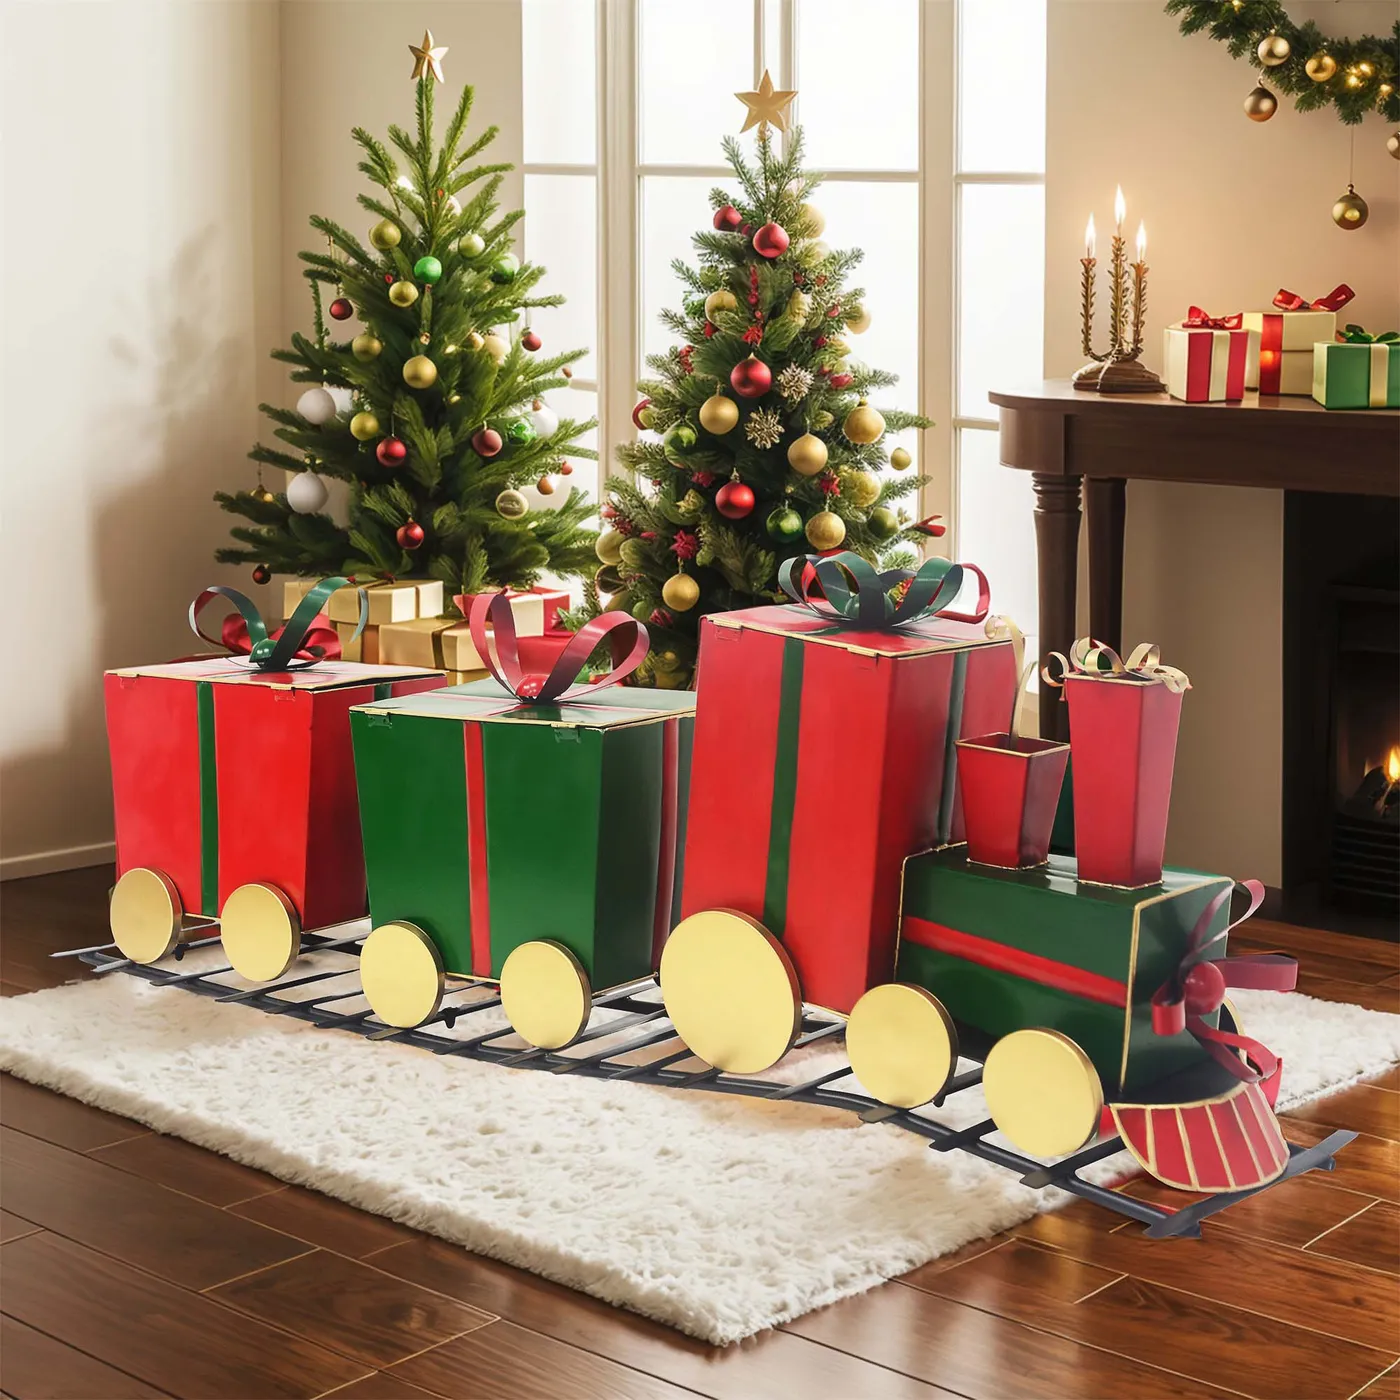
- Gift-box train plus metal track kit: $45–$120
- Two pre-lit tabletop trees, 4–6 ft: $60–$180
- White faux-fur rug, 5×7: $50–$160
- Dark wood console or low bench: $120–$400
- Candlesticks and taper candles: $25–$60
- Pine-and-bauble garland: $30–$70
Total: roughly $330–$990. The cheaper route: wrap six empty shipping boxes in clearance paper ($25), borrow the rug from the bedroom, and skip the console by stacking two storage bins under a length of fabric. Same silhouette for about $120.
holding this whole scene together is that white faux-fur rug. Take it away and you have a craft project on a floor; put it back and the track suddenly reads as packed snow, the trees read as a forest edge, and the candles read as a cabin window. Faux fur absorbs light instead of bouncing it, which is why the reds and greens stay rich instead of plastic. Go with a pile at least an inch deep, and pull the rug four to six inches past the ends of the track so the train looks parked, not stranded.
2. A Gingerbread Train Depot With a Working Clock Tower
Three things are doing the heavy lifting here. First, vertical stacking — a depot with a tower gives the eye somewhere to climb, which is why kids stop in their tracks while adults walk right past flatter displays. Second, the striped wall covering and floor-length gold curtains act as a proscenium: a patterned backdrop makes the gingerbread read as sculpture. Third, the frosting brickwork repeats one texture at three scales — bricks, snowy base, snow-capped tower — and that repetition is what makes a display look intentional instead of assembled.
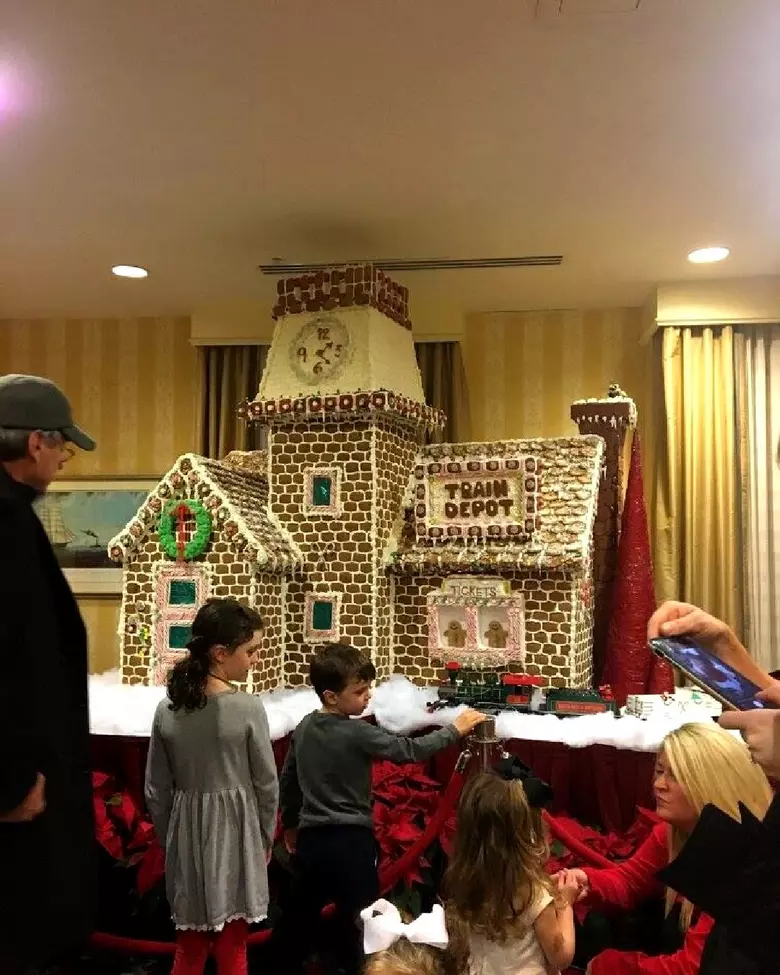
Lighting is where display gingerbread usually falls apart. Put the structure under a 2700K picture light aimed from about 45 degrees above, never straight down — top-down light flattens frosted brick into a white blob and kills the clock tower’s shadow. Keep 14 to 18 inches of air between the light and the tallest point of the roof so frosting doesn’t sweat or soften. And if you’re baking it yourself, let every piece dry a full 24 hours before stacking. A clock tower that leans is a clock tower that falls.
3. An Elf Workshop Corner With a Flickering Mini Fireplace
Building the little workbench vignette takes an afternoon, not a weekend:
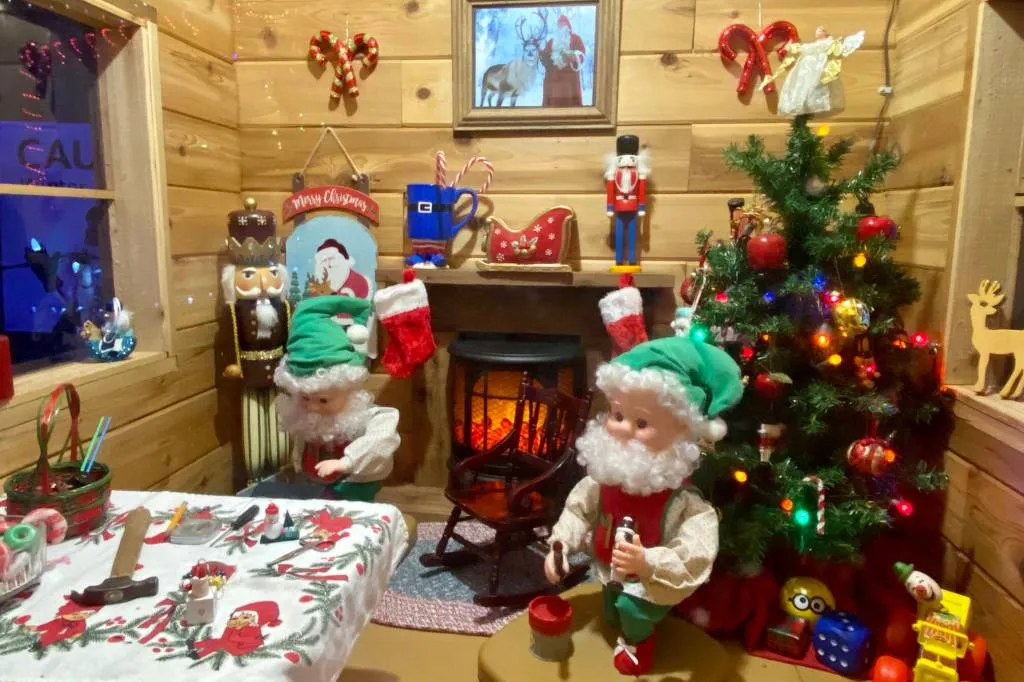
- Clear an 18-inch-deep surface about 30 inches high — a console, desk, or sturdy bench works.
- Set the mini electric fireplace slightly off-center, then lay a red runner over the front third of the surface.
- Arrange two or three elf figurines in a half-circle facing each other, not the camera. They should look busy.
- Add one oversized nutcracker per side as a frame so the scene has clear edges.
- Tuck a lit tabletop tree behind the workbench, elevated on a box so it rises above their heads.
Time: about two hours plus a trip for figurines. Material cost: $60–$150 if you already own the surface.
Honest word about miniature electric fireplaces: the good ones are LED-only and throw zero heat, and the cheap ones flicker in an orange-blue rhythm that reads more haunted house than cozy cabin. Look for a unit with a single warm amber setting. And if you have toddlers, treat those elf dolls as collectibles, not toys — the little hats and tools come off and go straight into mouths. A shelf at 48 inches or higher solves the problem entirely.
4. A Peppermint-Wheel Locomotive in the Front Yard
The formula here is roughly 55% candy-stripe red and white, 30% warm brown and cream, 15% multicolor light. That middle 30% is what keeps it from turning into a carnival — the brown locomotive body and cream ice-cream stack give your eyes somewhere to rest between all that peppermint. Swap the palette and the math still holds: navy and silver with white bulbs becomes a snowy night train; pastel pink and mint with warm white becomes a candy shop. Keep the ratio and you can change every single object.
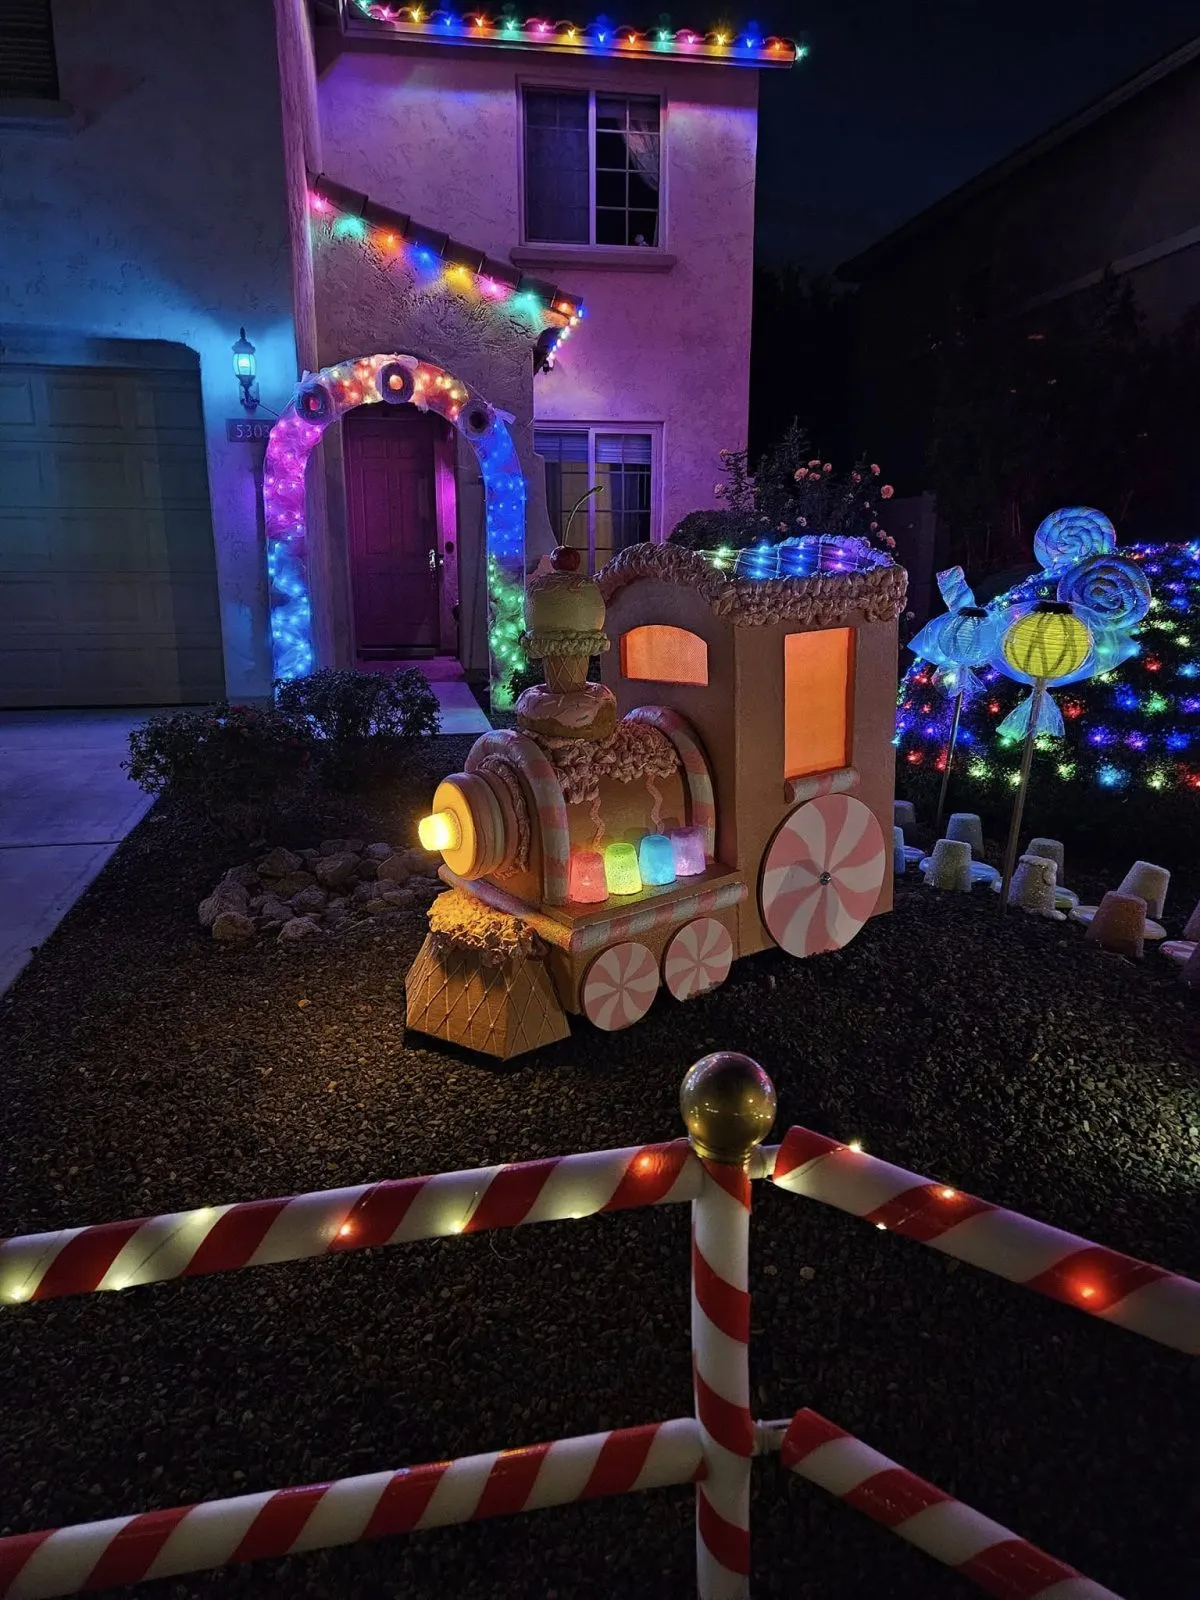
You don’t need custom sculpture for this. Buy a 4×8 sheet of exterior plywood, sketch a locomotive silhouette, and cut it with a jigsaw — about $45 all in. Paint it brown and cream, then glue on foam peppermint wheels ($12 for six at a craft store). Lighted lollipop yard stakes run $3–$6 each at dollar stores; buy nine and cluster them in threes. The candy cane fence is a ten-foot PVC section wrapped in red-and-white tape — this is the yard-sized version of Idea #1, same small-thing-reads-big trick.
5. A Locomotive Snow Globe With Santa in the Cabin
It’s the tree-slice base. Rest that same globe on marble or a bookshelf and it’s a knickknack; set it on raw wood with visible rings and it suddenly belongs to a story about a forest and a train that runs through it. The wood also does quiet color work — it pulls the gold lantern and the antique metal into the same warm family, so the red and green inside the globe become the only real color in the frame. Look for a slice at least an inch thick so it reads as a pedestal rather than a coaster.
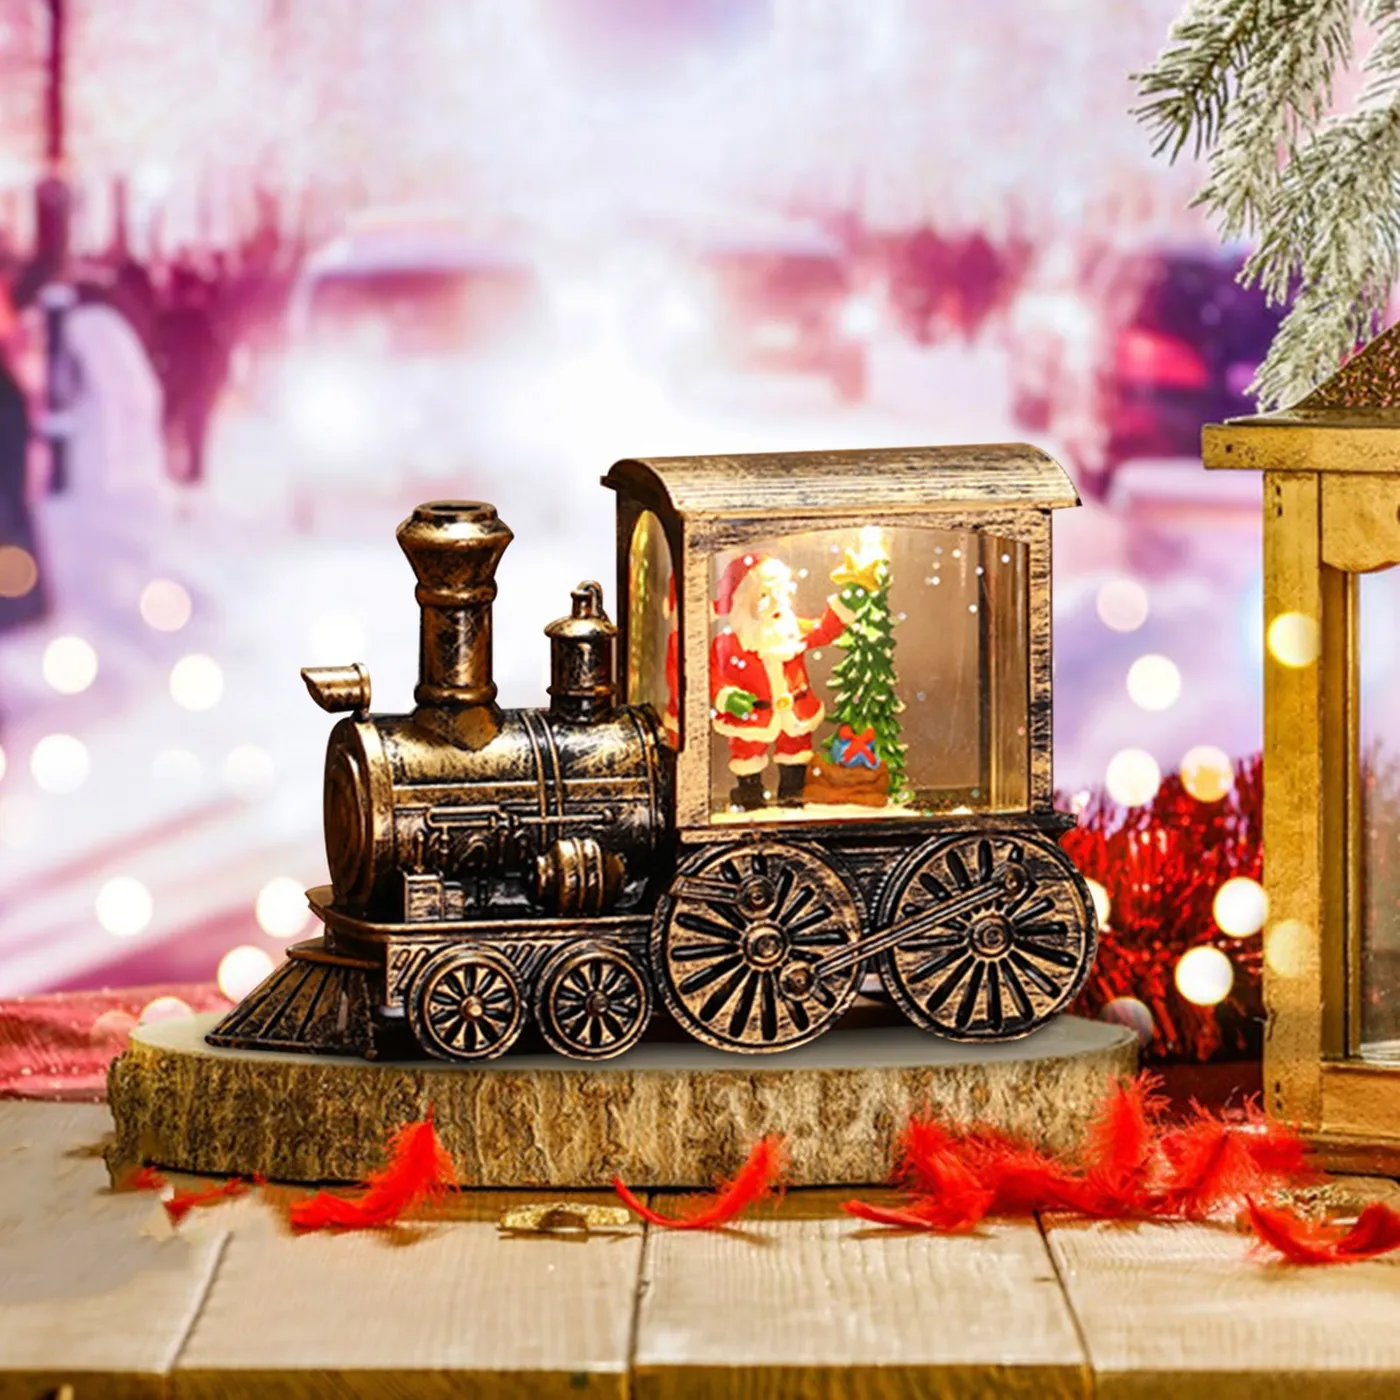
This one is the small-space hero of the bunch. It works on any flat surface 12 to 30 inches wide — a hallway console, a nightstand, a windowsill, the top of a radiator cover — and it doesn’t care about ceiling height, which makes it a genuine option for apartments and basements. Keep it below 48 inches if you want kids to see the Santa inside. Above eye level, the whole point of the piece disappears.
6. A Model Train Loop That Circles the Christmas Tree
The reason this reads as magic and not clutter is radius. The track curve draws a visual circle around the trunk, and that circle echoes the tree’s own shape — your eye keeps traveling in a loop instead of stopping. Elevation matters too: the track sits on a green surface raised a few inches off the carpet, which puts the train just below the lowest branches. Close enough to feel like it’s running through the tree, far enough that it never snags. The red-and-white ornaments above match the train below and tie top and bottom together.
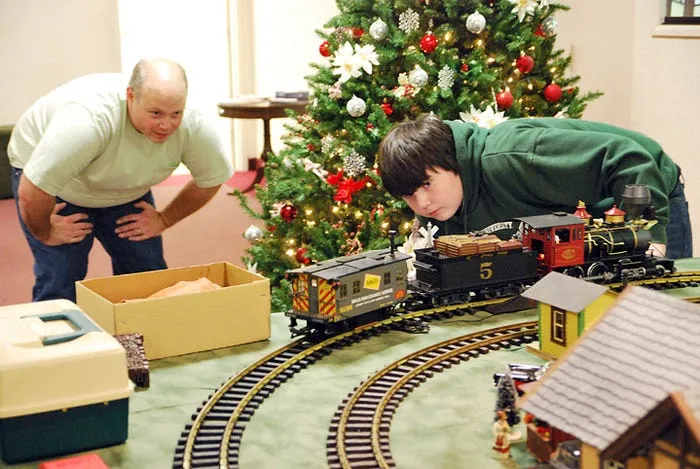
Three realities nobody mentions. Carpet kills model trains — pile gets into the wheels and the engine stalls, so run it on a board or hard surface. Any track at floor level is a trip hazard and a chew toy; with a dog or toddler, put the loop on a table instead. And derailments cost you five minutes of re-railing each time, so run it slow. We break down the light-temperature mistake that ruins most of these displays in the mistakes section at the end.
7. A Miniature Winter Village on a Red-Skirted Table
Village displays are having a genuinely big 2026 because the culture swung toward slow holiday decor — things you build over weeks and keep, rather than one cart of disposable sparkle. Nostalgia is the other driver: the model railroading generation is passing its boxes down, and their kids are opening them. That’s why you’re seeing villages photographed against dark red walls and multi-pane windows instead of white backdrops. It’s not a trend with an expiration date either. Villages are the rare holiday category that gains meaning the longer you own it.
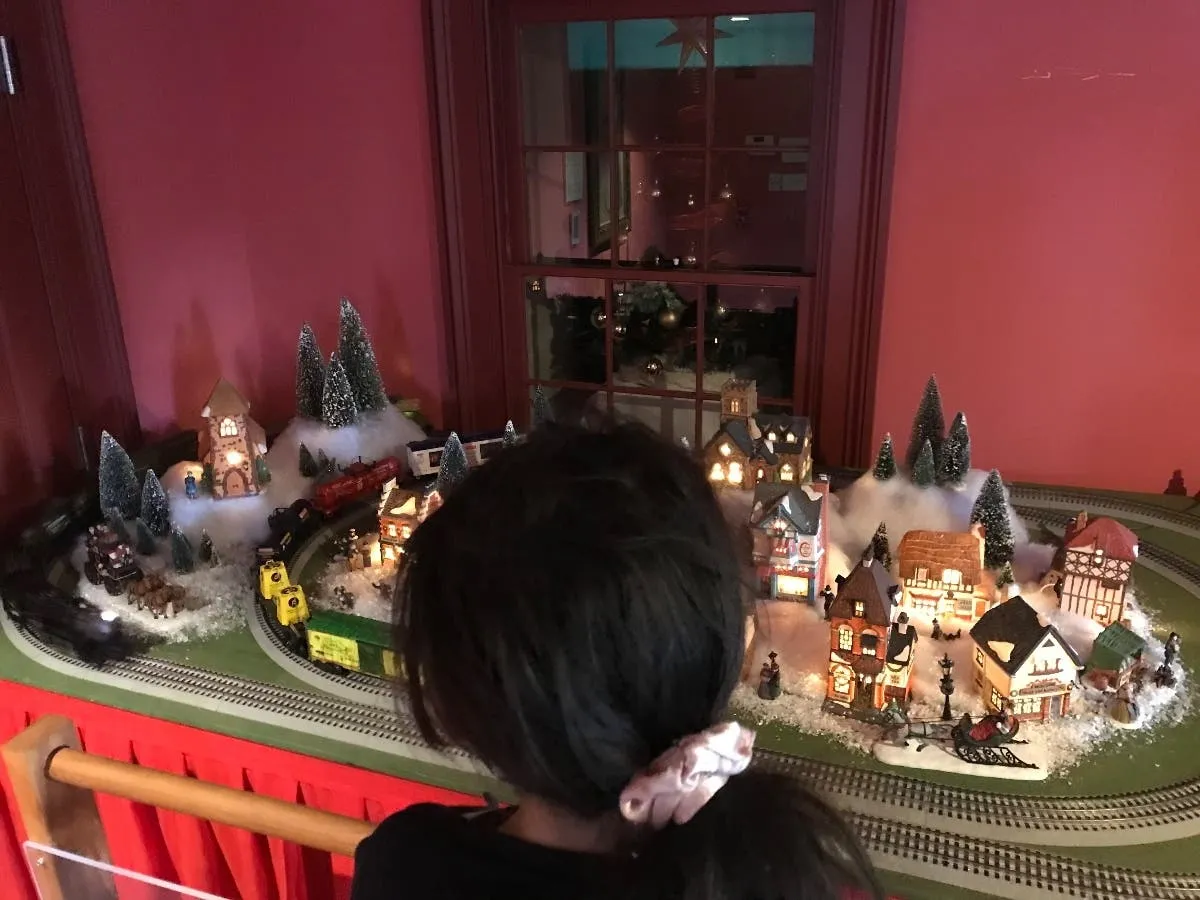
Skirt the table properly: measure the table height, add half an inch, and cut your fabric to that length. A skirt that pools on the floor collects dust and reads sloppy, while one that stops a half-inch short looks tailored. For the snow layer, use two inches of quilt batting over foam board rather than loose cotton. Loose cotton shifts every time someone walks past and you’ll be re-fluffing it nightly. A hard base under the batting keeps every building level, which is the difference between a village and a pile.
8. The Train Village That Lives in Wooden Display Cabinets
Before you commit to a cabinet-based village, check these:
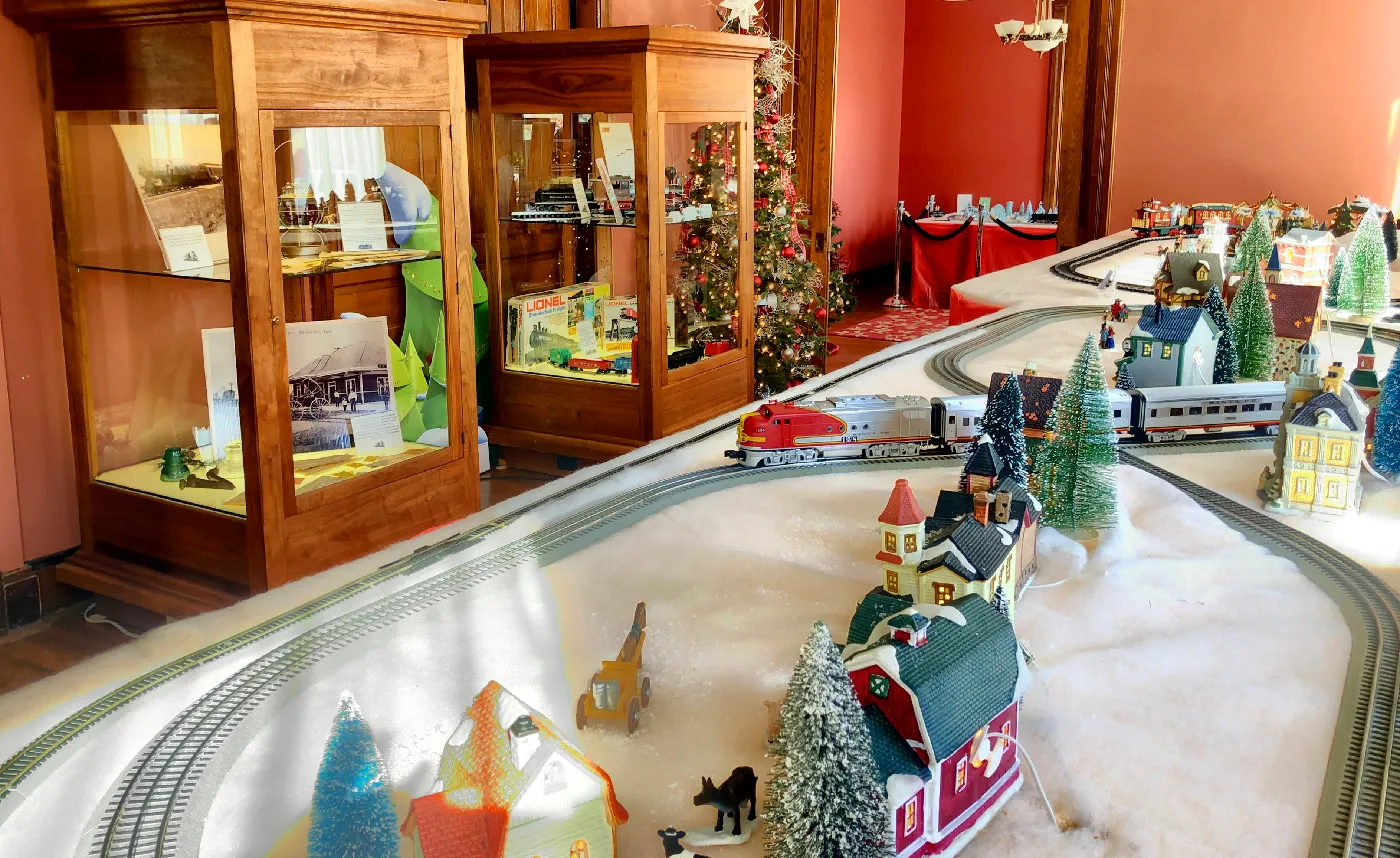
- Measure the footprint — most cases hold a 30×14-inch scene per shelf, and villages eat space fast.
- Confirm an outlet within three feet; you’ll be running a lot of low-voltage cords.
- Check shelf height for sightlines. Kids under 48 inches can’t see a top shelf.
- Pick your light temperature now: 2700K for vintage warmth, 4000K if you want a museum feel.
- Set a firm number on how many buildings you’ll buy this year. Villages are the number-one “just one more” purchase in holiday decor.
What makes this feel like a collection instead of an avalanche is the cabinet itself. Glass-front wood cases turn dusting from a weekly chore into a yearly one, and more importantly they give each scene a frame and a boundary — the one thing every sprawling tabletop village is missing. The wood tone also does the color work for you, warming all those little white, coral, and silver buildings into a single family. Take the cabinet away and the same buildings read as clutter.
9. A Shelf-Sized Train Line With Bottle-Brush Pines and Toy Cows
The ground cover is what separates a convincing miniature from a toy on a table:
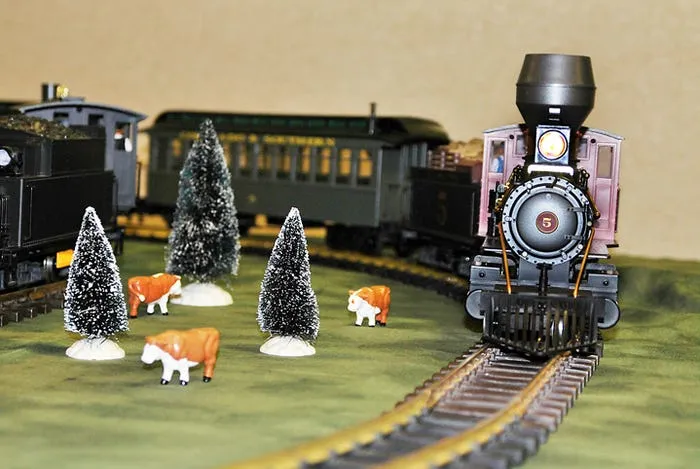
- Cut foam board to your shelf depth, then cover it with green landscape fabric or fine moss.
- Lay the curved track first and let it run slightly off the front edge — the eye fills in the rest.
- Place trees in odd-numbered clusters of three, tallest behind the track.
- Add snow to the tree bases only, using a small brush and white craft paint or flocking powder.
- Finish with one story detail — here, tiny cattle — and stop. One story detail, not five.
Time: about 90 minutes. Cost: $40–$80, most of it the trees.
Scale contrast is the real trick. The locomotive is your reference object, so everything else has to agree with it: trees roughly twice the train’s height, cattle about a third of a car length. Get that relationship wrong and even expensive miniatures look like toys. The composition also leans on negative space — that stretch of empty green between the pines is what makes it feel like countryside rather than a diorama. Compare with Idea #8, where the same instinct is handled by cabinet shelves instead of open air.
10. Four Lit Village Dioramas Against a Dark Shelf
Cotton and felt snow is the maintenance villain of every village — it collects dust, yellows near heat, and can’t be vacuumed, only picked at with tweezers. Plan on a full swap every two to three years and budget $15–$25 for replacement batting. The LED string lights inside these dioramas will outlast the snow by a decade, but the batteries won’t: if they aren’t hardwired, expect to change AA cells every six to eight weeks during the season. Store each diorama in its own labeled bin with the lights coiled around a card, never stuffed into a bag.
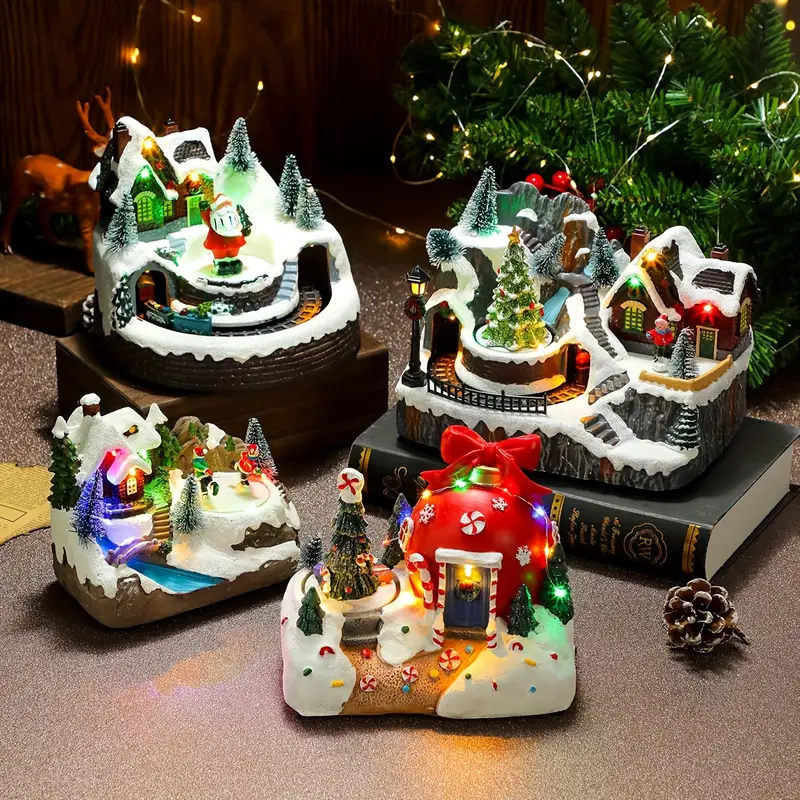
Here’s the exact color math these four scenes use: 60% snow white, 25% forest green, 10% ruby red, 5% warm gold light. White does the heavy lifting, greens build structure, reds are the accents you actually notice, and gold appears only in the bulbs. Swap the red for cobalt and you get a cool, almost Scandinavian village; swap the green for charcoal and it turns into a moody nighttime scene. Keep white above 50% and it will always read as snow rather than stuff.
11. A Lionel Train Village on a White-Fabric Snow Field
Thrift stores and estate sales are where village collections actually come from — individual lighted buildings run $3–$12, and you can assemble a full town for under $100 if you’re patient between September and November. Bottle-brush trees are $1–$2 each at dollar stores and craft chains. For the snow base, a queen-size white flat sheet costs about $10 and drapes over a folding table in one motion. Add a used Lionel or Bachmann starter set from Facebook Marketplace for $50–$90 and you’re at roughly $175 for a display that looks like it took a decade to build.
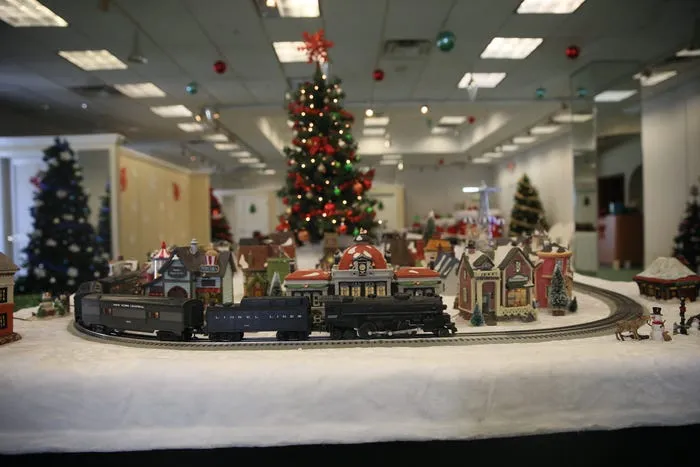
This scale needs real estate. A four-by-eight-foot layout is the sweet spot, which means a dining table, a folding table in a spare room, or a corner you’re willing to surrender from Thanksgiving to New Year’s. You want at least a 10×12-foot room so people can walk two sides of it, and a standard eight-foot ceiling is fine since the whole scene stays under 20 inches. If your space is tighter, the tiered approach in Idea #14 stacks the same amount of village into half the footprint.
12. A Gingerbread Train Climbing Past a Frosted Sugar Mountain
If you’re building this in sugar, the mountain comes first: sculpt it over a foil-covered armature and let it dry a full 48 hours before the train goes anywhere near it. Royal icing for the “snow” should hold a soft peak — if it drips off the whisk, add powdered sugar a tablespoon at a time. And here’s the tip that matters even if you buy instead of bake: mount the whole scene against vertical wood slats with a garland running about 12 inches above the tallest peak. The slat texture gives the frosting something to read against, and the garland caps the composition so it doesn’t float.
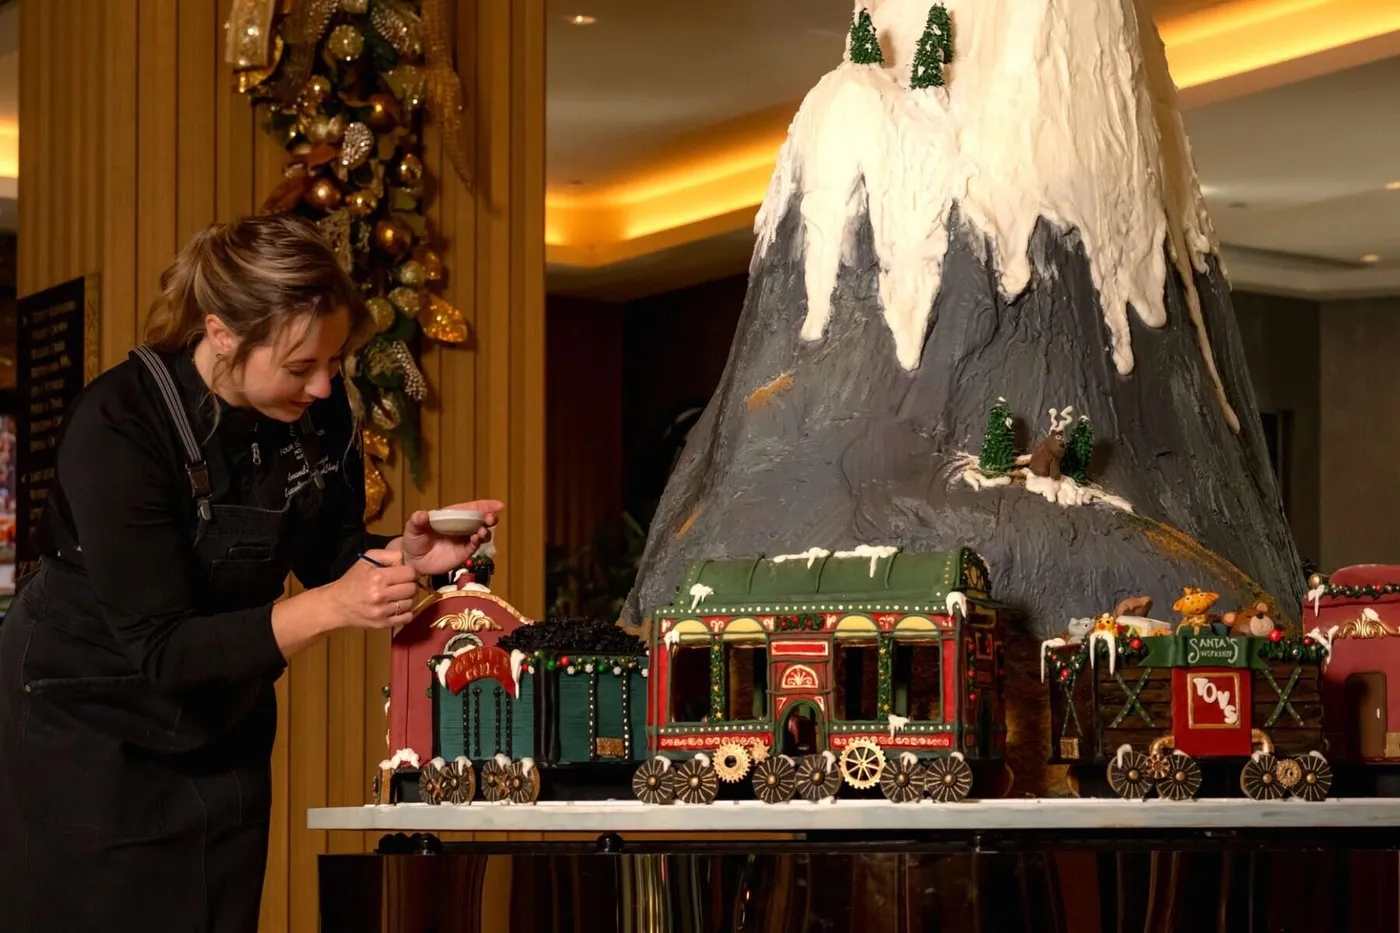
Oversized edible centerpieces exploded this year because they photograph beautifully and they’re an event — people gather, kids point, phones come out. The tech helped too: silicone molds and structured fondant mean home bakers now attempt shapes that used to be pastry-school territory. Is it a trend with legs? Partly. The giant edible showpiece is cyclical and probably peaks in a year or two, but the underlying idea — one large focal object instead of twenty small ones — is the most durable styling rule there is. Adopt that and skip the trend cycle.
13. A Burgundy Living Room With Symmetrical Flanking Trees
What it costs to recreate this mantel moment:
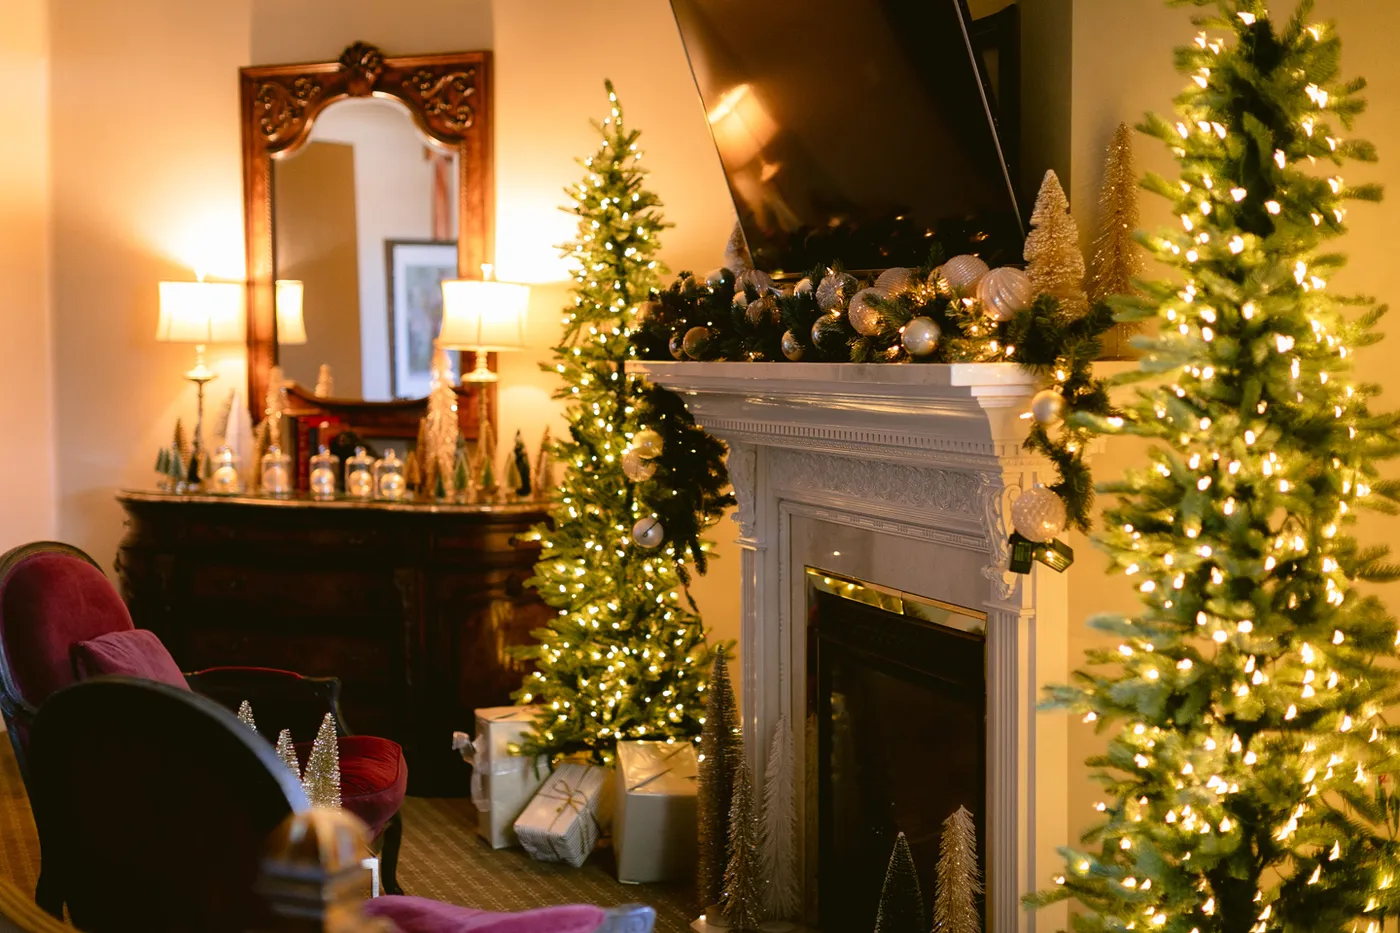
- Two pre-lit tabletop trees, 4–5 ft: $120–$300
- Pre-lit garland for a 60-inch mantel: $40–$110
- Ornament set, about 60 pieces in gold and white: $35–$90
- Wrapping paper, ribbon, and gift boxes: $30–$70
- Console table with mirror: $150–$450
Total: roughly $375–$1,020. Budget route: two unlit trees at $35 each plus two $12 strings of warm LEDs, a plain pine garland you dress yourself with thrifted ornaments, and gifts wrapped in kraft paper with one ribbon stripe. That lands near $150 and reads almost identically once the lights are on.
The single element that makes this room work is symmetry — two trees, one on each side of the mantel, mirroring each other. Sounds boring, but it’s what lets everything else stay soft: the loose garland drape, the mismatched presents, the lived-in burgundy chairs. Remove one tree and the composition tips, the mantel starts looking like a shelf, and the gifts below look like storage. If you can only afford one, don’t park it beside the fireplace — center it on the mantel wall and let it be the axis.
14. A Tiered Village With White Stanchions Around It
Building the tiers is easier than it looks:
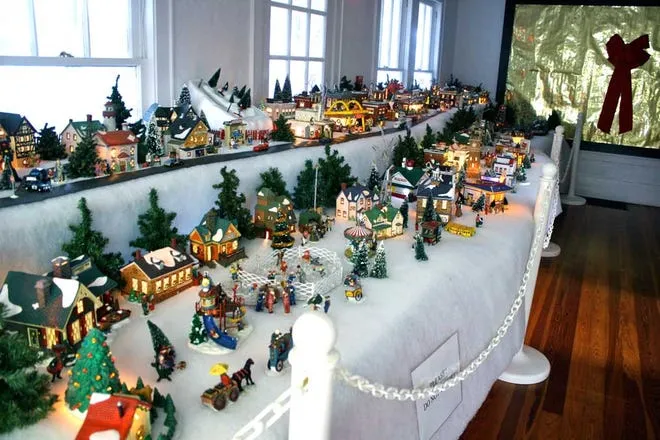
- Collect three to five boxes, cake stands, or foam blocks in graduated heights, tallest at the back.
- Cover each level with quilt batting, tucking the edges underneath so no cardboard shows at the front.
- Place your largest building on the top tier and work downward — big objects first, always.
- Thread the lights before the figurines; run them behind buildings, never in front.
- Add the skating rink last, on the lowest tier, so it sits in the foreground of the scene.
Time: three to four hours. Cost: $120–$300 if you already own the buildings.
About those white stanchions and chains: they look fantastic in photos and they’re a genuine tripping hazard in a hallway, especially for anyone over 70 or under 6. If you keep them, tape the bases down and leave a little slack so the chain doesn’t snap taut at ankle height. The other tradeoff is mood — a roped-off display reads museum, not home. For a similar sense of boundary without the barrier, use a low upholstered bench or a row of large baskets, the way a tree base does the job in Idea #20.
15. Gold Bell Ribbons and a Custom Engraved Train Ticket
Personalization is usually where holiday decor gets expensive, and it really doesn’t have to be. Plain gold jingle bells run $4–$8 for a dozen at craft stores; add red satin ribbon ($3) and write names with a metallic paint pen instead of ordering printed ribbon. For the “golden ticket,” Etsy sellers engrave them for $8–$15 each, but you can print a ticket graphic on cream cardstock and brush the edges with gold wax for about $1.50 apiece. Frosted pinecones are free if you gather them in October and dip the tips in white paint.
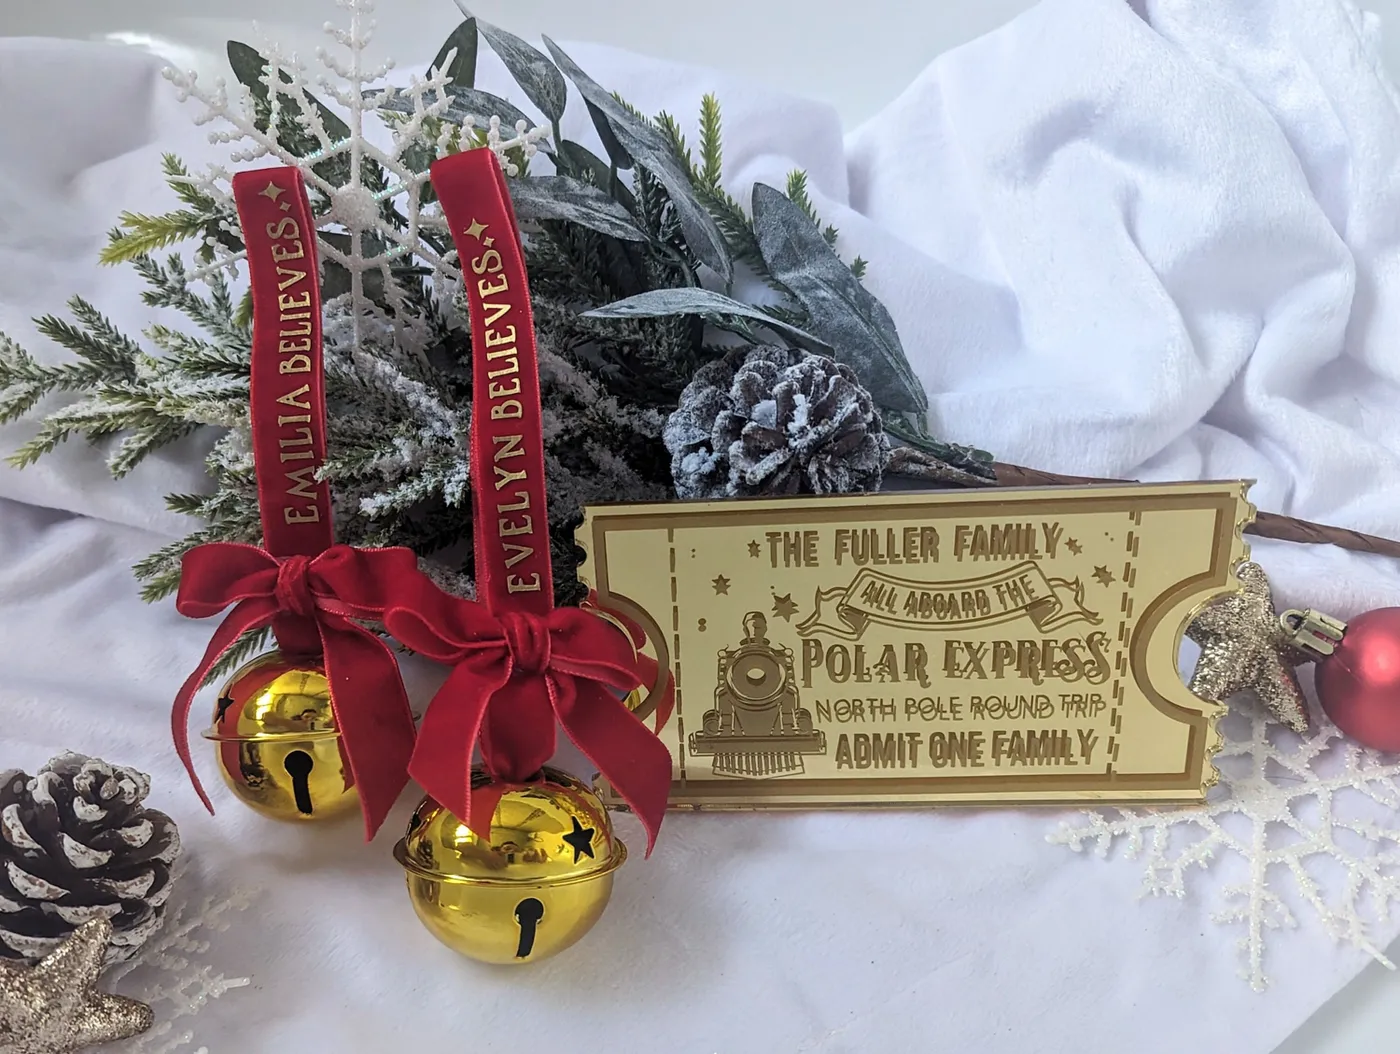
Print size is the whole ballgame on a ticket ornament. Something too big reads like a gift tag someone forgot to remove; too small and nobody can read it. Three inches wide by 1.5 inches tall is the sweet spot for a hanging ornament, and it stays legible from about four feet away. If you’re engraving, use a lightweight serif — script looks elegant on screen and turns to mush at that size. Drill the hanging hole before you engrave, not after, or you’ll chip the finish.
16. A Miniature Santa Train With Gift-Filled Cargo Cars
This little train works because it’s a story in sequence. The locomotive leads, Santa sits in the cab, and each cargo car introduces a new character — gifts, snowmen, penguins — so your eye travels the length of the train instead of stopping at one object. Same principle as a picture book: repetition of form, variation of detail. The frosted bottle-brush trees behind it do the framing, and the black track grounds the whole thing so it doesn’t float in a sea of fairy lights. Cheap, simple, and far more engaging than most of what sits on a shelf.
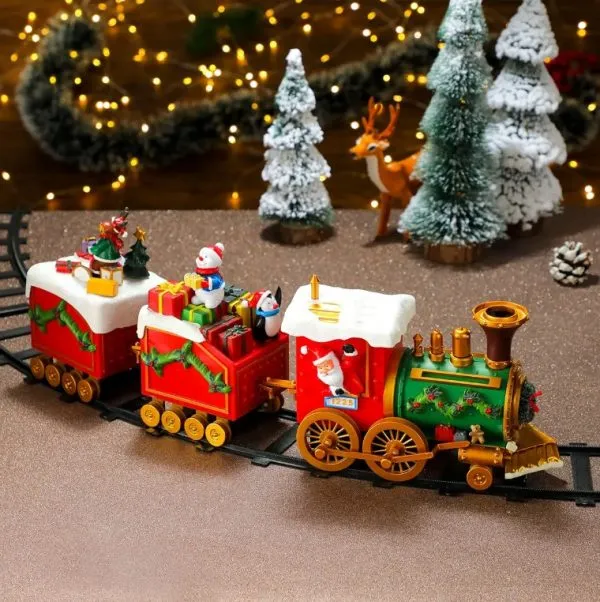
Two practical warnings. Cars that detach are wonderful for play and terrible for display — expect to re-couple them every time someone dusts. A dot of museum putty on each coupling fixes it. And if this sits low enough for small kids to reach, know what you’re signing up for: the penguins and snowmen are exactly choke-test size, and battery compartments on inexpensive trains are usually one screw away from open. Put it at 40 inches or higher unless it’s strictly look-don’t-touch.
17. A Green-Boiler Toy Train on a Reflective Table
The palette breaks down to roughly 50% green and red, 30% gold, 20% neutral. It’s a classic complementary pairing with a metallic bridge between them — the gold wheels and cowcatcher do the job a neutral gray would do, just warmer. Switch the gold to silver and the same train reads modern and slightly icy; switch the green to navy and you get a preppy, almost coastal holiday look. Keep that metallic under a third of the composition. Past 40% and the whole thing starts to feel like a trophy.

A dark reflective tabletop is gorgeous for exactly eleven minutes. Every fingerprint, water ring, and dust mote shows under warm light, and stacked gifts will slide on glossy lacquer. Wipe with a microfiber cloth and a 50/50 water-and-vinegar mix rather than spray polish, which builds a film that makes reflections cloudy. Put felt pads under the train wheels so you aren’t dragging metal across the finish, and expect to re-dust this surface about twice a week through December.
18. A Felt Polar Bear in a Red Pom-Pom Hat
Handmade ornaments need different spacing than glass ones. Hang felt pieces 4 to 6 inches apart and cluster them in threes so they read as a group — a single felt bear floating in a sea of shiny baubles just looks lonely. Keep them between 24 and 60 inches off the floor, the band where you actually look. And always hang with a wire hook wrapped in a scrap of the same felt or ribbon; a bare metal hook cutting across a soft ornament is the small detail that makes a tree look homemade instead of handmade.
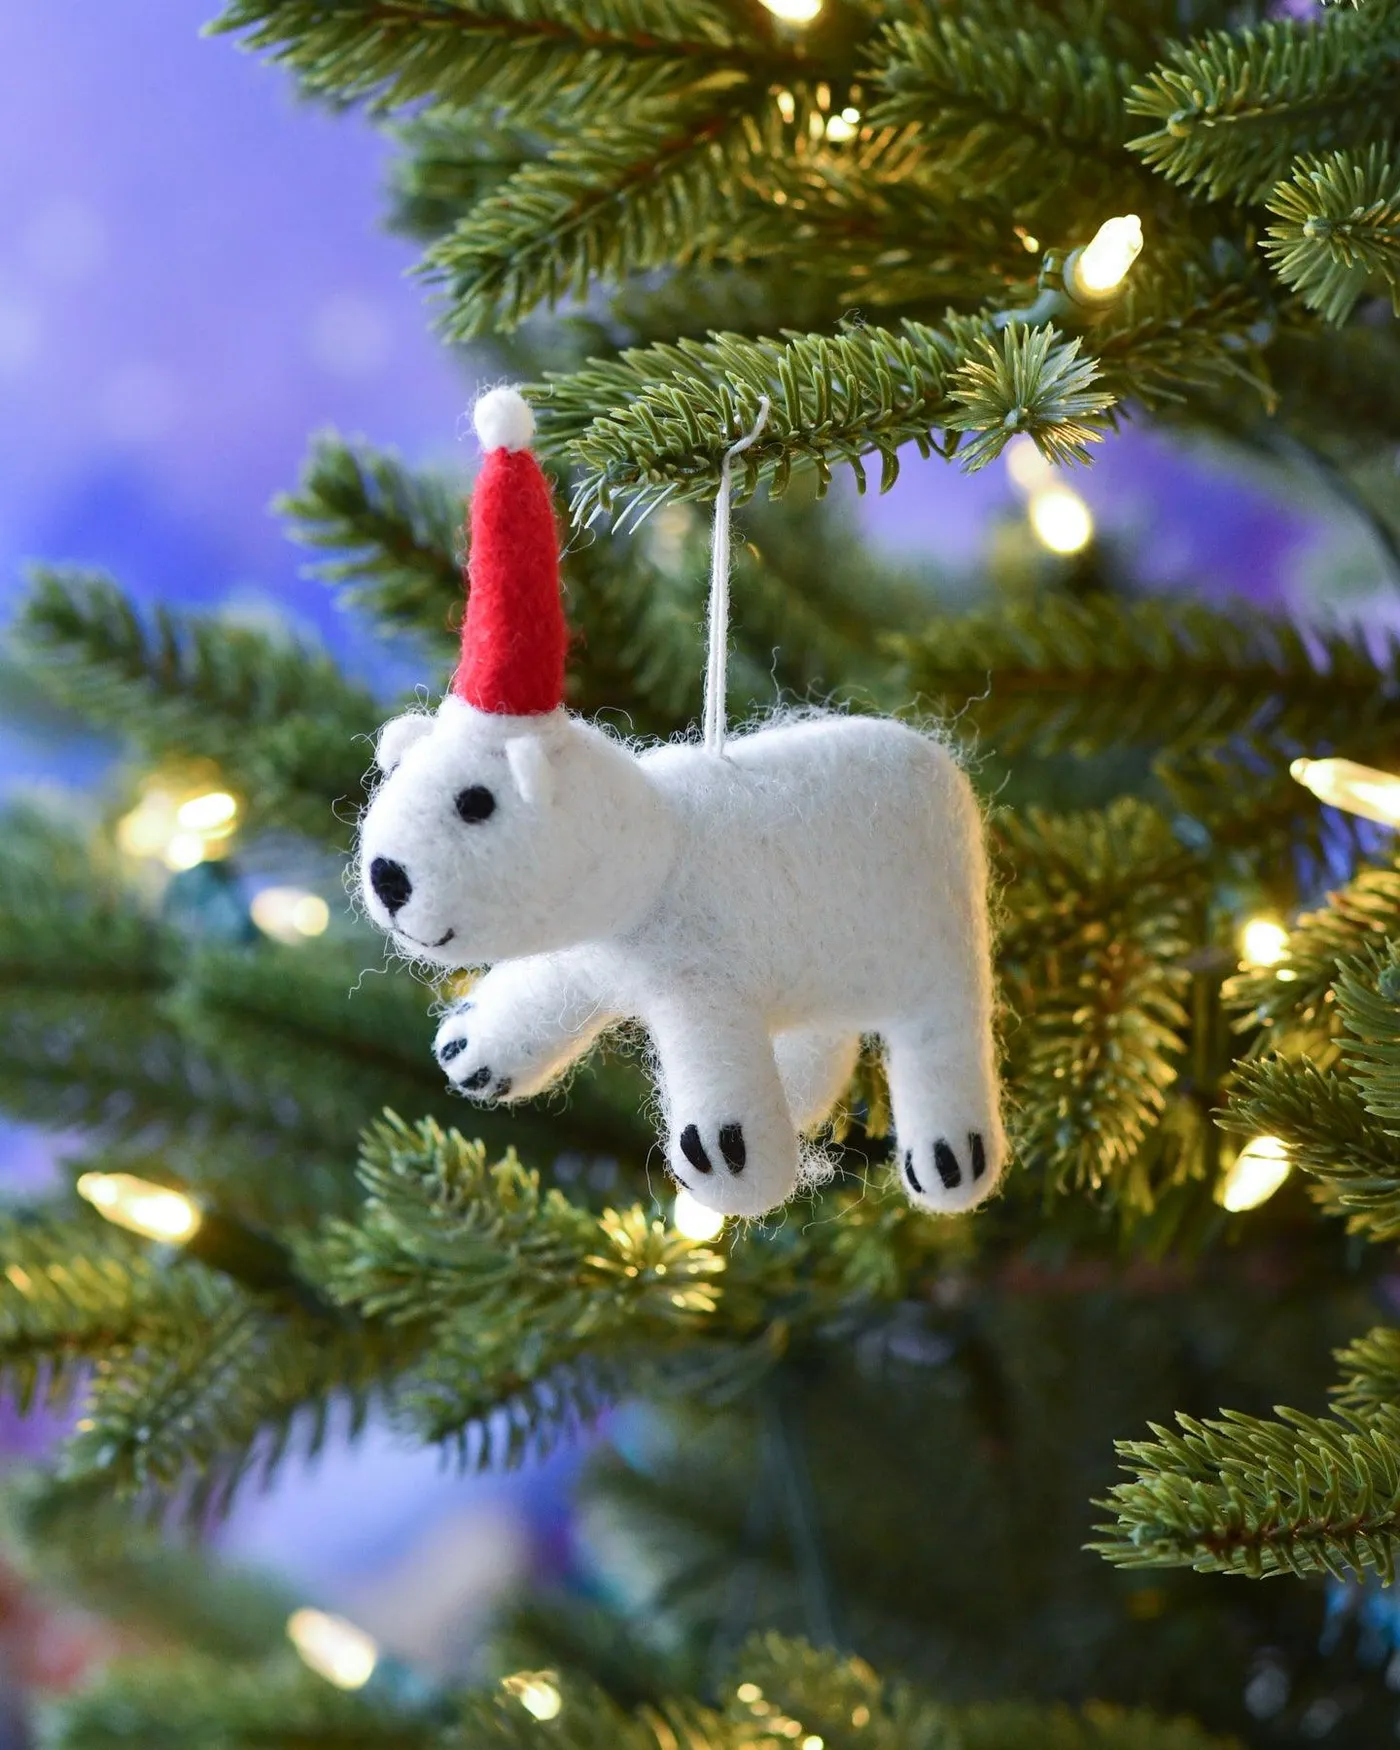
Ornament scale should follow tree size. On a standard 6-to-7-foot tree in a 10×10 room, a 3-to-5-inch ornament reads as a proper accent; under 2 inches it disappears. Working with a 4.5-foot apartment tree? Drop to 2-to-3-inch pieces and hang about 40 instead of 80 — overcrowding a small tree makes it look like a bush. No ceiling-height requirements here, which is why this is the easiest idea in the list to pull off in a rental.
19. A Glass Polar Bear Skater With a Blue Glitter Scarf
The blue scarf is the whole trick. Everything else on this ornament is white, silver, and green — which is to say, nearly invisible against a green tree. That one small band of blue glitter is what makes the bear read as a character with a personality instead of a Christmas blob. It also introduces a cool note into a tree that’s probably 90% warm, and that tiny temperature clash is exactly what keeps a traditional tree from looking flat. If you buy one ornament this year, buy the one with a single deliberate color break.

Specialty glass ornaments from boutiques run $18–$35 each, which is fine until you want six. Big-box stores and discount chains carry comparable glass animal ornaments for $5–$9, and the difference is mostly paint detail, not glass. Thrift stores and estate sales are the real secret: vintage glass animal ornaments turn up for $1–$3 and age better than anything new. Want the look in a kid-proof material? Felt and wood versions run $4–$8 and survive toddlers and hardwood floors alike.
20. A Blue and Silver Tree Base With a Train Running Around It
The train needs a clear ring around the trunk. Plan on a 30-to-36-inch outer diameter for the track loop, which means your stand and skirt have to fit inside roughly a 24-inch circle. In practice, you’re looking at a spot where the tree sits at least three feet from any wall or doorway — a 12×14 living room is comfortable, a 10×10 gets tight fast. Standard eight-foot ceilings are fine since the train stays under four inches tall. If your tree lives in a corner, use a half-loop track or go with the shelf display in Idea #9.
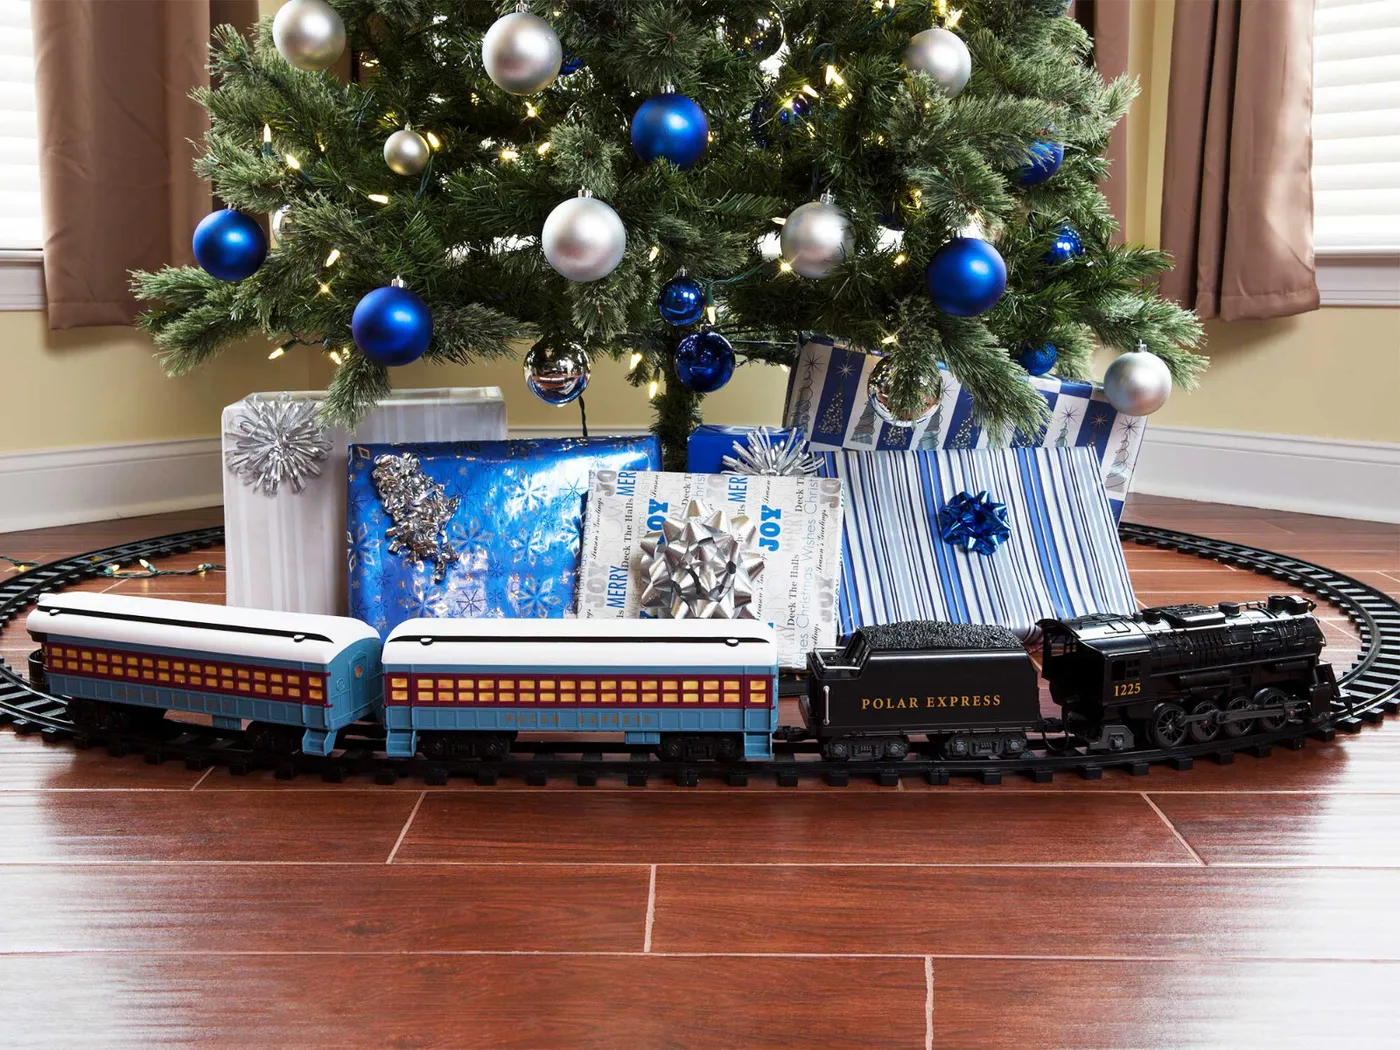
The color story is doing the real work: royal blue and silver presents, blue-and-silver ornaments, then one warm-lit tree overhead and a black-and-blue train below. Cool palette, warm light source — that contrast matters more than any single object in the scene. The train also solves a practical problem: instead of a fabric skirt that bunches and collects pine needles, the loop of track defines the base and hides the stand at the same time. Rare decoration that’s both prettier and more functional than what it replaced.
21. Mirrored Gold Ticket Ornaments Resting on Pine and Snow
Tiny vignettes like this are the cheapest way to look expensive:
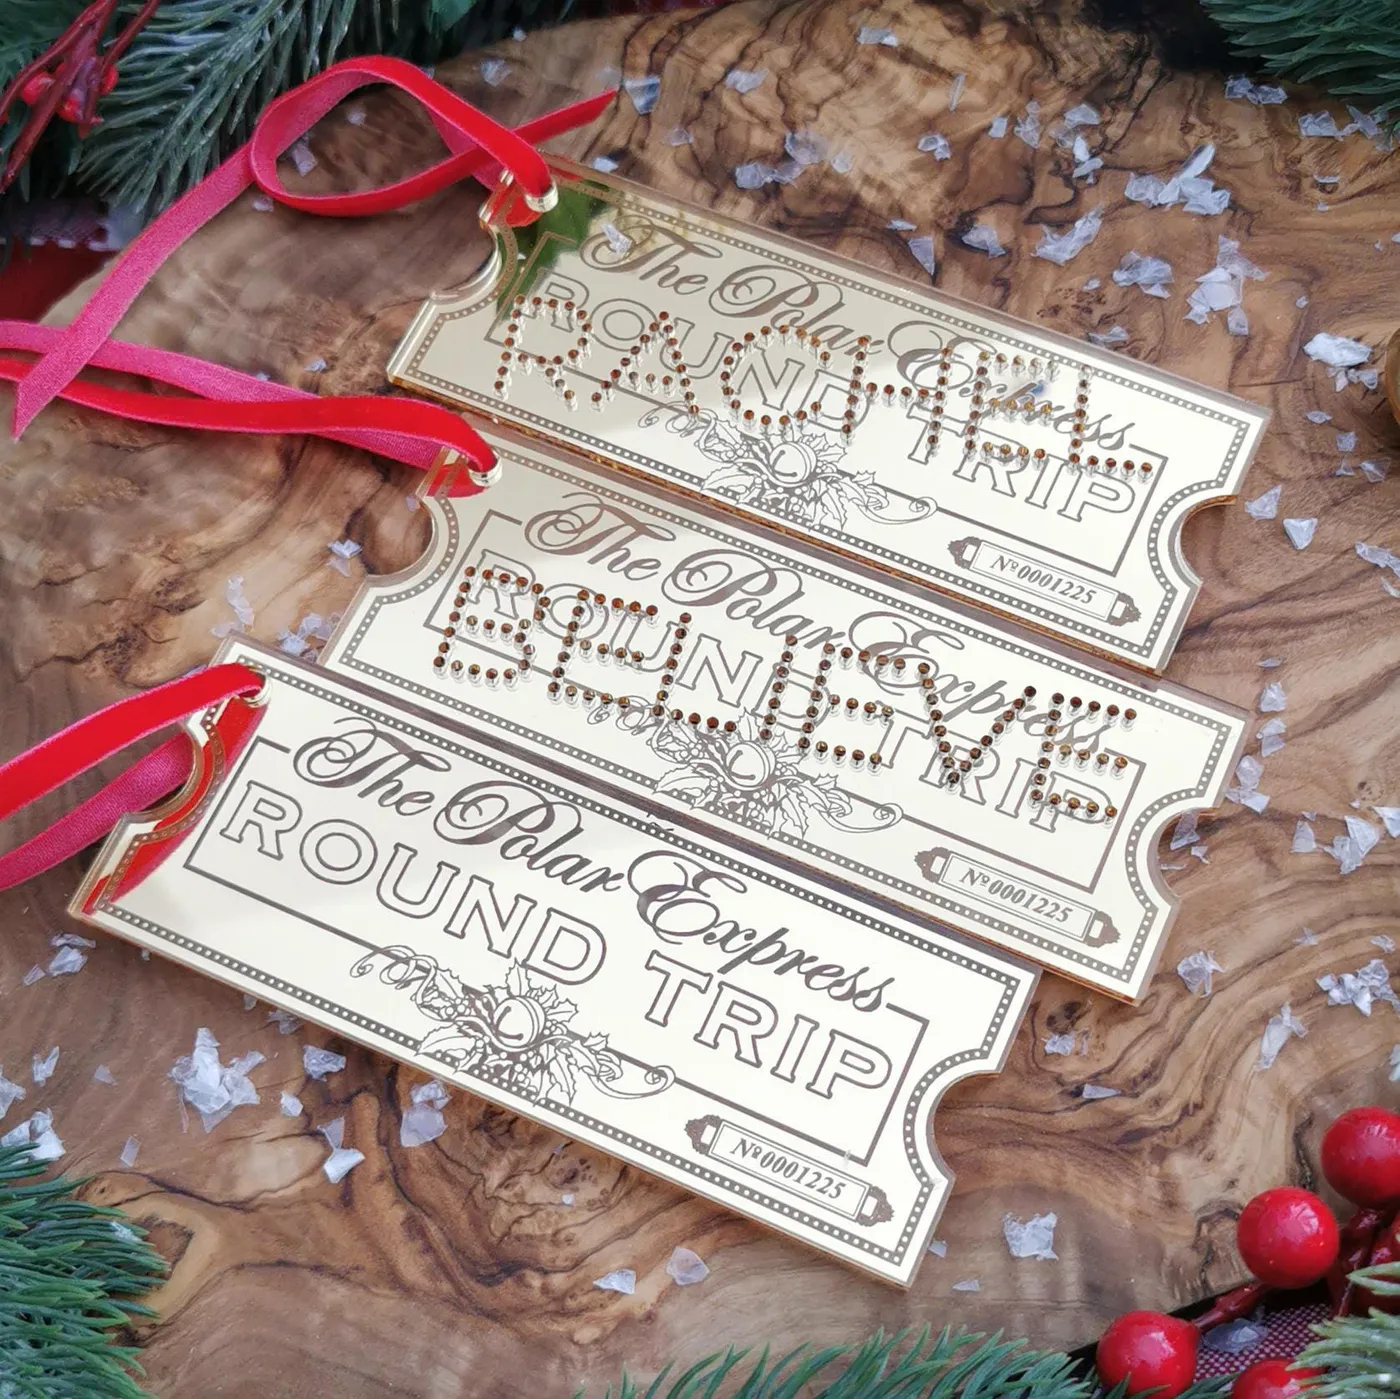
- Three mirrored ticket ornaments: $24–$45
- Red velvet ribbon for hangers: $5–$10
- Shallow wooden tray or board: $12–$35
- Artificial snow: $6–$12
- Faux pine sprigs, 3–5 stems: $8–$18
Total: about $55–$120. To do it for less, buy one ticket ornament and two plain gold flat ornaments, print your own ticket design on cardstock, and clip a branch from the yard instead of buying faux pine. Roughly $20, and nobody at the party will know the difference.
Three objects, one tray, and stop. Odd numbers photograph better than even ones, and a tray gives the arrangement a boundary so it doesn’t sprawl across your dresser. Tuck a few pine sprigs underneath and slightly behind the ornaments, never in front, and let the snow mound up between them so they look set down rather than placed. Leave about two inches between pieces so each throws its own shadow — mirrored finishes lose all their drama when they’re crowded.
22. A Cardboard Train Hauling Wrapped Gifts Under the Tree
Cardboard decor has been climbing for a few years and 2026 is its mainstream moment — partly cost, partly the broader shift toward decor you can actually recycle, partly crafters sharing cut files anyone can print and assemble at home. The family-activity angle is real too: people are building the train together instead of buying a finished object. That’s the part that sticks. A cardboard train is disposable, but the ritual of building it every December almost never is.
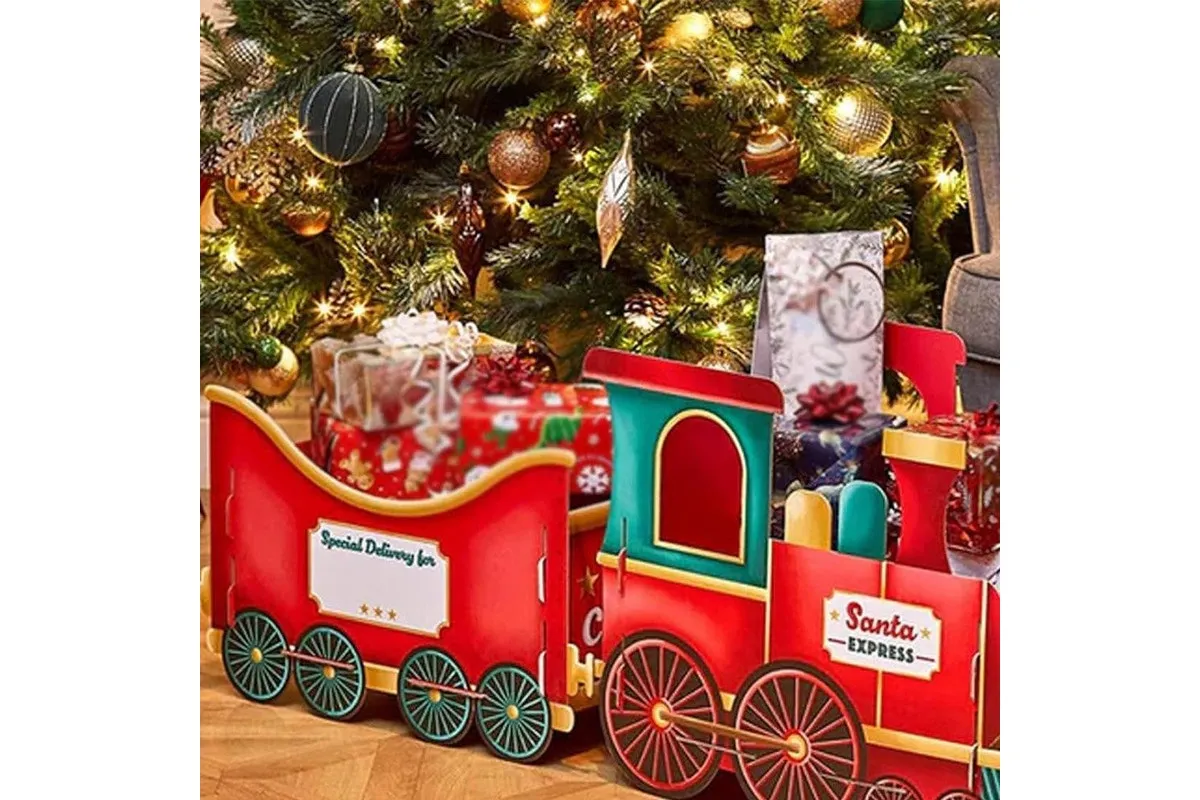
A wooden or metal decorative train big enough to hold gifts runs $150–$400. The cardboard version is $12–$25 at craft and discount stores, and if you’re handy, a plain corrugated box plus red and green acrylic paint comes in under $10. Line the carriages with scrap tissue or fabric so wrapped gifts don’t snag on cut edges, and reinforce the base with a second layer of corrugated board — the weak point is always the floor of the car. Let the kids paint it, and if it gets crushed, it goes in the recycling.
23. A Red and Pink Toy Train Parked on Marble
Marble and stone floors scratch. A train loaded with wrapped gifts can weigh 15 to 25 pounds, and dragging it an inch to fix the angle leaves marks you’ll see forever in raking light. Felt pads under every contact point, and lift — never slide. Also think about traffic: a five-foot train parked across the middle of a hallway is a knee-height obstacle at night. If your floor is marble and anyone in the house is unsteady on their feet, keep the train hugging the wall.

This arrangement wants about five linear feet of open floor plus a wall behind it, so the fireplace and tree have something to register against. A 12×14-foot living room handles it comfortably; under 10×12, shorten the train to two cars and let the tree carry the height instead. Eight-foot ceilings are plenty since everything here stays under five feet. It’s the warmer, softer cousin of Idea #13 — same mantel-and-tree structure, completely different temperature.
24. A Peach-Walled Victorian Dining Room With a Corner Tree
Check these before you commit to a full dining-room treatment:
- Confirm the tree fits the corner without blocking window light or the sideboard drawers.
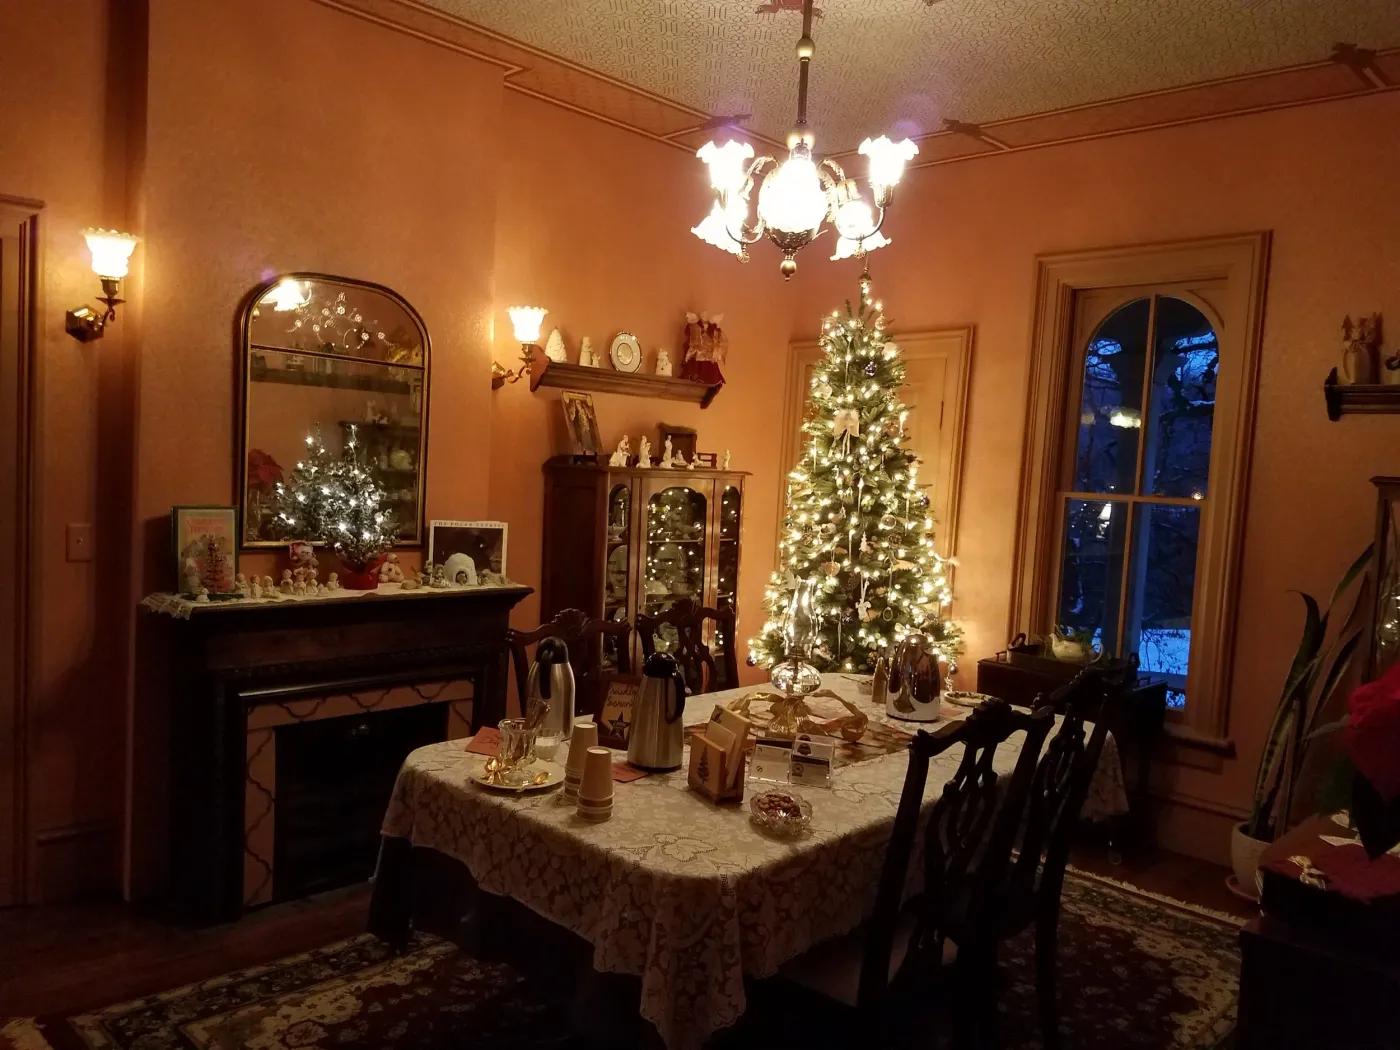
- Measure your table with the leaf in — a lit tree needs about 24 inches of clearance for chairs to pull out.
- Note which way the window faces; west-facing rooms get warm afternoon light that doubles your lamp glow.
- Decide whether the chandelier dims. If it doesn’t, add a dimmer — this look depends on it.
- Budget for extension cords and a switched power strip; you’ll be running three light sources at once.
The formula in this room is roughly 45% peach wall, 25% dark wood, 20% warm gold light, 10% white linen. Everything hangs off that dominant peach — warm enough to flatter candlelight, light enough that the tree doesn’t disappear against it. On cool gray walls the same setup goes flat, which is why you’d swap in a brass chandelier and cream linens to lift it. Change the peach to sage and the room turns cooler and more modern; keep the wood and gold either way.
25. A Needle-Felted Polar Bear With a Hand-Knit Scarf
If you’re felting your own, build the base shape loose first — about 30% larger than the finished bear — then firm it up with a finer needle. Wool compresses dramatically, and beginners always under-build, ending up with a bear the size of a grape. For display, put handmade pieces at eye level on a small tray or a single shelf rather than mixing them into the tree; one frame, one candle, and the bear is a complete vignette. Keep felted wool out of direct sun, too — the dye fades faster than almost any other holiday material.

Handmade ornaments are the fastest-growing category in holiday decor right now, and it’s not just a craft-store story — it’s a reaction to how uniform store-bought trees started to look. The pieces people save aren’t the most polished ones; they’re the ones with visible stitching and slightly uneven ears. In 2026, “made by a person” reads as luxury. Needle felting has staying power because the tools cost under $25 and the technique takes an afternoon to learn, so the hobby turns into an annual tradition.
26. A Tree Trimmed With a Red Locomotive and Gold Bead Garland
Tinsel and bead garlands are high-maintenance, and it’s better to know now. Metallic tinsel sheds, and those strands find their way into vents, pet fur, and every corner of the room. Gold bead garland tangles in storage unless you wind it around a cardboard tube or a paper plate — do that, or you’ll spend 40 minutes untangling next December. Store the locomotive ornament in a hard box with tissue rather than a zippered bag, since the glitter coating flakes where it rubs. Budget 15 minutes of fluffing every year no matter what you do.

What makes this section of tree look rich is that it mixes three textures at one color temperature: glossy glass, matte painted ceramic, and glittered metal. Same red family, three surfaces, so light catches them differently as you walk past. The gold bead garland reinforces a diagonal through the branches instead of circling them, which is what keeps tinsel from looking like a spiderweb. See Idea #17 for the toy-train version of this exact red-and-gold pairing.
27. A Tabletop Snowy Station With a Train Through the Tunnel
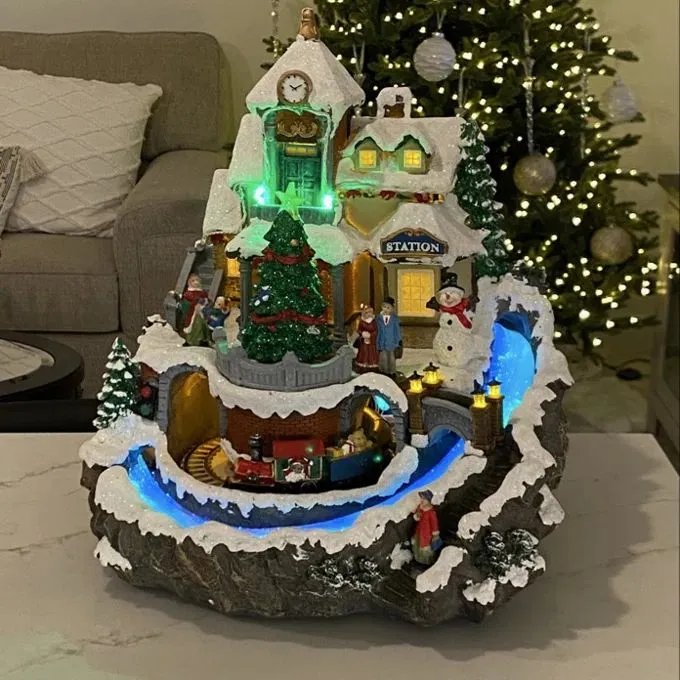
The tunnel is the one element worth building by hand:
- Cut a foam block or small cardboard box to about 6x5x4 inches and carve a U-shaped opening.
- Coat it with a thin layer of spackle or papier-mâché and let it dry overnight.
- Paint it white with a hint of gray at the base, then dust the top with fine glitter while the paint is tacky.
- Line the inside with dark card so you can’t see straight through it.
- Run the track through first, then set the tunnel in place so you aren’t fighting the rails.
Time: about two hours including drying. Cost: under $10.
This vignette fits on a 30-to-36-inch console or a wide bookshelf, which makes it the best option here for apartments and small homes. Set it against a wall with a couch or lit tree visible behind it — the glow bouncing off the backdrop is half the effect. Keep the top of the scene under 18 inches so it doesn’t compete with wall art, and put it on a surface 28 to 32 inches high, where seated guests see it at eye level.
Your Ticket’s Punched — Go Build the Scene
You don’t need a hotel lobby budget or a pastry chef on standby — you need one clear focal point, a warm light source, and a snow base that actually reads as snow. Start with the smallest idea that fits your space, live with it a week, then add to it next December. The displays people remember are the ones that grew.
📌 Pin this guide now so you have the palette math, the tiered build, and the light-temperature rules all in one place when December shows up again.