You spot a gorgeous glass bowl centerpiece on Pinterest, click through, and discover it costs $68 before shipping. Here is what those photos rarely tell you: most of them started as a $1.25 bowl from the Dollar Tree aisle.
We spent serious time browsing Dollar Tree, Target, Walmart, and Hobby Lobby — plus a few very good thrift stores — to bring you only what is actually worth making in 2026, across price points from $1.25 to about $145. Inside you will find 35 curated ideas spanning traditional red-and-green holiday styling, rustic natural textures, whimsical novelty decor, and living glass terrariums, with budget and luxury versions compared side by side so you can see exactly where the money goes.
And stay until the end — we break down the most common mistakes that can ruin these looks.
This post contains affiliate links. If you buy through them, we may earn a small commission at no extra cost to you. 📌 Save this to Pinterest for later — you’ll want to revisit these ideas.
1. A Red and Green Centerpiece With Mercury Glass Glow
Think of this arrangement as a formula rather than a project: 50 percent deep green pine needles as the structural base, 30 percent glossy red in three finishes — velvet petals, glittered spheres, mercury glass — 15 percent warm gold from the crackled flower centers, and 5 percent natural wood from the table itself. The green does the work, the red does the talking, and the gold keeps it from reading cheap. Swap the red velvet blooms for burgundy dahlias or plum ranunculus and the same math holds; just shift your votives to amber glass so the warmth builds instead of clashing.
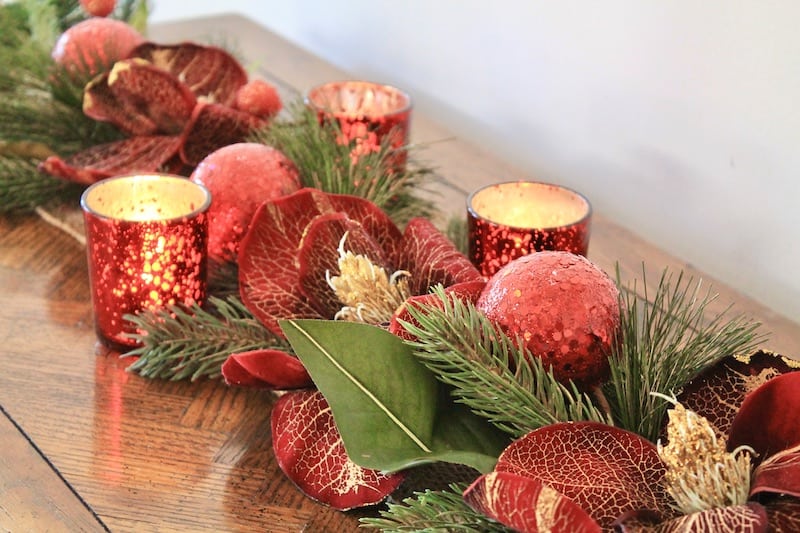
It is the red mercury glass votives, without question. Take them out and you have a pretty but flat arrangement of pine and glitter. Put them in and the whole centerpiece starts breathing — the glass throws tiny pools of warm light onto the wood, and the flowers look like they are lit from underneath. Mercury glass is the rare material that looks expensive at every price point, which is why it has survived every trend cycle since the 1930s. If you upgrade one thing on this table, upgrade these.
2. Glass Cloche Terrariums With a Tiny Sheep on a Cake Stand
Build a terrarium in about 25 minutes for under $30:
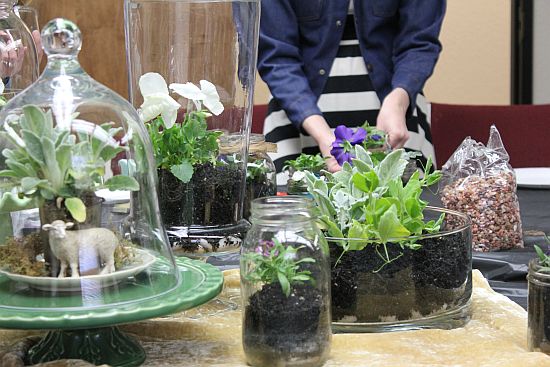
- Start with a one-inch layer of small pebbles for drainage, then add a thin layer of activated charcoal to keep things from going sour.
- Add two to three inches of potting soil — the dark, chunky kind, not fluffy seed-starting mix.
- Nestle the plants in, keeping leaves below the rim of the glass so air can still move.
- Add a single accent: a stone, a tiny figurine, a slice of preserved moss.
- Water lightly, then leave it alone for a week before you judge it.
Glass vessels look magical and punish you for overwatering. A cloche or a vase with no drainage hole means water has nowhere to go, and root rot shows up quietly — the plant just starts looking sad three weeks later. Keep the soil barely moist, water with a spray bottle instead of a pitcher, and skip anything that needs constant humidity. Succulents and small ferns are the safest bets; a plant labeled keep evenly moist will not survive a sealed bowl on your counter.
3. Rustic Wooden Bowl Filled With Silver Mercury Ornaments
Here is what this bowl actually costs to build from scratch:
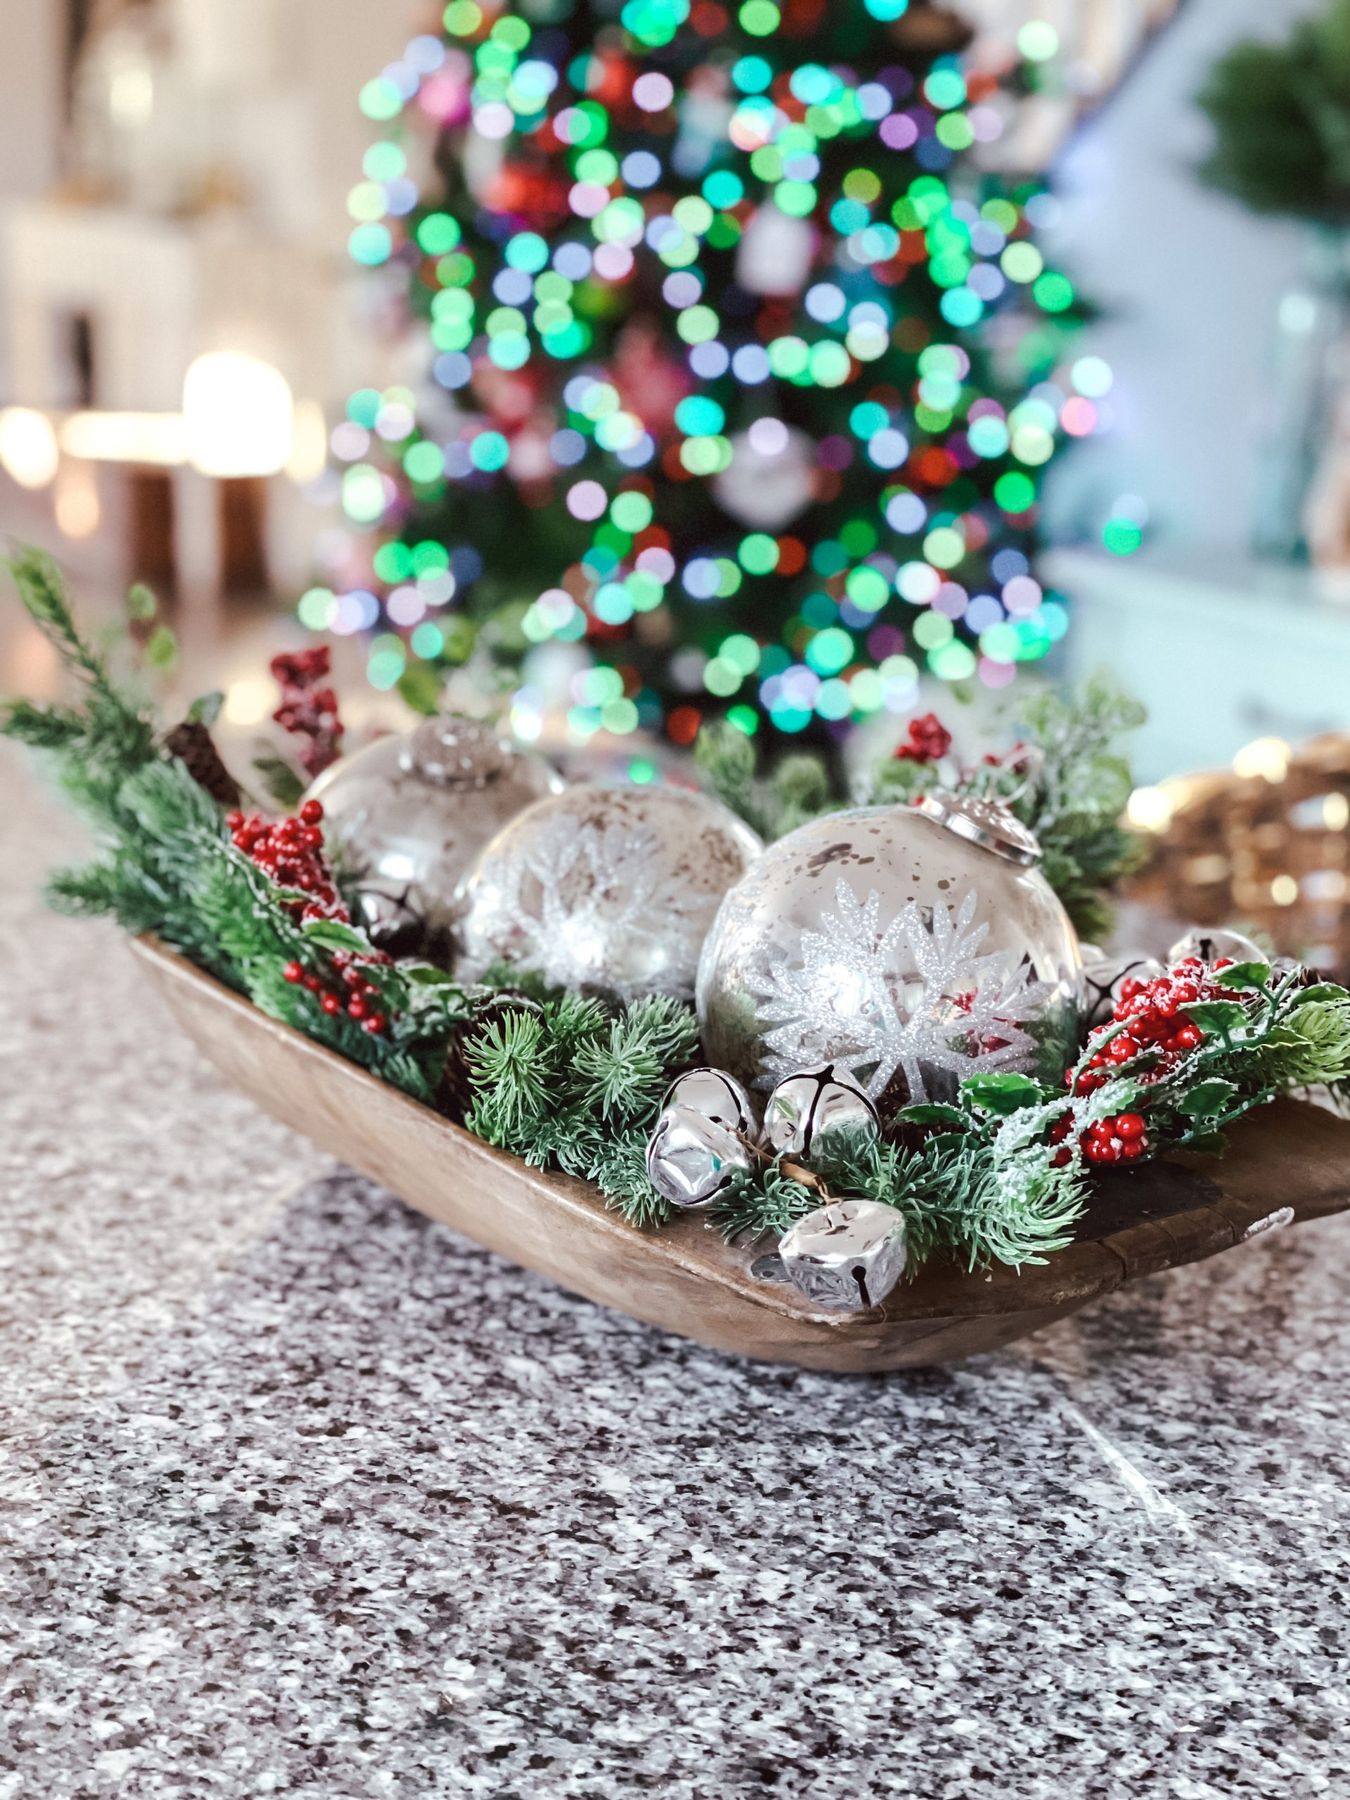
- Rustic wooden bowl, large: $25–$60
- Silver mercury glass or shatterproof ornaments, six to eight: $12–$30
- Frosted pine sprays and red berry picks: $15–$35
- Silver jingle bells and small pinecones: $8–$20
- Total: $60–$145
Budget alternative: a wooden dough bowl from a thrift store runs $8 to $15, shatterproof silver balls from the dollar store are $6, and one pine-and-berry spray cut into three pieces is about $12. That lands near $35, and from across the room it reads exactly the same.
Two things are doing the heavy lifting. First, scale contrast — an oversized bowl against small, densely packed ornaments makes every single ball feel deliberate instead of scattered. Second, the material mix: dull wood, distressed silver, frosted green. Every surface is matte or aged, so nothing competes. The jingle bells add a sound element too, which is the most underrated trick in holiday styling. Texture you can hear sticks in memory longer than texture you can only see.
4. A Miniature Snow Scene Inside a Clear Glass Bowl
Twenty minutes and about $20:
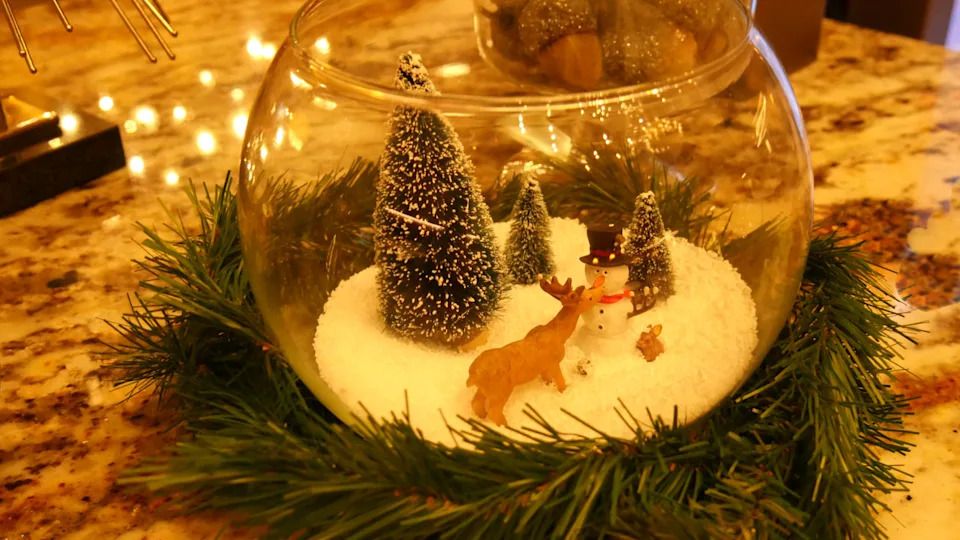
- Pour a two-inch base of fine artificial snow into a clear bowl — flakes, not chunky cotton batting.
- Push in three flocked bottle brush trees, tallest toward the back, so the bowl reads as a tiny landscape rather than a collection.
- Set a snowman or reindeer figure in front, slightly off-center.
- Tuck one small faux pine sprig against the glass to soften the transition from snow to bowl.
- Finish with a battery tea light half-buried in the snow for the glow.
This one wants a countertop or side table — a surface roughly 18 by 18 inches, minimum. Below that, the bowl crowds everything around it and the miniature scene stops reading as a scene at all. Ceiling height is irrelevant here, but sightline is not: a scene like this wants to sit slightly below eye level so you are looking down into it. Working with a tighter counter? The low wooden bowl in Idea #3 takes up far less visual real estate than glass.
5. A Lit Cut-Glass Bowl Topped With a Layered Red Bow
Ribbon math that actually holds: use a four-inch-wide fabric ribbon for the base loop, then layer a 1.5-inch cream patterned ribbon on top, offset about 15 degrees so both read clearly. Wire-edge ribbon keeps its shape; plain satin collapses by day two. If your bow keeps sagging, thread a pipe cleaner through the center knot and cinch it tight — that is the trick florists use on wreath bows and almost nobody explains. Anchor the finished bow to the bowl with a small adhesive strip underneath so it stops sliding.
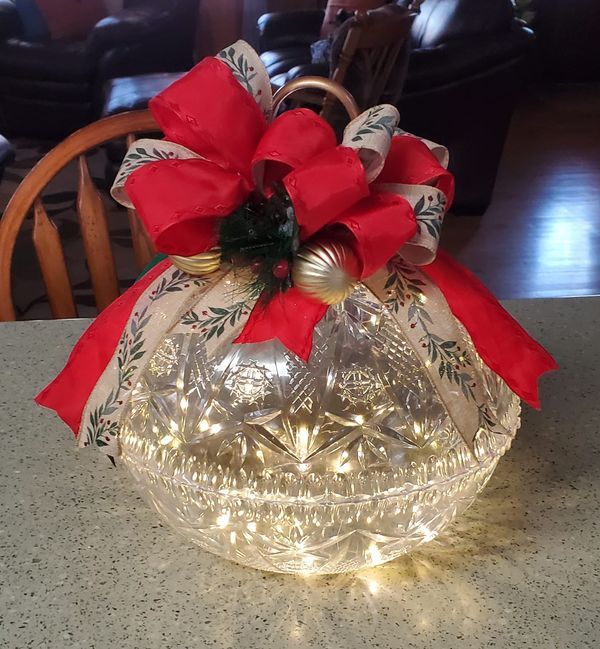
Two warnings before you fill any glass bowl with lights. Battery packs are bulky, so plan for the pack to hide behind the bowl rather than inside it, or the whole thing looks lumpy. And heat is real: use LED string lights only, never incandescent, and never leave a lit bowl unattended when fabric ribbon is draped over it. One more thing — this design collects dust like nothing else on your table. Every one of those little bulbs needs a swipe, and by February you will notice.
6. Two Clear Plastic Bowls, One Hot Glue Gun
The classic two-bowl shell, done properly in about 15 minutes for roughly $4:
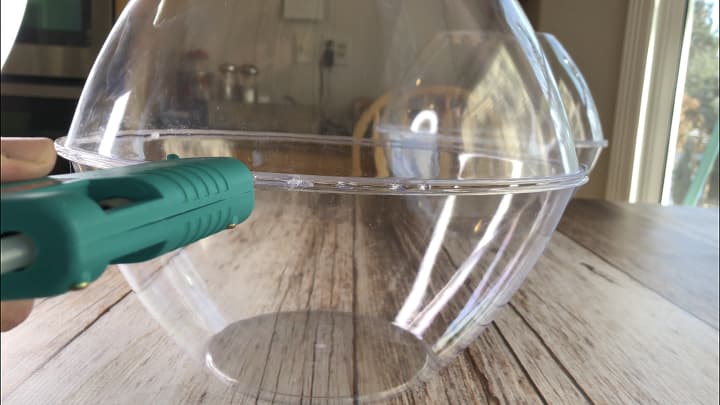
- Wipe both rims with rubbing alcohol so the glue actually grips.
- Run a continuous bead of hot glue around one rim — no gaps, no skimping.
- Press the second bowl on and hold for a full 30 seconds while it sets.
- Seal the outside seam with a second thin bead for insurance.
- Let it cure 10 minutes before you handle it or spray-paint it.
The entire raw material list comes in under $10. Clear plastic bowls are two for $1.25 at Dollar Tree, and the smaller sizes usually come in multipacks. Hot glue sticks run about $3 a bag and will outlast the project. Spray paint, if you want a colored shell, is $5 to $7 a can at Walmart or Target. Ribbon or twine to hang it: another dollar. This is the rare craft where the finished object genuinely costs less than the decoration you would buy at a big-box store, and it looks less generic.
7. Patterned Glass Bowls Stacked Into a Tiered Light Display
The tier is everything. A single patterned glass bowl with lights inside is a nice candle holder. Stack two — a bowl sitting on a matching stand or an inverted bowl — and it becomes a small sculpture, because your eye travels up through the pattern and the light multiplies at every layer. The tier also solves the battery-pack problem: the bottom bowl becomes a hiding spot. Lose the stacking and you lose the entire reason this reads as a centerpiece instead of a table accessory.
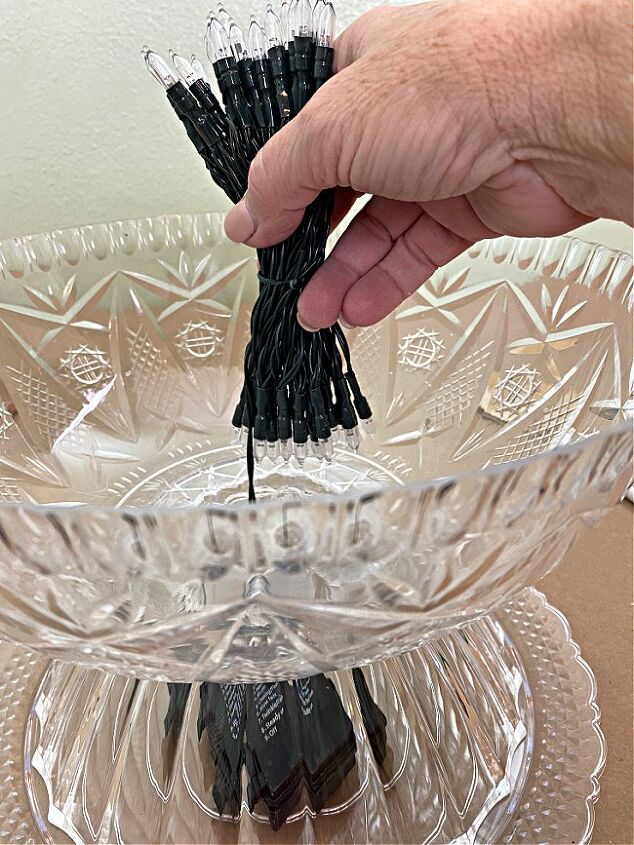
Perfect for a round dining table 42 to 54 inches wide, or a kitchen island at least 30 inches deep. Two tiers usually stand 8 to 11 inches tall, which is the sweet spot for a table you actually eat at — below eye level when seated, tall enough to anchor the center. In a small apartment this can replace a side-table lamp entirely. Compare with Idea #10, where a single low bowl suits a narrower surface.
8. Glass Gems Pressed Into a White Circular Base
Buy flat-backed glass gems, not the domed ones — they will not sit flush and you will fight them the entire time. Work from the outer edge of the circle inward and set the gems in concentric rings instead of randomly; the eye reads rings as intentional and scatter as messy. Use a thin bead of clear-drying craft glue and let it cure 24 hours before anyone picks it up. Total supply cost is about $8 for something that looks like a $40 boutique object.
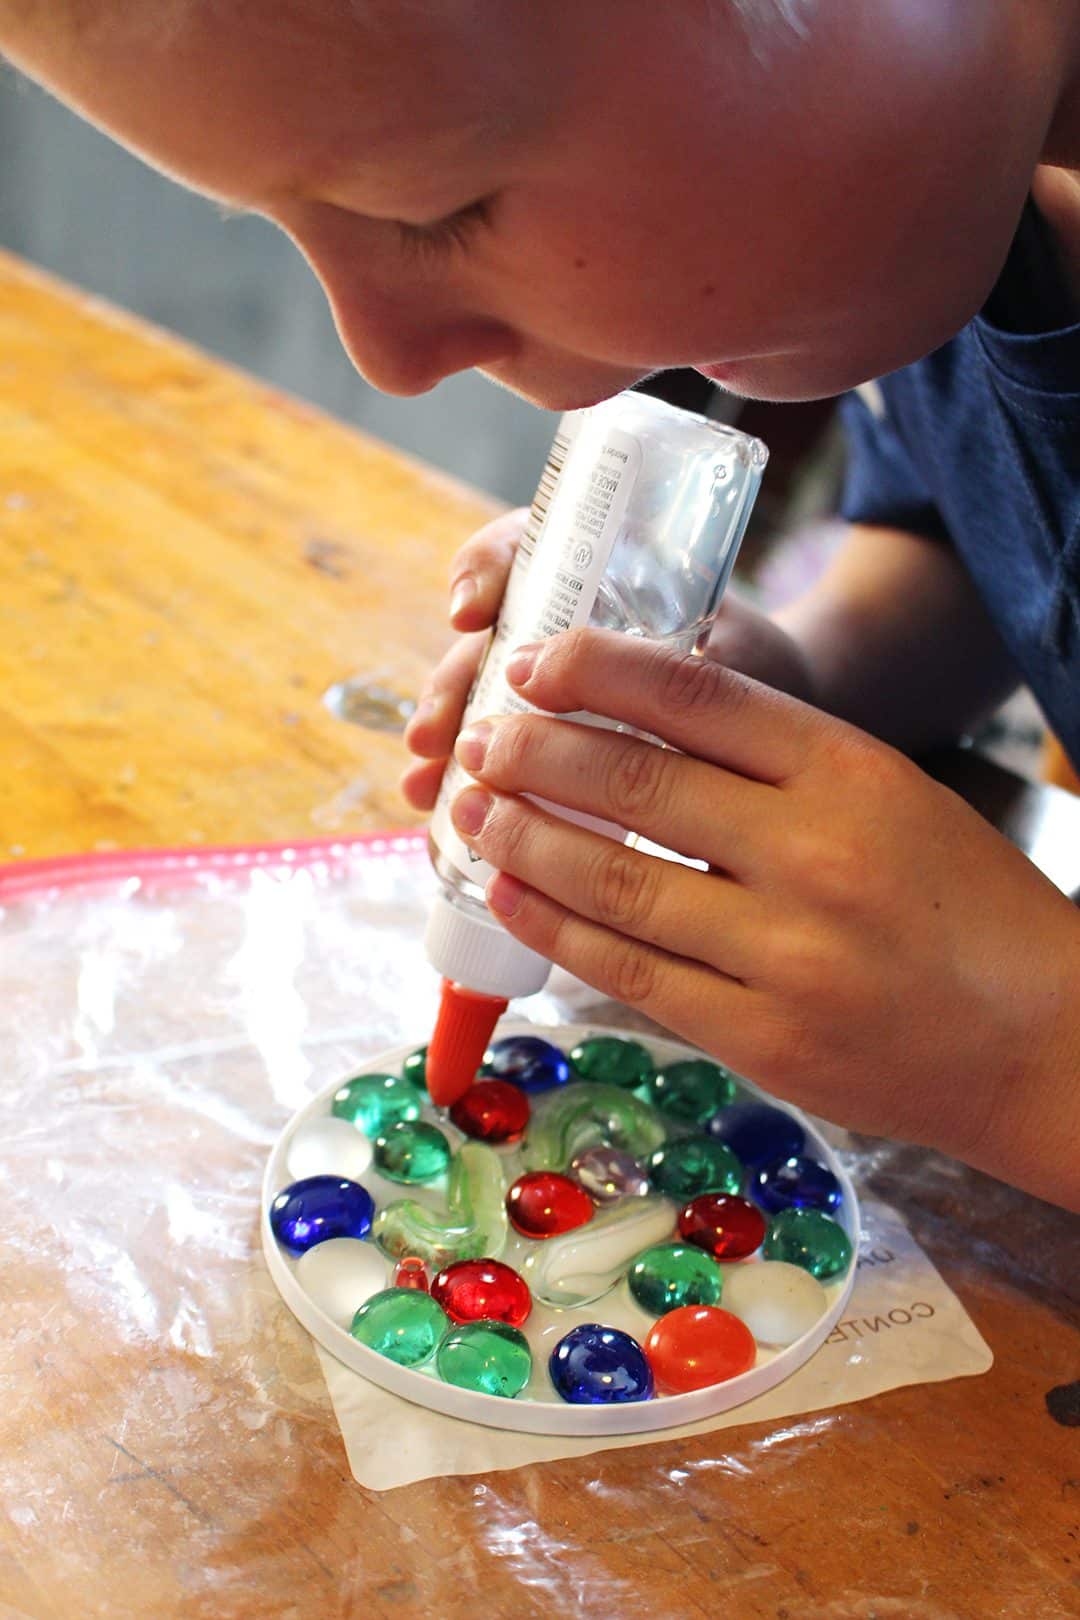
Glass gems are heavy, and a fully covered 10-inch base can weigh several pounds. Hang it from a doorframe or a proper stud, not from a drywall anchor rated for five pounds. Second, this is a kids project that will absolutely shed a gem or two — keep the glue bottle handy and accept a slightly imperfect finished piece, because that imperfection is what makes it charming. If you have toddlers, skip small gems entirely and use large flat buttons instead.
9. Fillable Ornaments Stuffed With Pom Poms and Gold Bells
Fillable plastic ornaments run about $1.25 for a two-pack at Dollar Tree. A bag of mixed red, white, and green pom poms is $1.25. Small gold jingle bells are $1.25 for a pack of fifty. That is roughly $4 for six finished ornaments. The same look at a boutique holiday shop runs $8 to $12 each, and yours can be color-matched to your tree exactly. Add a $1 spool of thin ribbon for hangers and you are done for under $6.
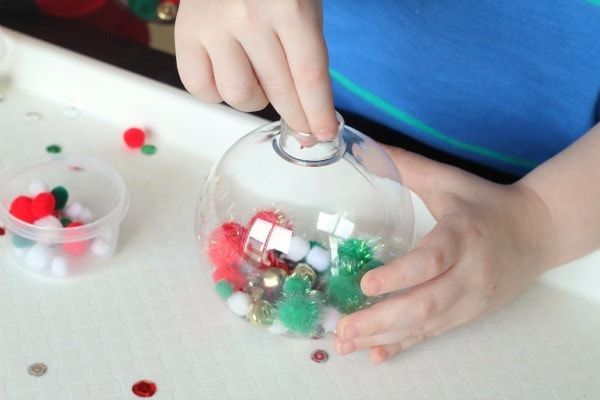
It is the layering inside the clear sphere. You get three textures at once — soft pom poms, hard metallic bells, and empty air — which makes a single ornament read as an object rather than a decoration. The transparency also lets light travel through instead of bouncing off, so the tree lights behind it glow through the fill. And because you choose the colors, six of these can tie an entire tree together without a single new garland.
10. Silver Ornaments in a Ruffled-Rim Glass Bowl
The formula here is 70 percent silver, 20 percent clear glass, 10 percent shadow. At least 70 percent of the volume is one metallic tone — that is what keeps a monochrome bowl from looking like a clearance bin. Mix finishes rather than colors: matte silver, glittered silver, and mirror-polished silver, roughly equal parts. Then leave the ruffled glass rim standing empty so it frames the fill. Swap silver for champagne gold and the math holds; swap in two colors instead of one and it collapses.
Choose ornament sizes in three tiers — roughly one inch, 1.5 inches, and two inches — and keep the largest near the bottom center of the bowl. That is how you avoid the everything-floated-to-the-top look. Fill about 80 percent and let the top layer sit slightly irregular. Overfilled bowls bury the visible rim, which is the entire reason to buy a bowl with a wavy edge in the first place. Ten to fourteen small ornaments usually does it for a nine-inch bowl.
11. A Matte Red Bowl of Glitter Ornaments and Tinsel
Here is the honest number breakdown for a bowl this full:
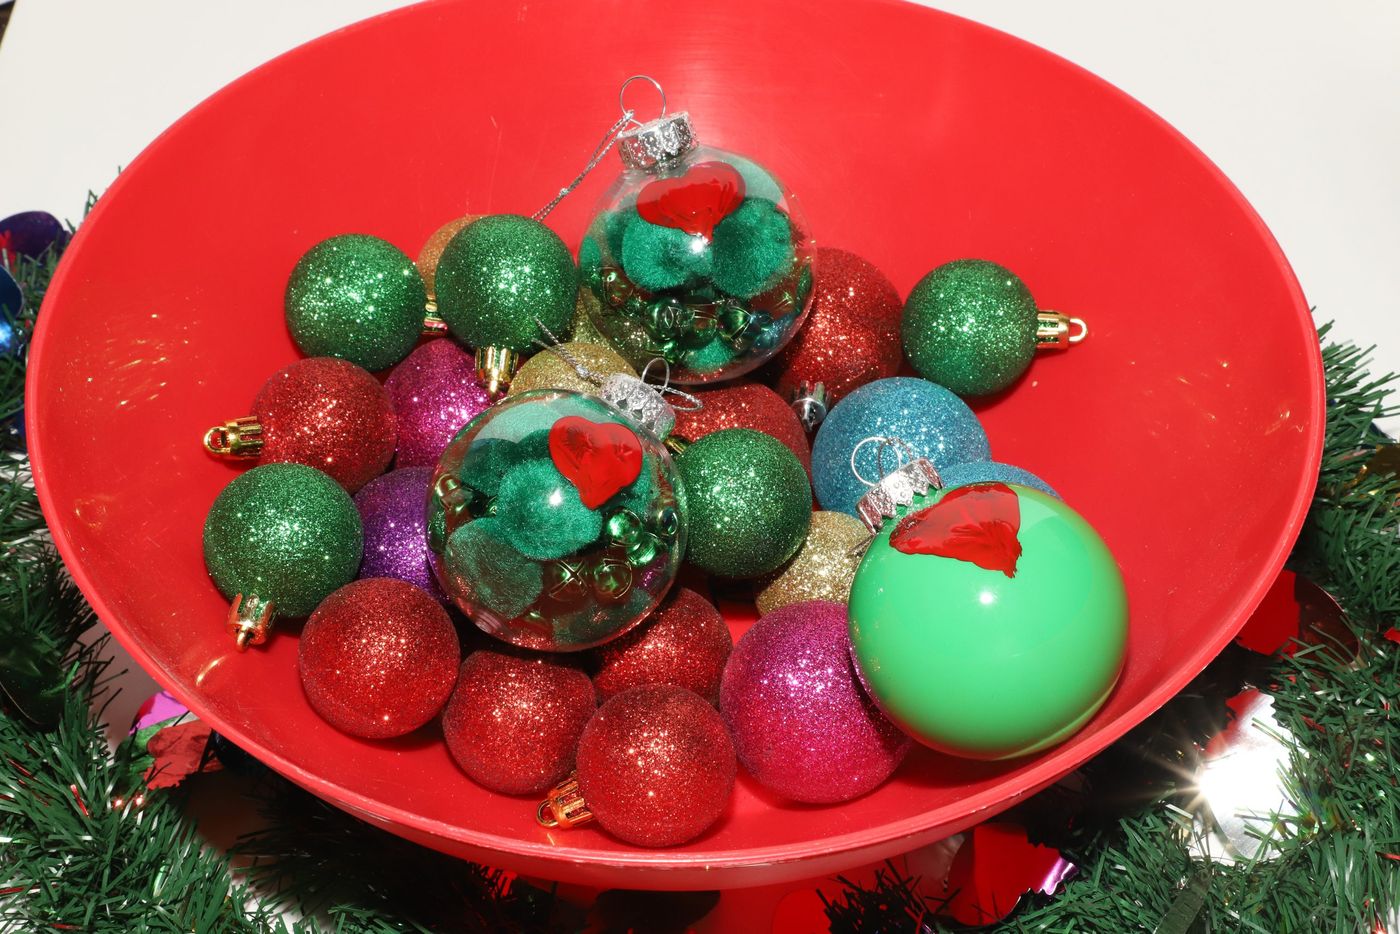
- Matte red bowl, 12-inch: $15–$35
- Boxed glitter ornament set, mixed colors: $20–$45
- Fillable clear ornaments plus pom poms and mini hearts: $8–$15
- Green tinsel garland: $6–$14
- Total: $49–$109
Budget alternative: Dollar Tree bowl, last season’s ornament boxes at half price, and one tinsel garland you already own. Real-world cost: under $25.
The matte-finish bowl is doing something very 2026. After a decade of high-gloss everything, the market swung hard toward flat, chalky finishes that photograph without glare and hide fingerprints. Search interest in matte holiday decor has climbed steadily, and the color story here — candy pink and green mixed into classic red — tracks the dopamine-color decorating that took over Pinterest. Is it forever? The matte vessel, yes. The full rainbow assortment, maybe five years. Buy the bowl once, change the contents.
12. Metallic Sequins Spilling From a Fluted Glass Bowl
Sequins are static magnets and they will cling to the inside of a glass bowl in a thin film that looks like grime. Fix it with a dryer sheet: wipe the inside of the bowl once and the static drops enough to keep them loose. Mix shapes too — 6mm flat rounds, larger 12mm discs, a few stars — because uniform sequins read as a solid mass while mixed shapes catch light at different angles and keep the whole bowl moving visually.
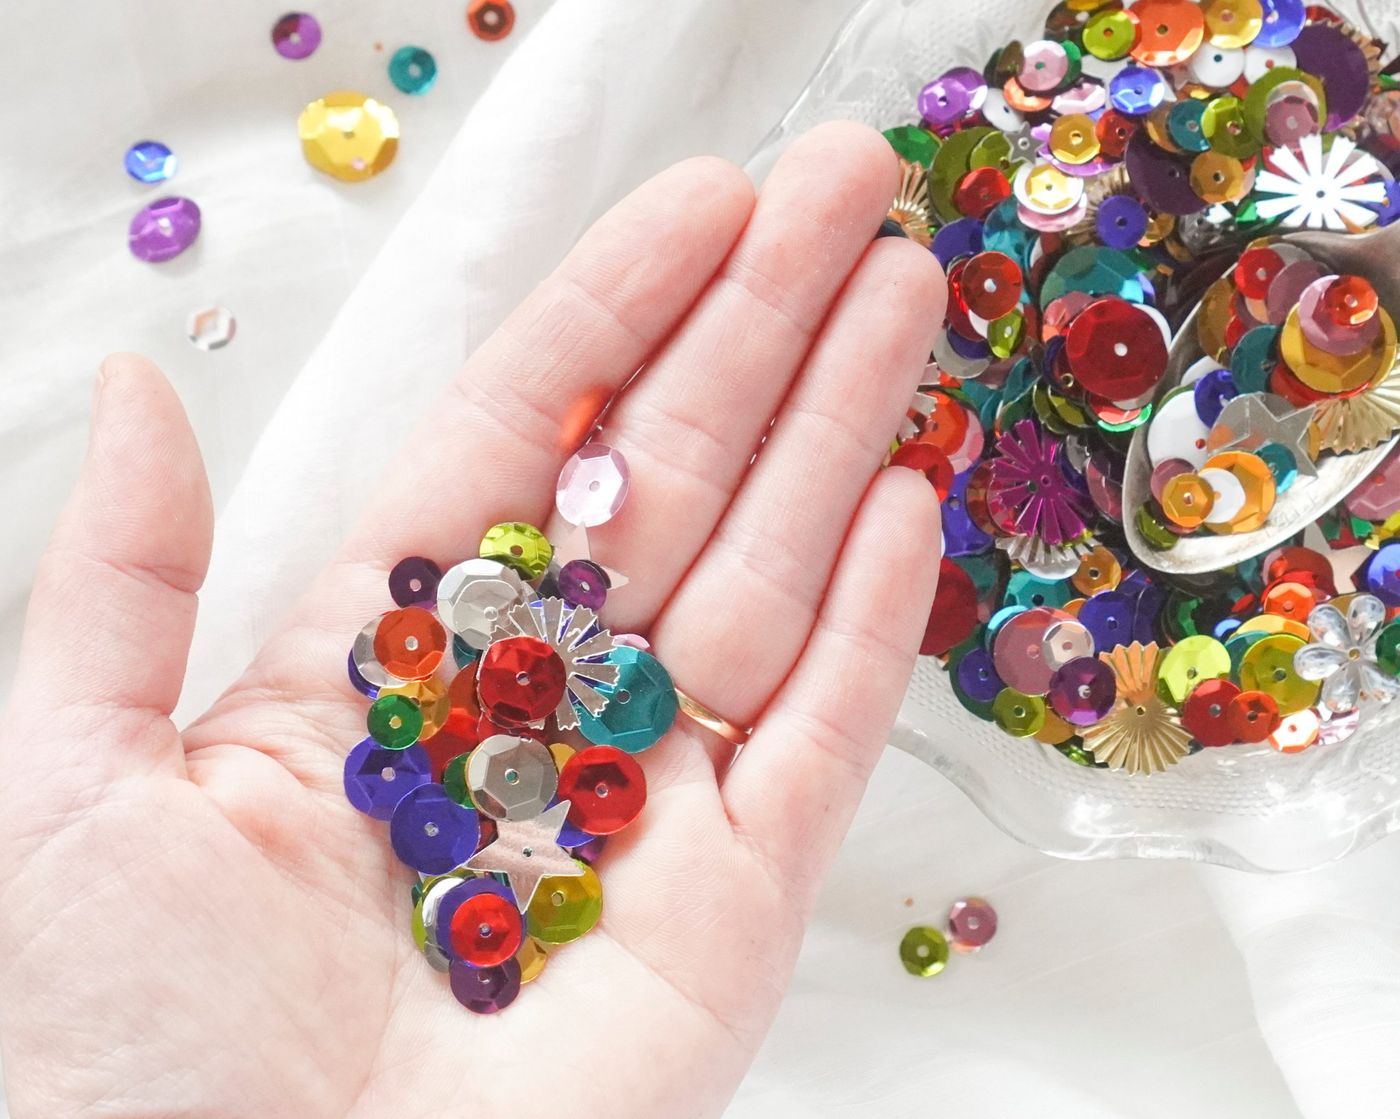
Sequins by the bag are one of the cheapest ways to fill volume. A mixed-color bag runs $4 to $6 and will fill a six-inch bowl two or three times over. The fluted glass bowl itself is $1.25 at Dollar Tree. If you have kids or pets and do not want loose sequins all over the floor, layer them between two nested bowls and seal the rims with hot glue — see Idea #6 for the sealing technique. Same sparkle, none of the cleanup.
13. Green and White Ornaments With a Feathered Bird on the Rim
The bird. A clear bowl of green and white ornaments with a few pinecones is a perfectly nice natural arrangement, but the moment a small feathered bird perches on the rim, the whole thing becomes a scene with a story. It also breaks the edge, which is what stops the eye from sliding right off the glass. Perch it slightly off-center toward the front and make sure only its feet touch — a bird sunk down into the ornaments loses the effect completely.

This one is countertop or console scale — a bowl around eight to ten inches wide works on a surface at least 12 inches deep. It also needs a light background to sing, because clear glass holding white ornaments disappears against a white wall. Put it on a wood console, a stone counter, or a dark tray. If your surface is glass or mirror, slide a woven mat underneath first. For a bigger dining table, Idea #16 scales up better with its footed bowl.
14. A Winter Terrarium With Bottle Brush Trees and a Spotted Ornament
Artificial snow is a commitment. That fine granular stuff migrates — you will find it in grout lines for months. Vacuum it out of the bowl with a hose attachment rather than wiping, which just smears it into the glass. Cheap bottle brush trees shed bristles, so handle them by the base. And if there is any real plant in the mix, it needs water that the fake snow does not want. Keep it all artificial, or commit to a saucer underneath and water sparingly.
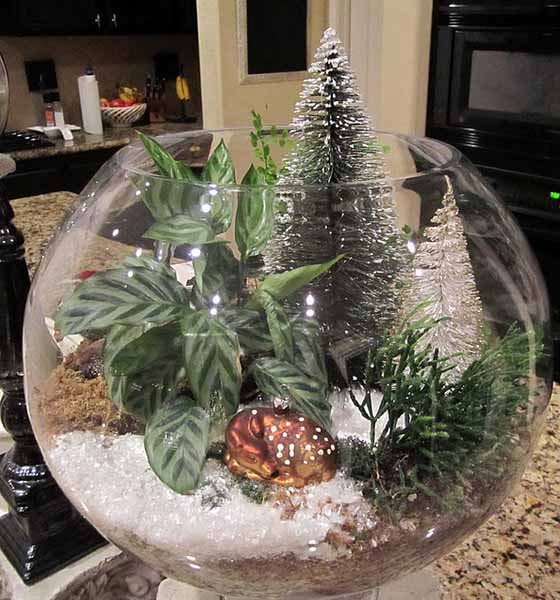
Height variation is the entire trick. Two bottle brush trees at different heights plus a low metallic ornament create a triangle your eye can follow, which is why this reads as a landscape instead of a bowl of stuff. The bronze spotted element adds the one warm tone the arrangement needs against all that white and green. And the striped leaves give a vertical line — the same job a single tall stem does in a flower arrangement.
15. A Glittery Miniature House Inside a Lidded Glass Jar
Under $15 and about 20 minutes:
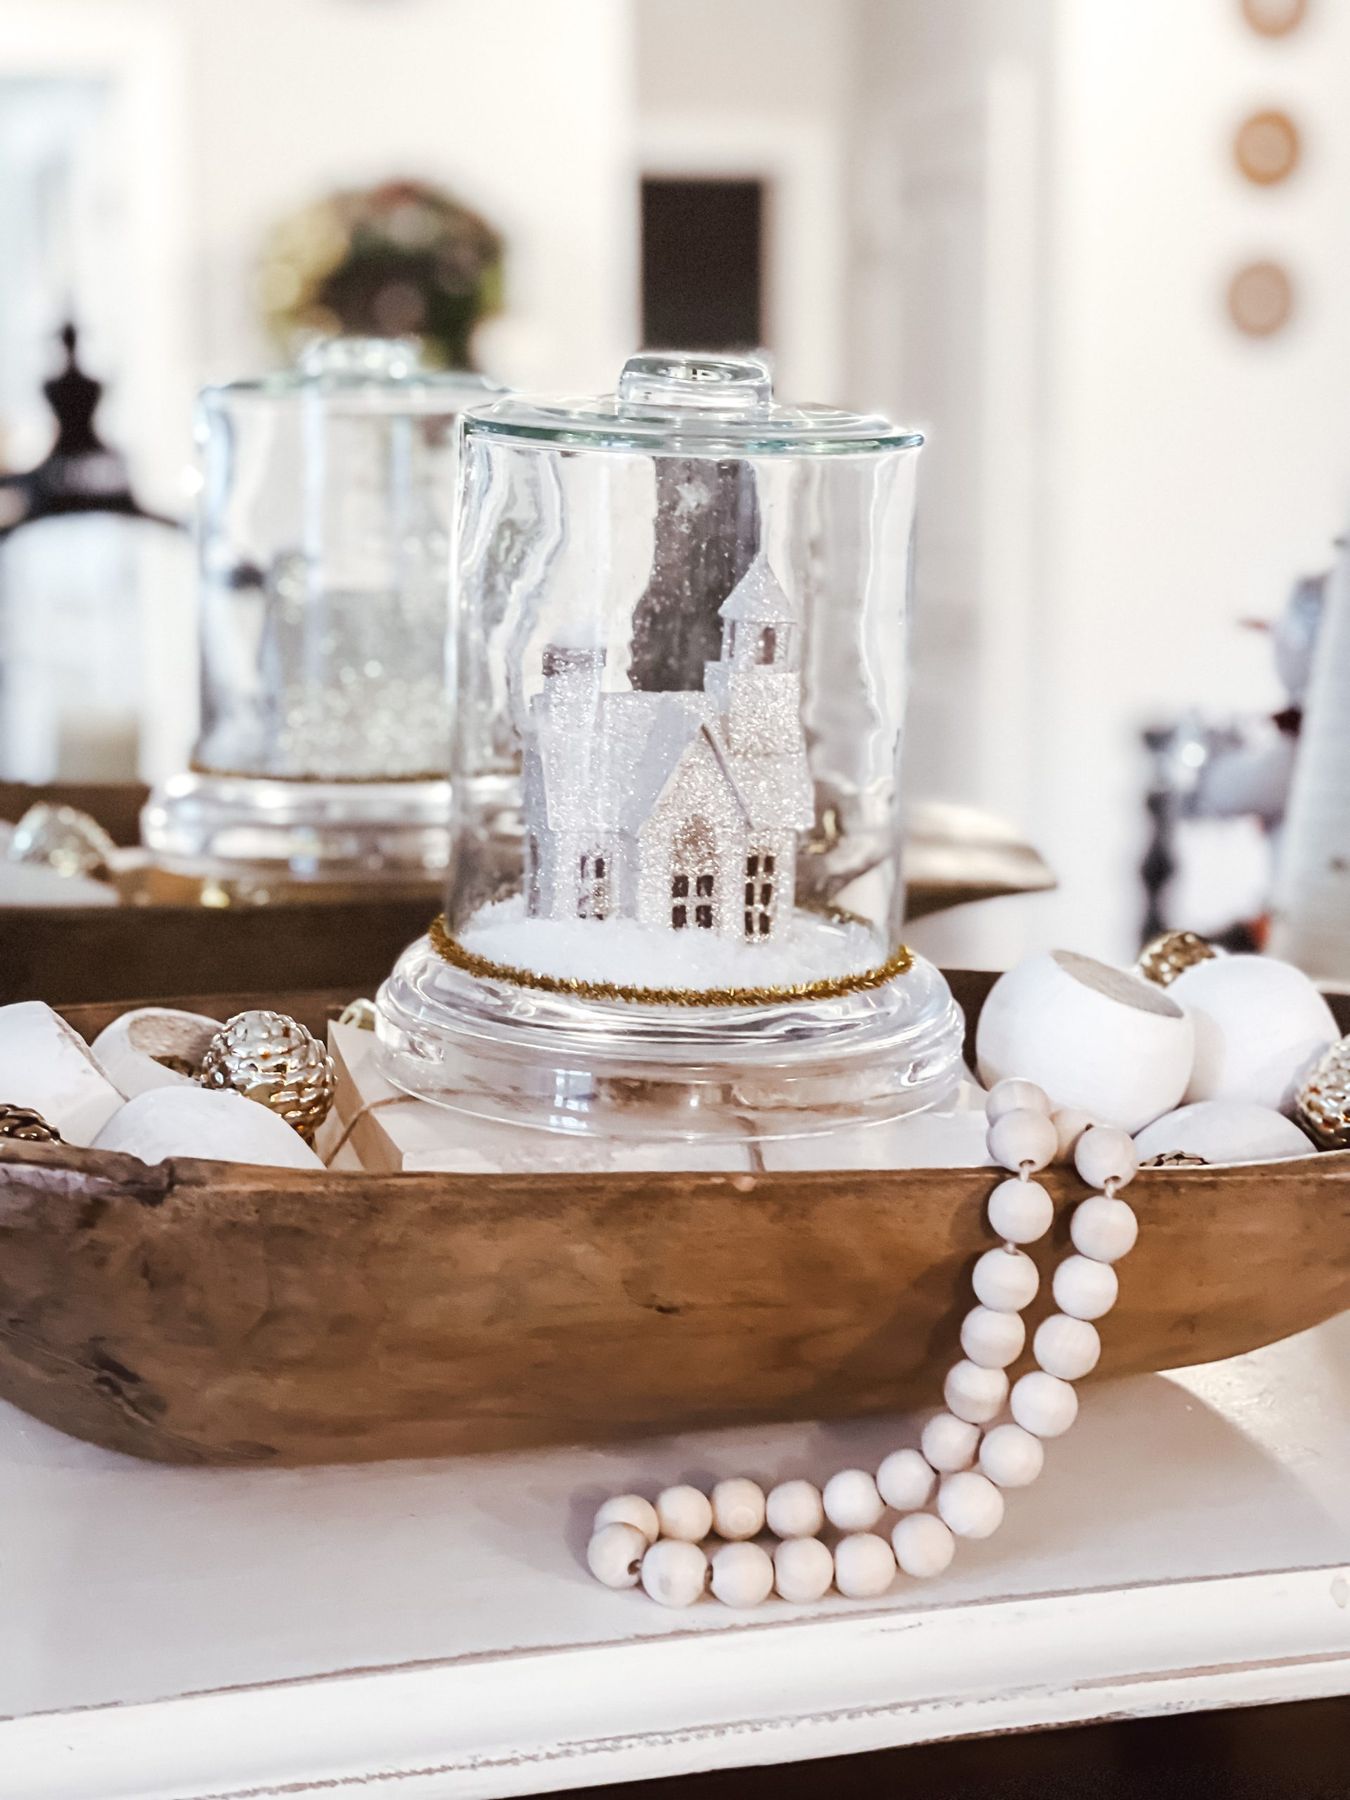
- Fill a small lidded glass jar two-thirds full with faux snow.
- Set the miniature house on top, tilted slightly so it does not read as a flat object.
- Add a thin line of gold tinsel at the jar base, then close the lid — this keeps the glitter contained.
- Nestle the jar into a dark wooden bowl and half-fill the surrounding space with wooden bead garland.
- Tuck small gold accents into the gaps at the bowl edge.
The lid. Closing the jar means the glitter stays inside, the arrangement survives being bumped, and — this matters more than you would expect — the house reads as being under glass, which makes it feel preserved and precious instead of just placed. Without the lid you have a pile. With it, you have a little vitrine. If you cannot find a lidded jar, a clear glass cloche over a small plate does the same job.
16. Matte Olive Textured Spheres With Frosted Mini Trees
60 percent dark grey linen base, 25 percent olive green in varied matte textures, 10 percent warm white from candles and string lights, 5 percent clear glass. The rule that makes this work is texture over color: every green element is matte and a different surface — ribbed, checkered, needle. Swap olive for burgundy and keep the textural variety or it goes flat. Swap the grey linen for cream and drop the white candles for black tapers to hold the same contrast ratio.
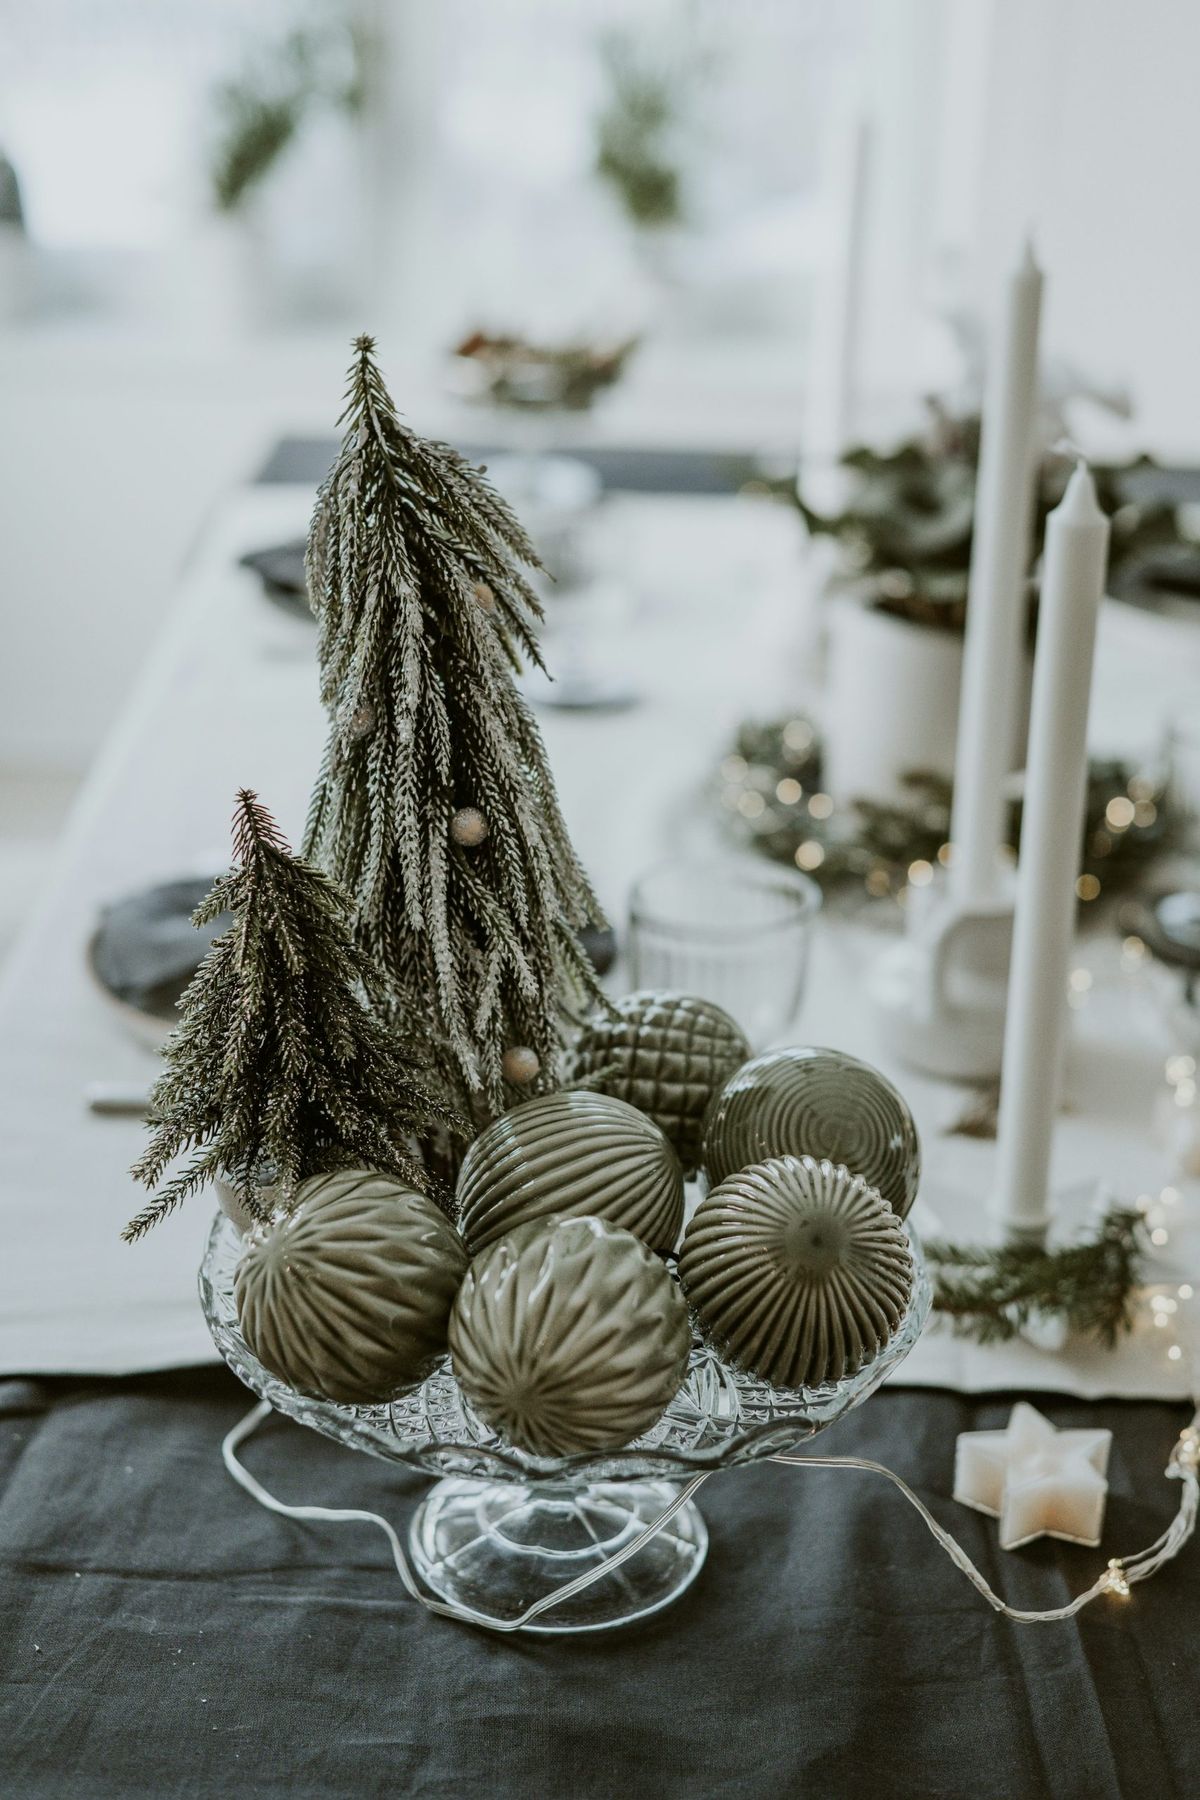
This is a dining table centerpiece and it wants room — plan on a 60-inch or longer table, or an island at least 36 inches wide. A footed bowl stands eight to ten inches tall, which sits below eye level for seated guests, and that is deliberate: tall centerpieces force everyone to lean sideways to talk. Anything under 48 inches and you want the smaller version in Idea #13 instead.
17. A Shallow Bowl of Chocolates Topped With a Pearl Bow
Total cost here is under $12. Clear shallow bowl: $1.25 at Dollar Tree. Red shredded paper filler: $1.25 a bag. Foil-wrapped chocolates: $5 to $8 depending on brand, and honestly the cheaper ones photograph better because the foil is shinier. The pearl bow — if you cannot find a clip, a length of pearl-beaded trim from a craft store runs about $3. This is the gift that looks like you spent $30, and it is also the one people actually keep the bowl from.
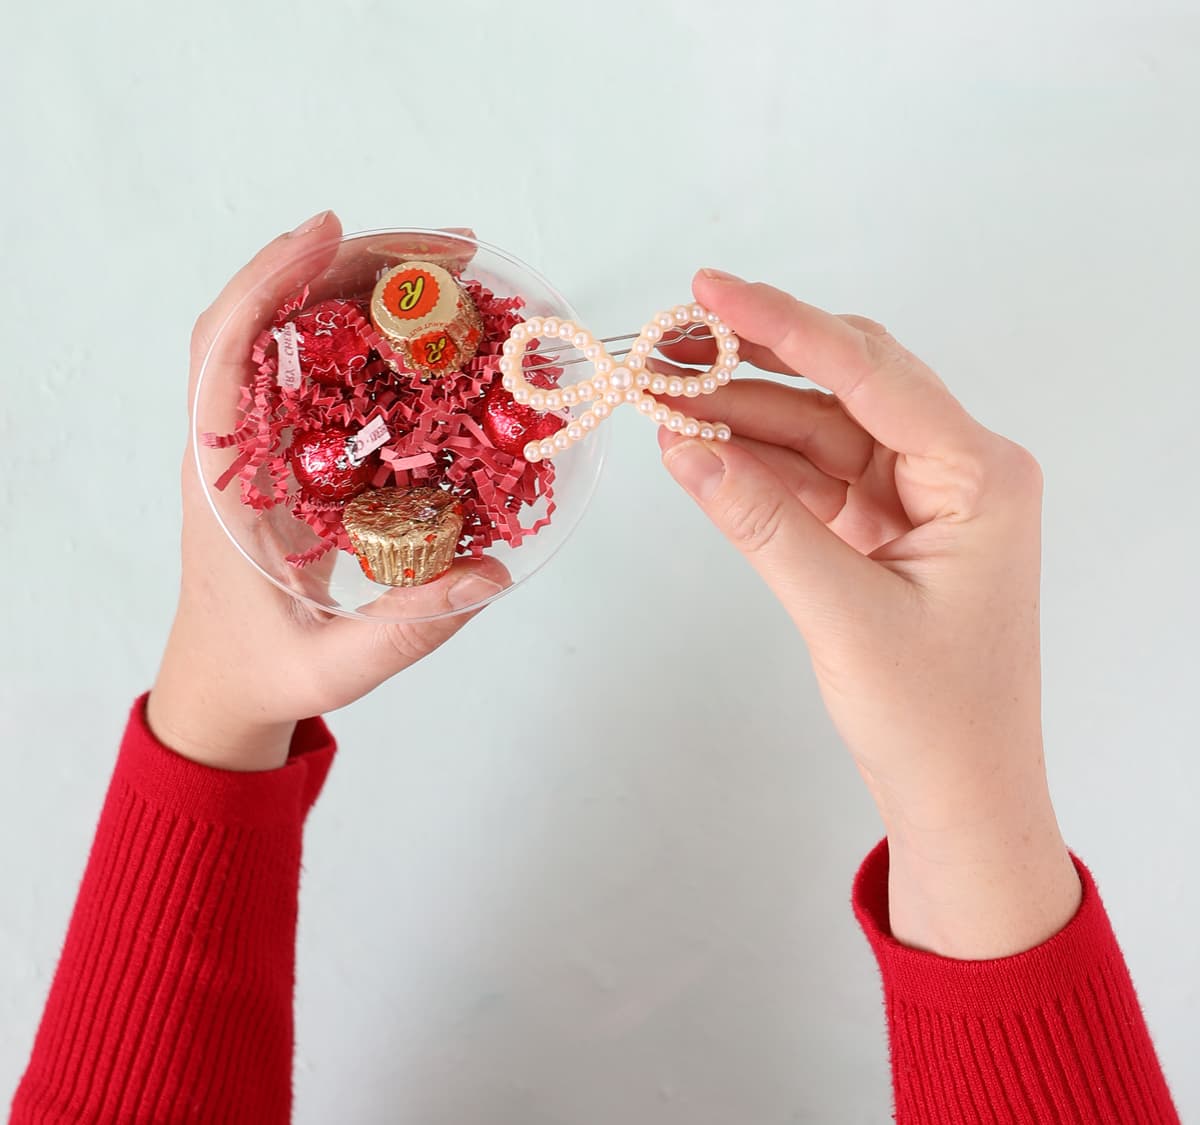
Never pour shredded paper in and dump candy on top — you will get a bowl of candy with paper creeping through. Instead, build a shallow paper bed, press a small clear cup or ramekin down into the center as a well, and fill that with chocolates. The cup holds the candy in a nice dome, keeps the paper from migrating, and makes the whole thing stable enough to carry one-handed. Two extra minutes, completely different result.
18. A Woven Rope Ornament on Brown Satin
It is the ribbon. A woven rope ball alone is a nice natural texture, but a wide brown satin ribbon changes the entire register of the ornament — rope says rustic, satin says considered. That mix of rough and smooth is the whole reason this reads as handmade-by-a-designer rather than handmade-at-camp. Use a ribbon at least half the diameter of the ball, tie a real knot instead of a bow, and let the tails hang long.
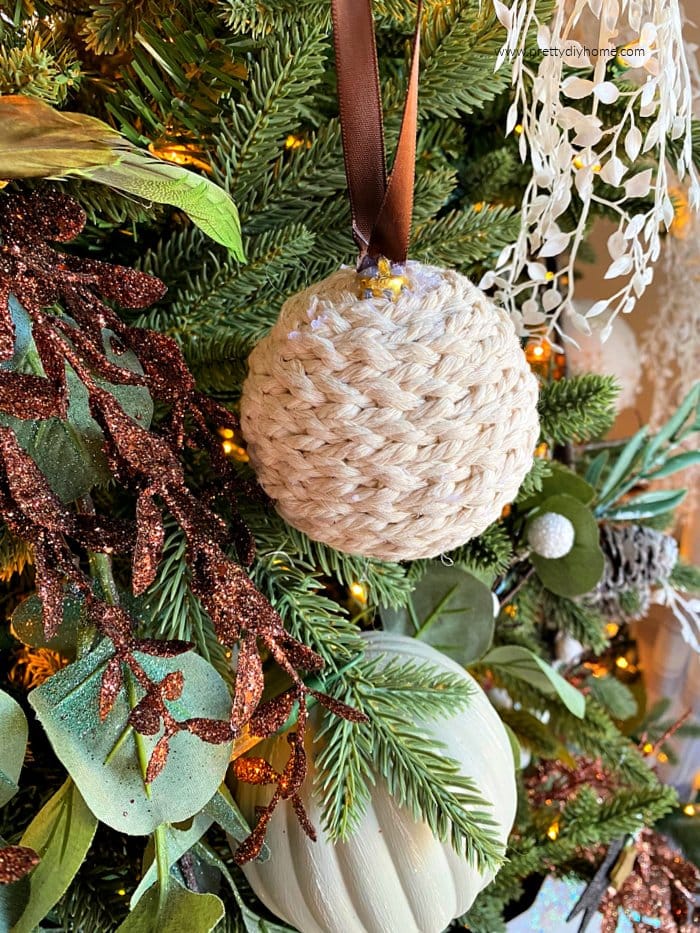
Glitter sheds, and if this ornament hangs anywhere near a heating vent you will find copper flecks on the floor all season. Frosted spray finishes also yellow slightly when stored in a hot attic — keep ornaments in a cool, dark bin with acid-free tissue, not newspaper, which transfers ink. The rope ball itself is nearly indestructible. It is the ribbon that fades, so buy an extra yard and swap it every other year rather than replacing the whole ornament.
19. A Neutral Stocking Mantel With Brass Bells on Twine
The palette does all the work: forest green, cream, brass. Three tones, no exceptions, which is why a busy mantel still looks calm. The brass bells and gold reindeer are the only reflective elements, and they are small — restrained metallic is what separates an elegant mantel from a shiny one. The black candle holders add a graphic note that keeps everything from going soft and beige, and the large painting above anchors the composition so the garland does not float in space.
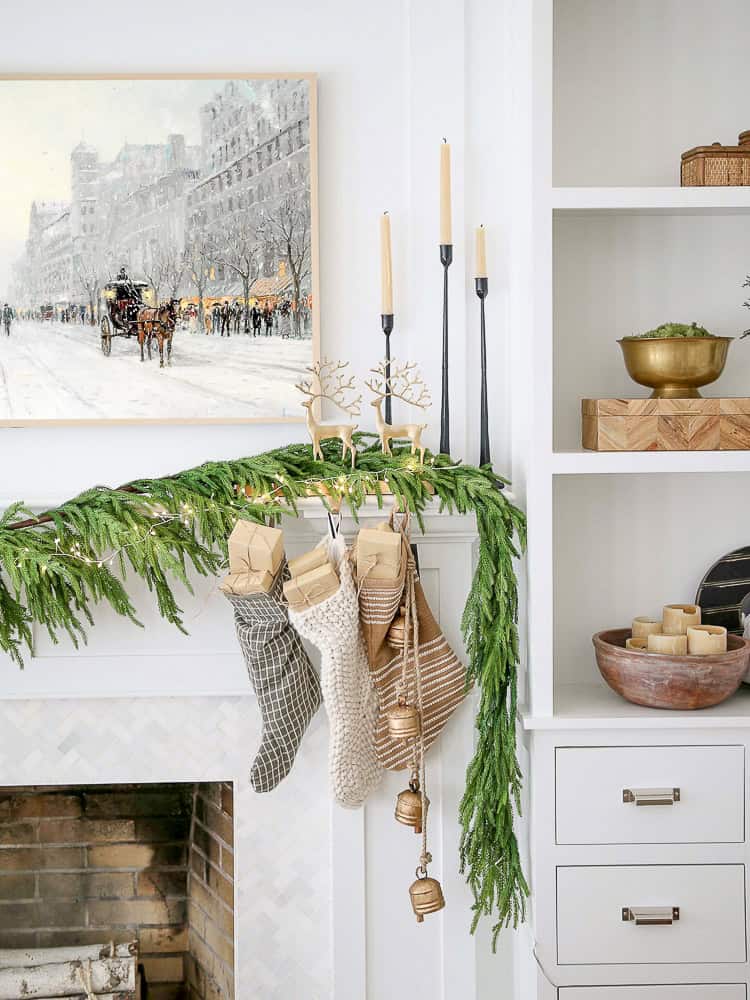
Run through this before you buy a single stem:
- Measure your mantel depth and the clearance to the bottom of any artwork — a full garland needs 12 to 18 inches.
- Find your outlets; a lit garland means a cord, and hiding it is half the battle.
- Check that hanging stockings will not cover the firebox opening.
- Pick one metallic and commit — brass or silver, not both.
20. Illuminated Candy Spheres and Striped Canes After Dark
Outdoor light displays fail for boring reasons. Check the outlet rating, use outdoor-rated extension cords, and keep every connection point elevated off the ground rather than lying in a puddle. Run the whole thing through a GFCI. In a freeze-thaw climate, the plastic on cheap illuminated spheres gets brittle by January, so bring them in rather than leaving them out all winter. And be honest about wind — anything large and hollow becomes a sail in a storm.
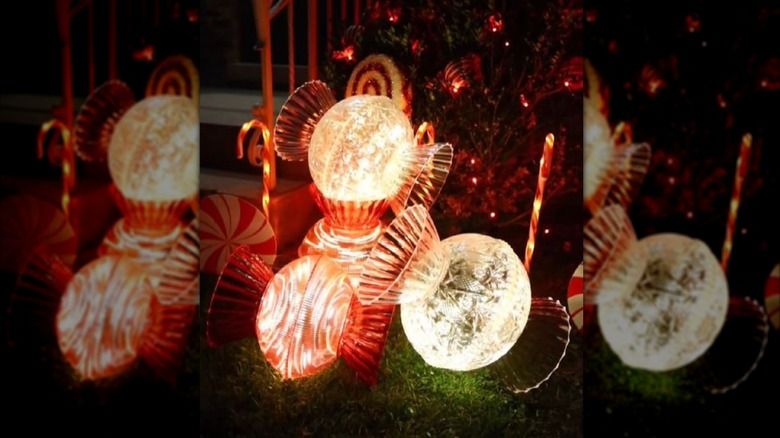
Expect to replace a bulb or a strand every season; holiday light strands average three to five years before sections start dying. Store spheres in labeled bins with a desiccant pack — moisture kills them, not cold. Wash the plastic with mild soap and water in spring, dry it fully, and never coil the cords tight, which kinks the wire right at the connection point where failures always start. Ten minutes of proper storage buys you two extra seasons.
21. Diamond-Cut Glass Bowl of Gold and Silver Spheres
40 percent gold, 30 percent silver, 20 percent dark frosted grey, 10 percent clear faceted beads. Two metallics is the ceiling; three turns it into a phone case. The dark frosted spheres are the anchor element and they look like a mistake during planning. They are not. Without something dark, bright metal against clear glass has nothing to push against and the bowl reads flat and shiny. Swap the frosted grey for matte black and the formula holds.
Diamond-cut glass throws light in a hard, patterned way, which means it needs contrast to show up. Place this bowl where it catches one specific light source — under a pendant, on a dark counter, near a black-framed window — and it will sparkle clear across the room. Put it on a white shelf in flat overhead light and the cut pattern simply vanishes. Cut glass is also dust-visible, so keep a soft brush nearby and swipe it weekly.
22. A Living Succulent Bowl in Dark Granular Soil
Twenty-five minutes and $20 to $35 depending on plants:
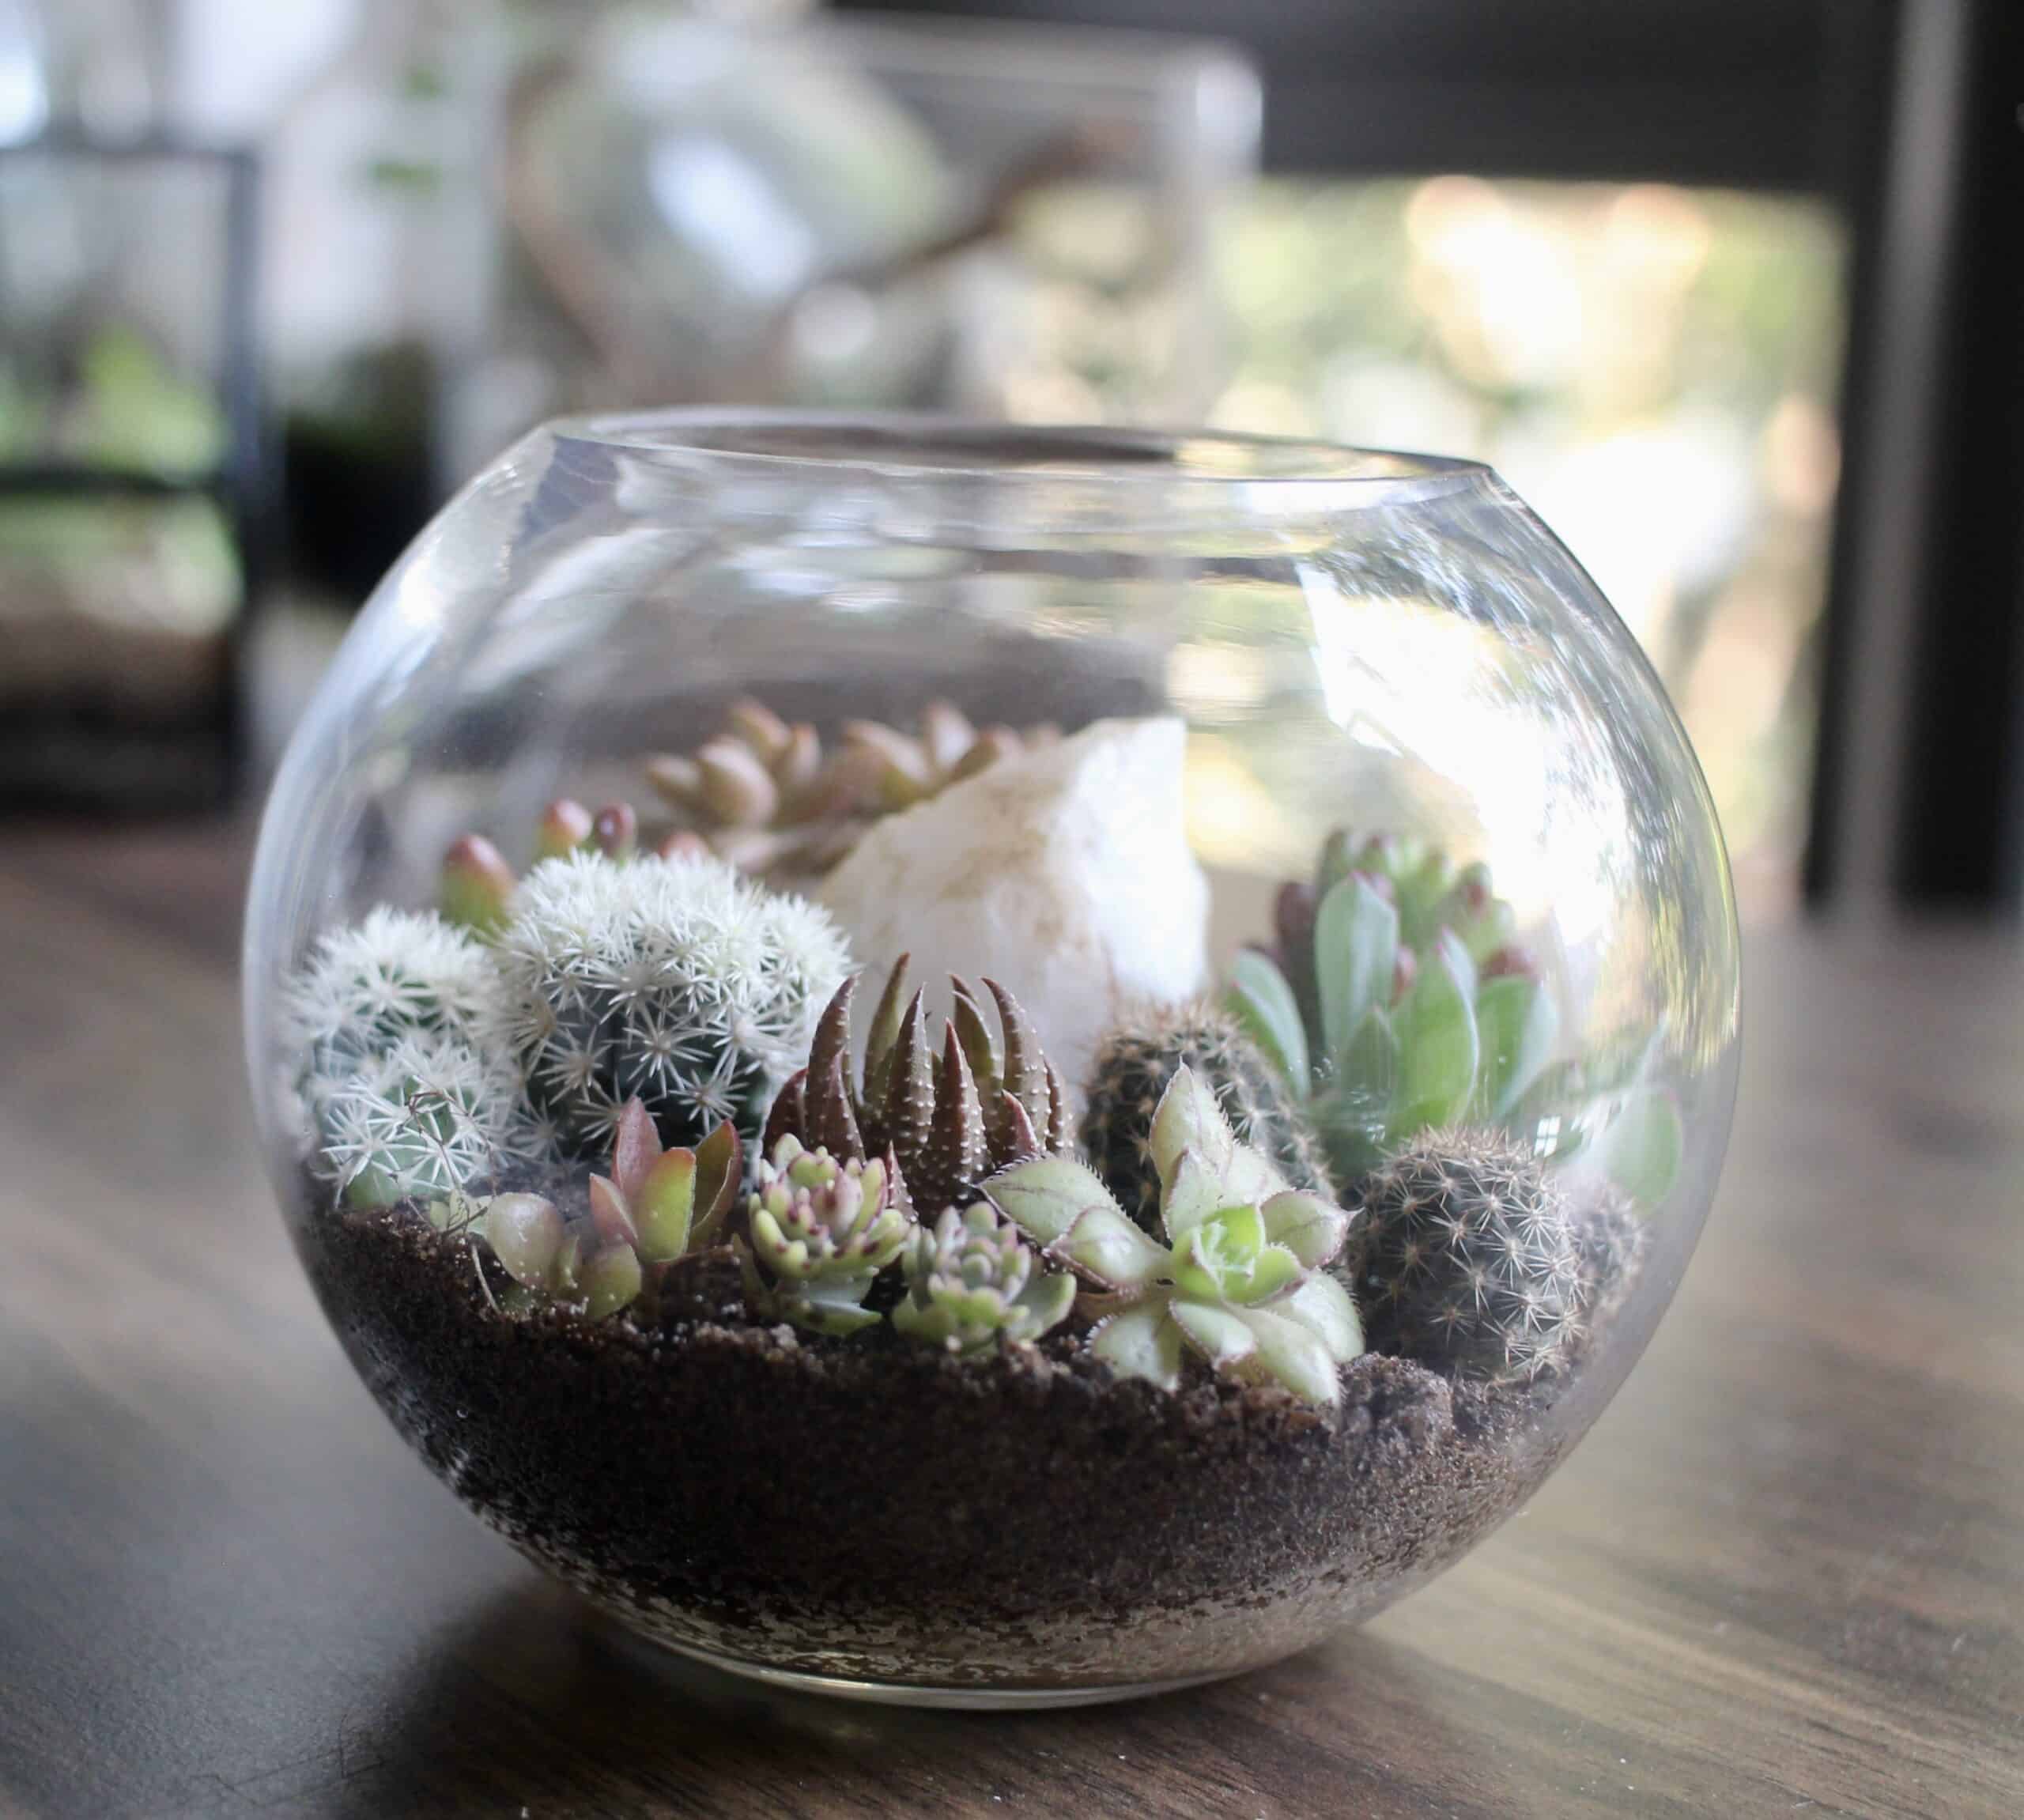
- Layer a half-inch of pea gravel in a clear bowl with no drainage hole.
- Add a thin layer of charcoal to buffer moisture.
- Spoon in cactus mix, mounding it slightly toward the back for height.
- Plant the tallest succulent just off-center, then fill around it with two smaller ones.
- Press in one pale stone as a focal point and brush stray soil off the glass with a dry brush.
Odd numbers and one rock. Three plants — always three, or five — avoid the symmetry that makes a terrarium look manufactured. And a single white stone does the job a piece of garden art does outdoors: it gives the eye a place to stop. Dark granular soil against pale green foliage supplies the contrast, and the clear glass lets you see the soil layers, which turns basic potting into part of the design.
23. Glass Pig Votives With Gold Mesh Wings
The wings. A speckled glass pig candle holder is charming and a little weird; a pig with gold mesh wings and a tiny crown is a whole personality. That one addition moves the object from folk-art tchotchke to collectible, and it is why people stop at the shelf instead of walking past. If you cannot find winged versions, a small brass crown ornament or a snippet of gold mesh hot-glued on gets you 90 percent of the effect for a couple of dollars.
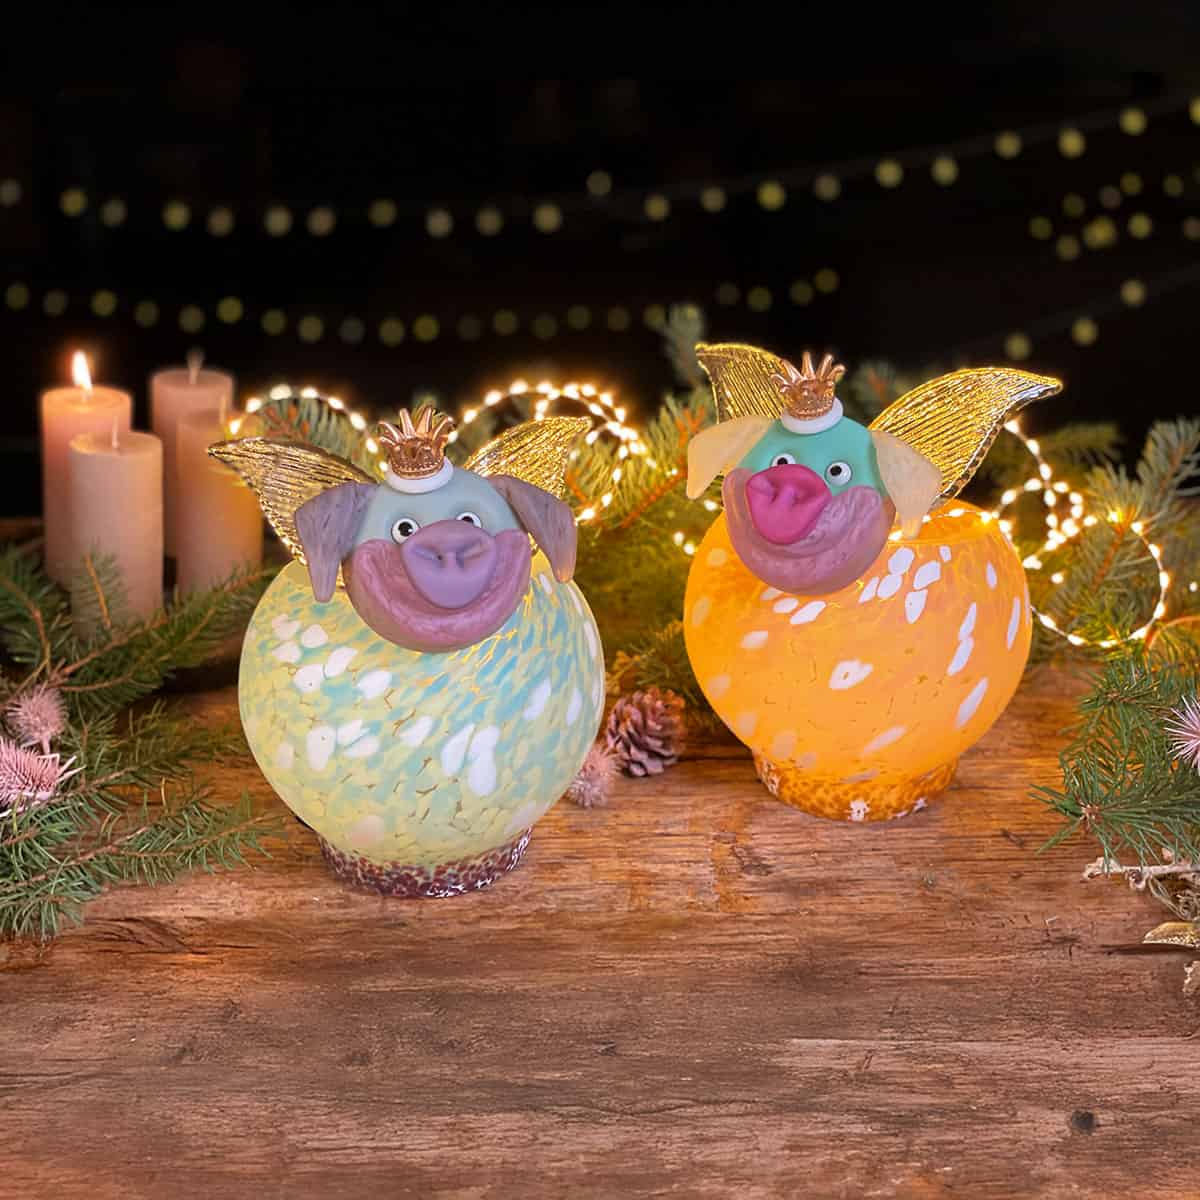
Whimsy is officially back. After years of beige minimalism, weird-little-things decorating has been rising on Pinterest — people are styling quirky figurines and vintage novelty ceramics next to candles instead of hiding them in a cabinet. There is real staying power here, because the shift is not about pigs specifically; it is about rooms reading as personal. The risk is real though: whimsy curdles into clutter fast. Two odd objects per surface, maximum.
24. A Glass Bulb Ornament Holding a Candle in Faux Snow
Fifteen minutes and about $10:
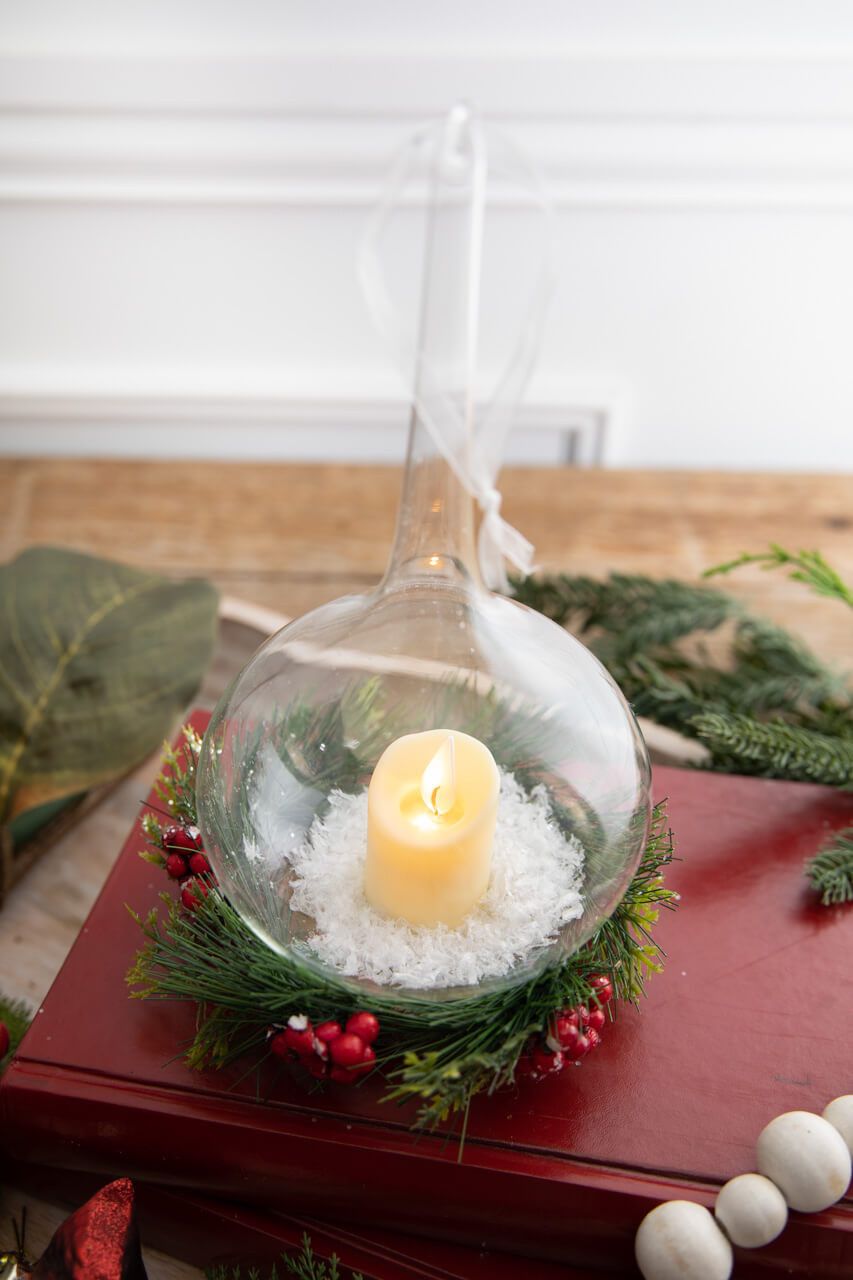
- Set a clear bulb-shaped glass ornament on a flat surface and spoon in an inch of faux snow.
- Press a cream battery candle into the snow so it stands upright.
- Set the ornament inside a small faux pine wreath and tuck two red berry sprigs into the edge.
- Stack two or three hardcover books, darkest on the bottom, and center the wreath on top.
- At night, shift the ornament a half-inch until the glow hits the glass evenly.
This is a shelf, side table, or nightstand vignette — it needs about a 10-inch square and it is happier in a corner than centered on a wall. The stacked-books base usually lands seven to nine inches tall, so placing it on a lower bookshelf gives you the glow without staring at the bulb. Skip it on a coffee table in a house with toddlers; that glass is thin. For a bigger surface, scale up with the arrangement in Idea #29.
25. Glitter Tree Ornaments Hanging From a White Branch
Almost none of this cost is the ornament itself:
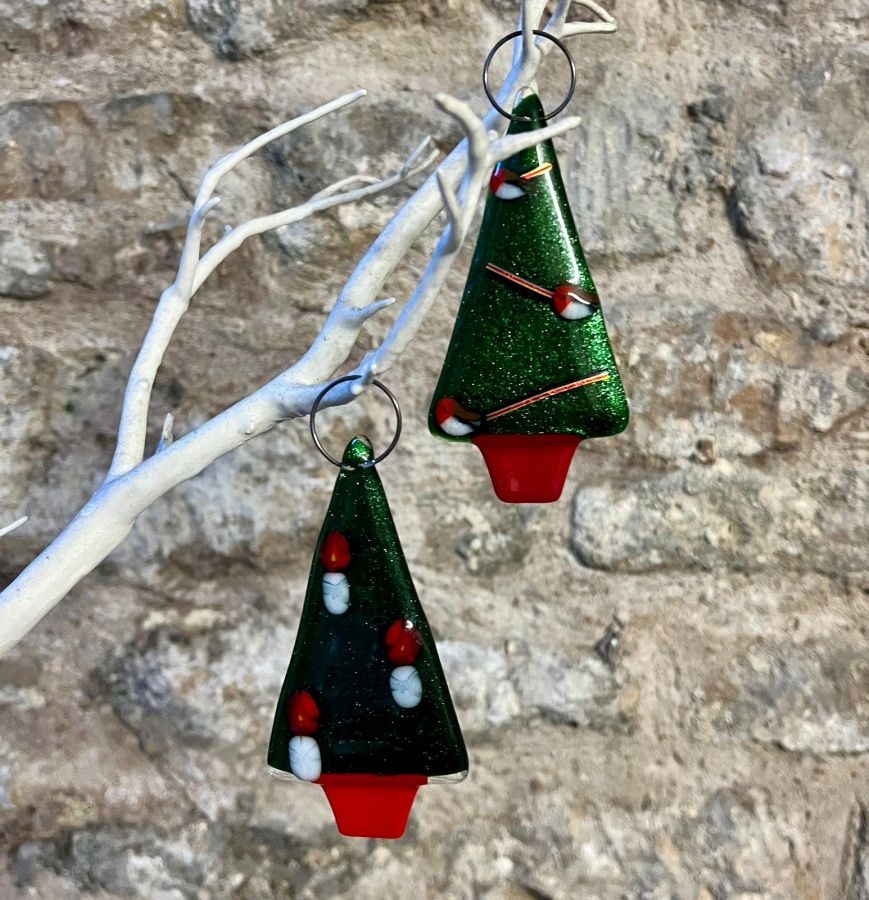
- Flat green glitter ornaments, blank, set of six: $6–$12
- Red craft paint for the trunk base: $2–$4
- White spray paint for the branch: $5–$8
- Silver hanging rings and thin cord: $3–$5
- Total: $16–$29
Budget alternative: flat wooden or cardboard triangle blanks from a craft store run about $4, green glitter glue replaces loose glitter at $3, and the branch comes from the yard. Under $12 for a full set.
Glitter the ornament inside a sealed bag, not over a plate. Pour glitter and the blank into a zip bag, shake, and pull it out already coated — loose glitter on a work surface ends up in everything for weeks. Paint the red trunk base first and let it cure a full 24 hours before you glitter the tree above it. Doing both at once drags red flecks up into the green and the whole thing looks muddy.
26. Hand-Painted Egg Bowls With Scalloped Rims
Paper mache bowls start as balloon-covered layers of newspaper and flour paste — total material cost under $5. Add craft paint in magenta or yellow, a cheap brush, and a coat of matte varnish and you are at about $12 for three bowls. Boutique paper mache decor runs $40 to $80 a piece. Thrift stores are also full of ceramic bowls you can repaint in the same palette if you would rather skip the paper mache process entirely.
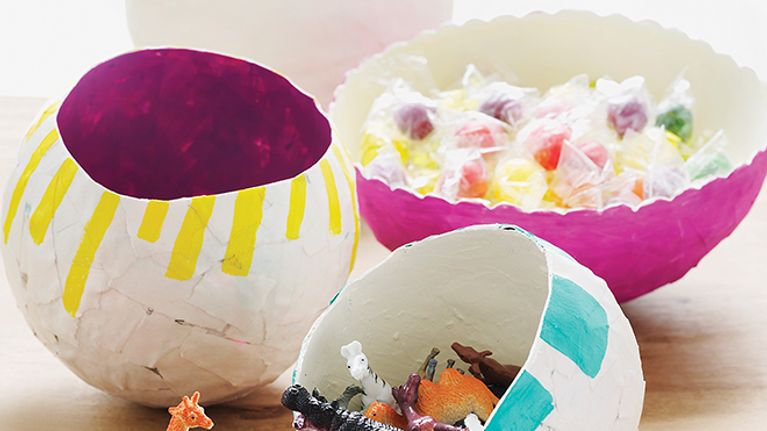
Hand-painted, slightly imperfect pieces are having a moment — the made-by-a-human aesthetic that grew out of the craft boom has not gone anywhere. What changed in 2026 is the palette: bold magenta and mustard instead of muted clay tones, and scalloped rims turning up everywhere from tableware to lampshades. These bowls are the low-commitment version of that trend, because you can test a whole color story for $12 instead of $120.
27. A Clear Ornament With a Hand-Painted Santa Face
Paint the face on the inside of the ornament if you want it to survive handling. Reverse painting with a long thin brush and acrylic keeps the image behind glass and completely smudge-proof. If you are painting the outside, scuff the plastic with fine sandpaper first or the paint flakes off by New Year. Two thin coats beat one thick coat every time, and a matte varnish on top kills the plastic shine that gives cheap ornaments away.
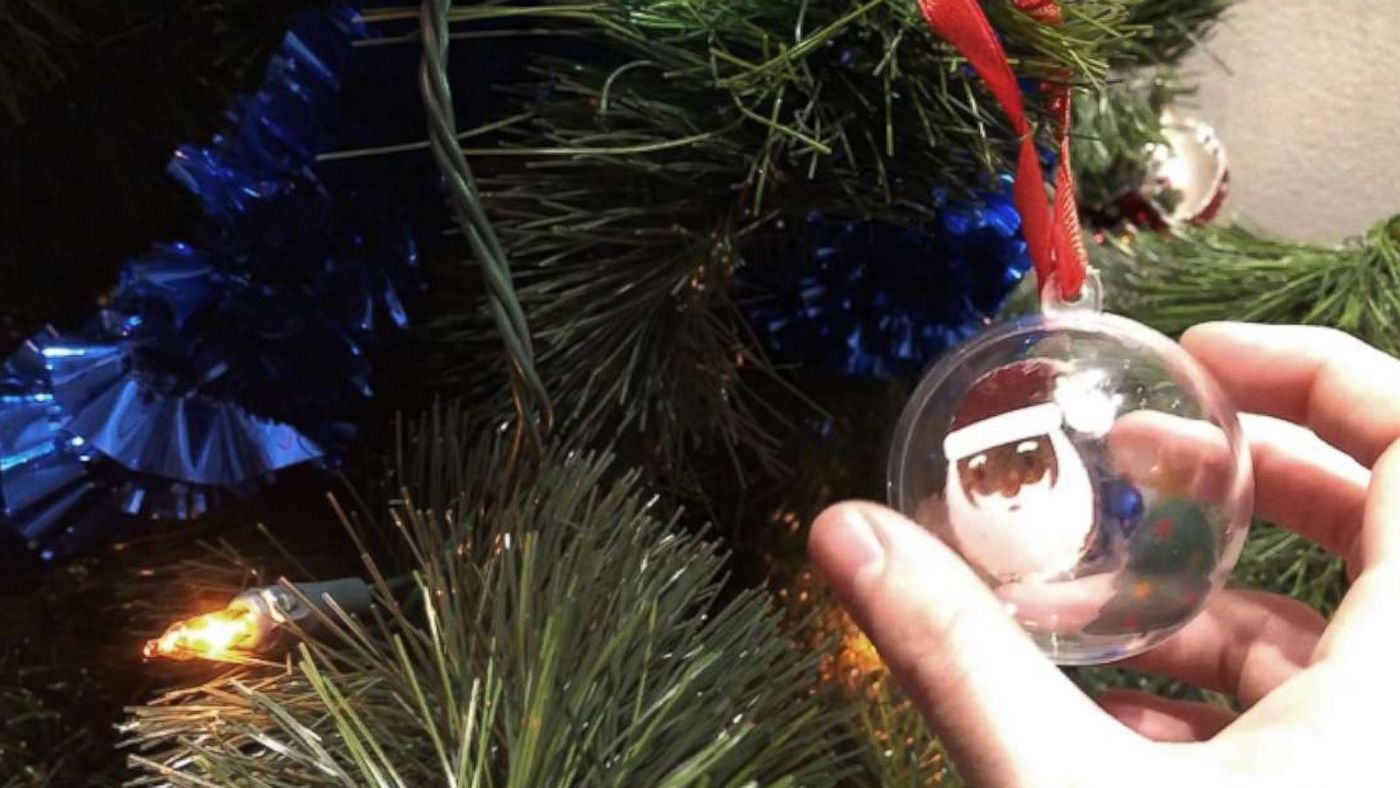
A clear sphere is the entire point. A painted Santa on a solid red ball is just a Santa ornament. Painted on clear glass, the tree light behind it throws the face into silhouette and the ornament seems to glow from within — that is what makes guests pick it up and turn it over. Keep the paint thin through the center of the face for exactly that reason, and heavier at the edges, so the light has somewhere to come through.
28. A Craft Table Set Up for Fillable Ornaments
Set this up for four kids in about 10 minutes:
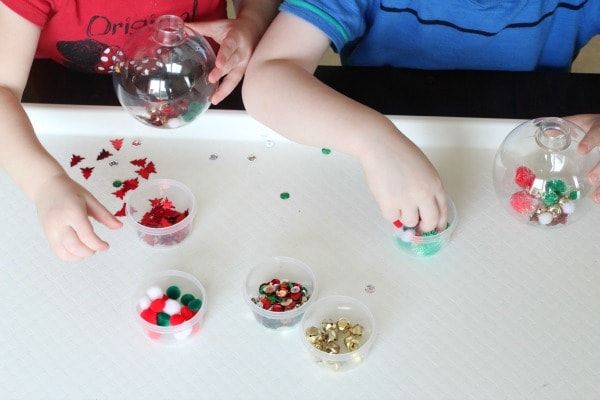
- Give each child one clear fillable ornament and one small container — sharing containers turns into chaos immediately.
- Sort the fillings by size so the biggest items go in last, not first.
- Fill to about 80 percent so the contents actually rattle and shift.
- Snap the halves together and run a thin bead of glue along the seam.
- Write the year on a small tag and thread it onto the hanger.
Everything here is one dollar-store run: fillable ornaments two for $1.25, pom poms $1.25 a bag, jingle bells $1.25, sequin mix $1.25, tree confetti $1.25. Six dollars buys a full afternoon for three kids and a set of ornaments they will want to keep forever. One upgrade worth making: small clear containers with lids for the fillings, so you are not sorting pom poms off the floor at nine at night.
29. A Tote-Shaped Glass Vase With a Red Bow on the Handle
The vase shape is where the money goes:
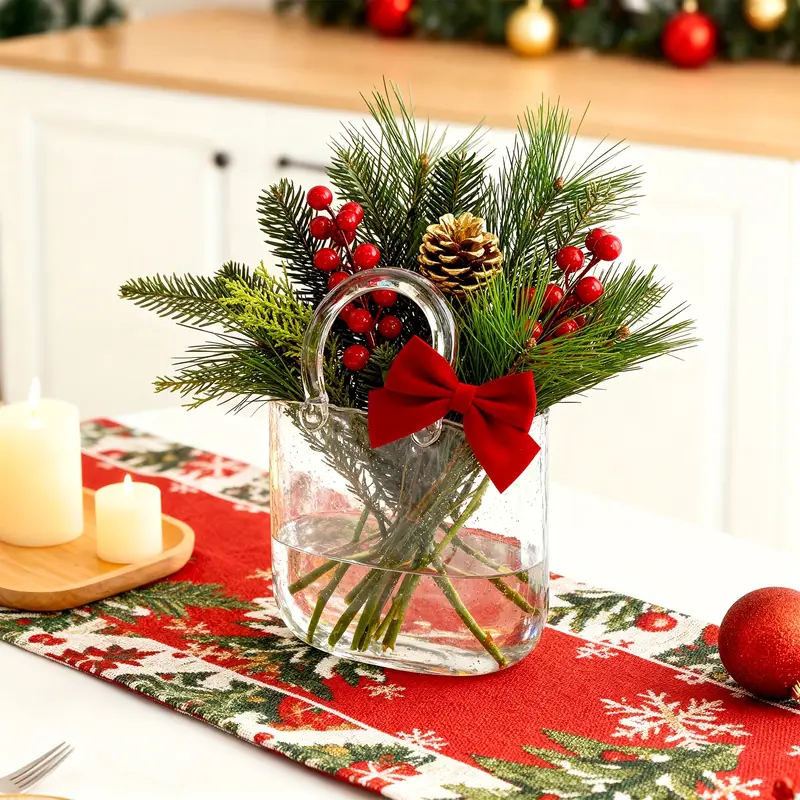
- Clear handled glass vase: $12–$30
- Faux evergreen stems, three to four: $15–$34
- Red berry sprays and one golden pinecone: $8–$18
- Red fabric bow and patterned table runner: $12–$28
- Total: $47–$110
Budget alternative: check Facebook Marketplace and thrift stores first, where handled glass vases go for $4 to $8. Dollar Tree sells evergreen picks and berry sprays seasonally at $1.25 each. Real-world rebuild: about $18.
This works on a dining table 48 inches and up, or on a sideboard where it can stand 12 to 16 inches tall. If you use real evergreen, expect needles on anything fabric, so put a tray under the vase and use a runner you do not mind vacuuming. On a narrow table under 36 inches, skip this entirely and go with a low bowl arrangement instead — tall greenery on a small table blocks every conversation.
30. Clustered Votive Holders on Polished Stone
Repetition at small scale. Twenty identical votives do more than two large candles, because the eye reads the cluster as one pool of light rather than a set of objects — and you get the flicker multiplied. Two other things matter here: every holder is clear and patterned, so nothing interrupts the glow, and the arrangement sits on polished light stone, which bounces warm light back up. That bounce is why it feels warmer than the actual candle count would suggest.
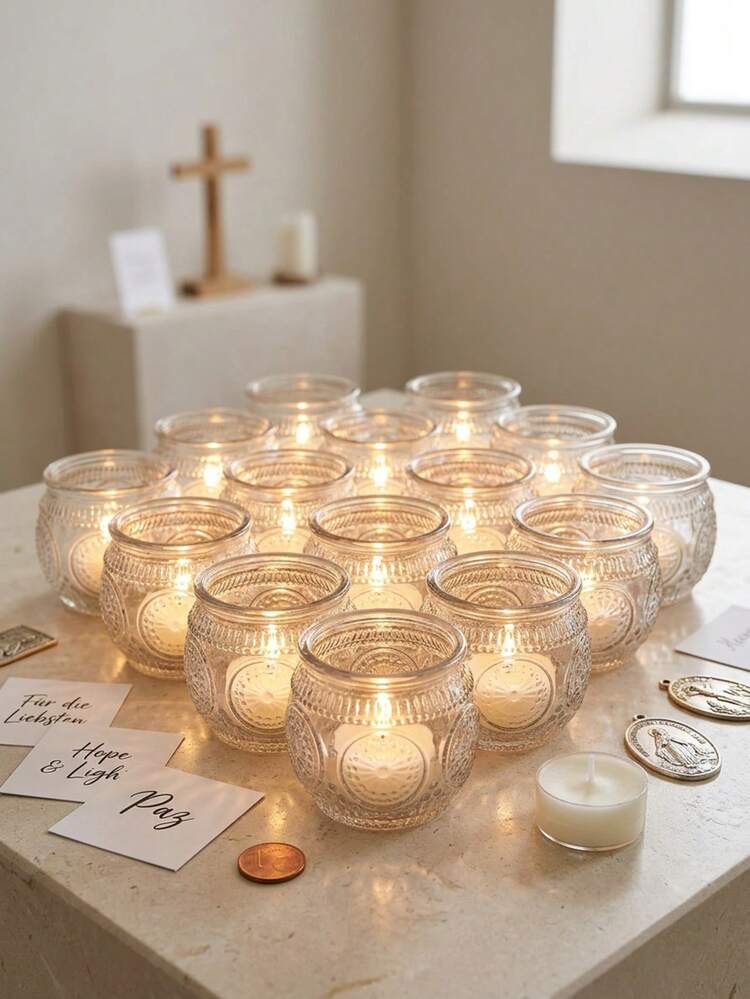
Never cluster tea lights directly on polished stone. Put a thin felt or cork mat underneath first — hot glass can leave a heat bloom you will not notice until you move them. Space the holders about half an inch apart so air circulates and the glass never gets hot enough to crack. And when you replace the candles, buy the same size every time — one mismatched height makes the whole cluster look like an accident.
31. Cream Knitted Ornaments With Brown Satin Ribbons
80 percent cream, 15 percent dark brown, 5 percent frosted green. That is it, and the restraint is the design. Knit cream against dark brown satin gives you a soft-on-hard contrast, and the frosted greenery is barely there — just enough to keep it from looking like a yarn bin. Swap the brown ribbon for charcoal and it goes modern; swap it for olive and it goes woodland. Change the tray or the ribbon, never both, or the arrangement loses its anchor.
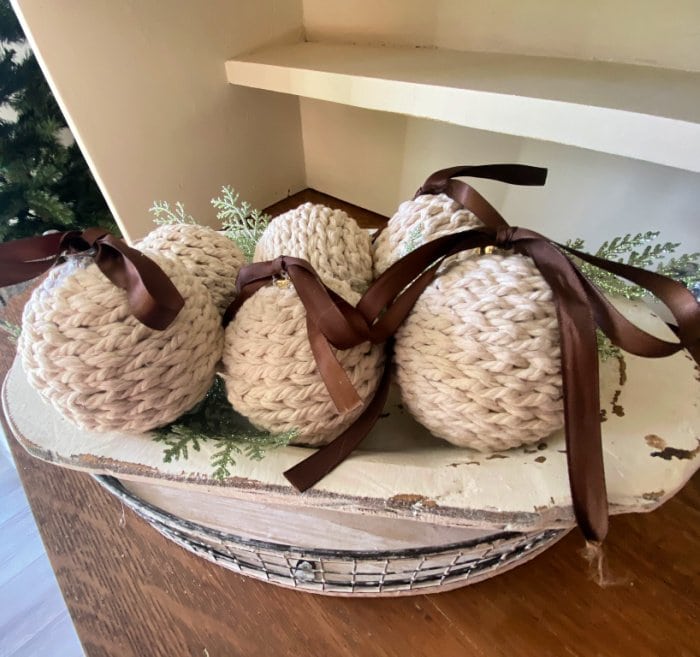
Knit ornaments are the easiest thing on this list to make yourself. A skein of cream yarn is about $4 and covers six ornaments, and foam or wooden ball bases run a few dollars for a set — wrap and hot-glue. The distressed white tray can come from a thrift store for $5, or you can paint a dollar-store tin tray white and sand the edges for the same aged look. About $15 total versus $80 for a boutique set.
32. Turning Clear Glass Bowls Into Colored Ones With Spray Paint
Do this outdoors, on a tarp, on a low-wind day:
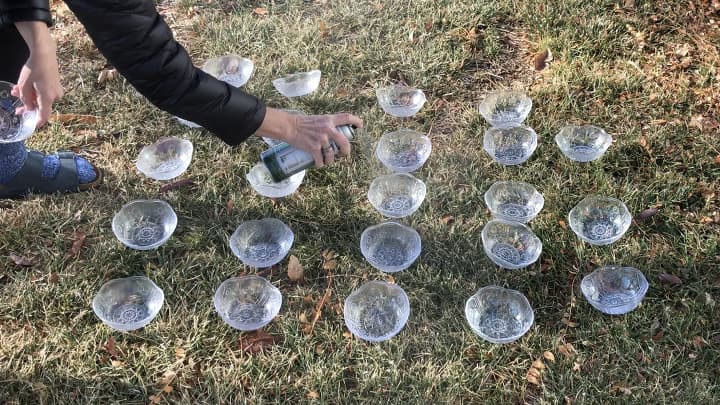
- Wash and dry the bowls completely — spray paint will not stick to fingerprints or dust.
- Set them upside down on scrap cardboard so you can hit the rim and sides evenly.
- Hold the can eight to ten inches away and mist in light passes rather than one heavy coat.
- Wait 15 minutes between coats and do three thin ones.
- Cure indoors for 48 hours before you put anything inside.
Two things go wrong with painted glass. First, paint chips, especially at the rim where you handle it — use a bonding primer or a spray formulated for glass and ceramics, and treat these bowls as decorative rather than functional. Second, the paint is not food-safe no matter what the can claims. If you are filling them with candy, drop in a paper liner or a small food-safe cup first. And never spray near a grill, a pet, or an open window into the house.
33. Swirled Green Glass and Peppermint Reds
50 percent emerald green, 40 percent vivid red, 10 percent white from the candy. Two-color decorating is unforgiving, and it works here because one tone is a deep cool green and the other is a bright warm red. That temperature clash is the energy. Swap the green for teal and the red starts to fight it. Swap red for pink and you need a deeper green underneath. Notice there is no third color at all — the peppermint white does not count because it stays small.
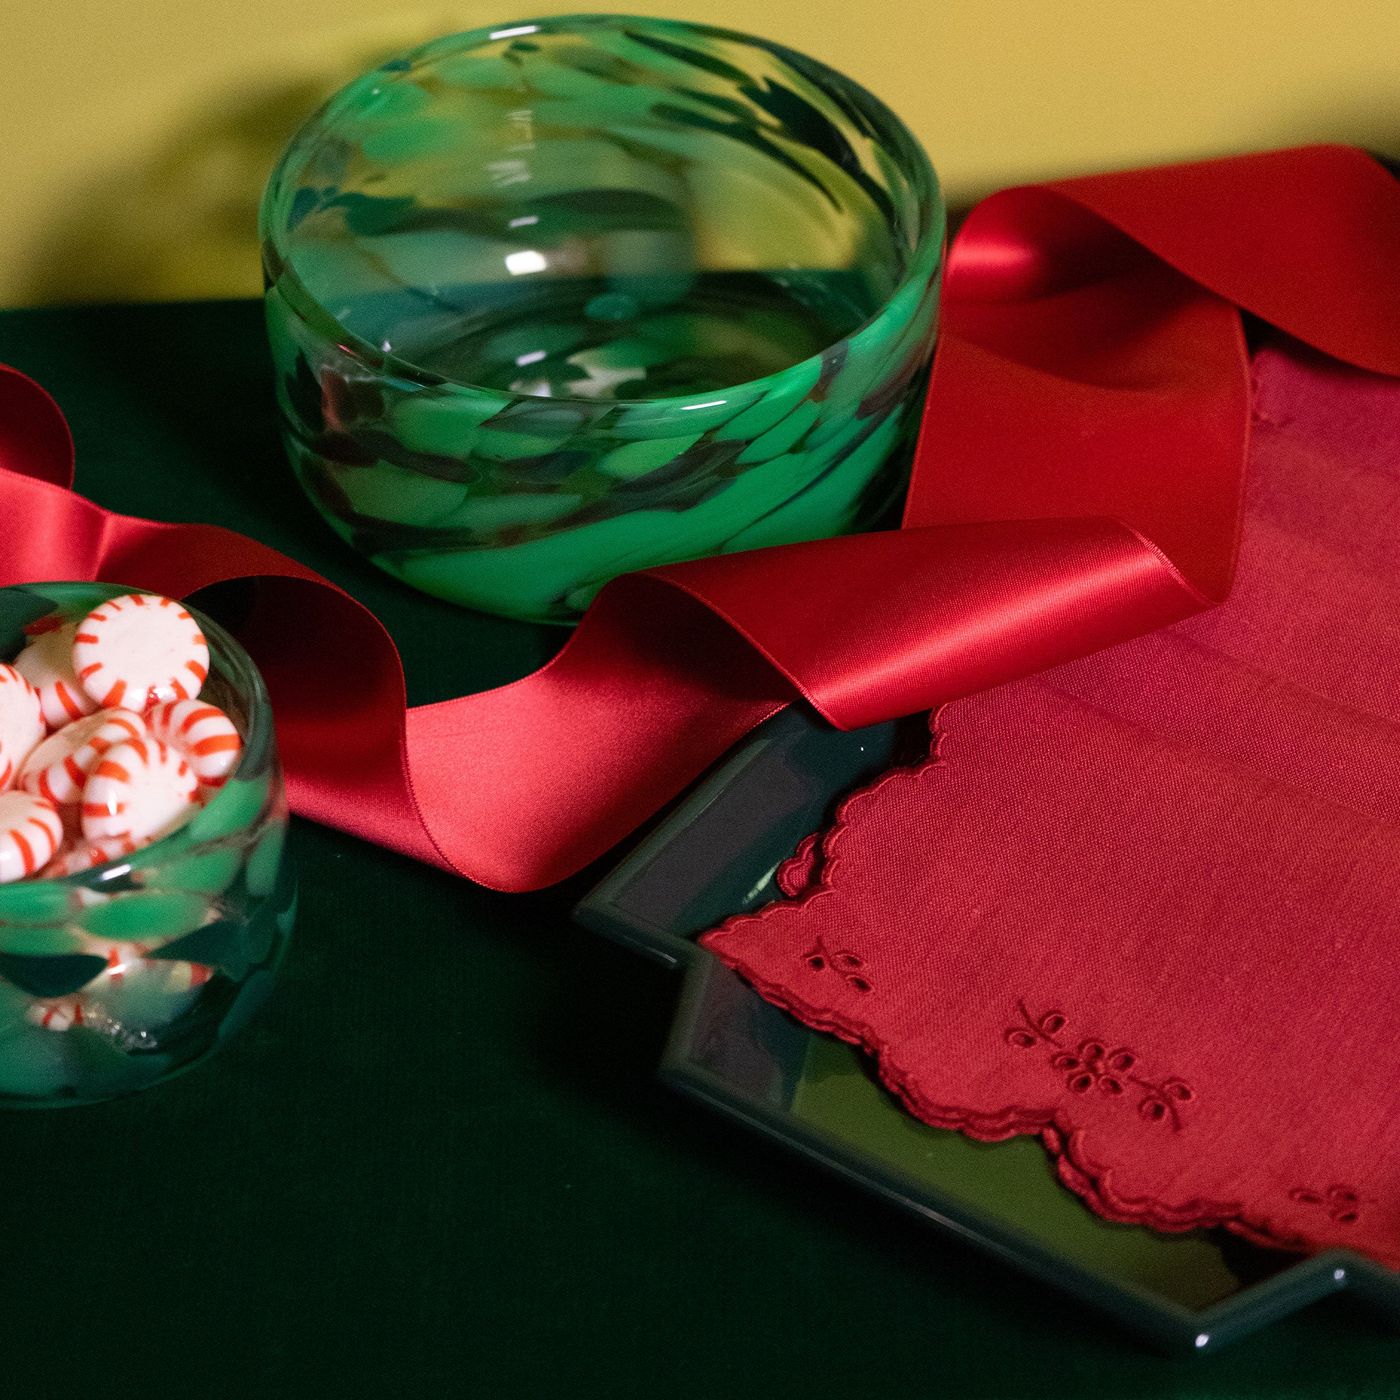
Check these before you commit:
- Keep the bowls away from radiators — exposed hard candy goes sticky and cloudy in a warm, damp room.
- Peppermint is toxic to dogs, so keep this display well out of reach.
- Line the glass with parchment if you want the candy to stay edible.
- Choose a tray slightly larger than the bowl footprint so the ribbon has somewhere to sit.
34. A Candy-Filled Sphere Dressed as a Giant Lollipop
Clear plastic fillable spheres are about $1.25 for a two-pack. Red foil-wrapped chocolates run $4 a bag, red satin ribbon $1, red-and-white striped paper straws $1.25 for fifty, and clear cellophane about $2. That is roughly $9 for a set of treats that look like they came off a candy-shop display, with straws left over for six more. Solid red straws work just as well if stripes are hard to find.
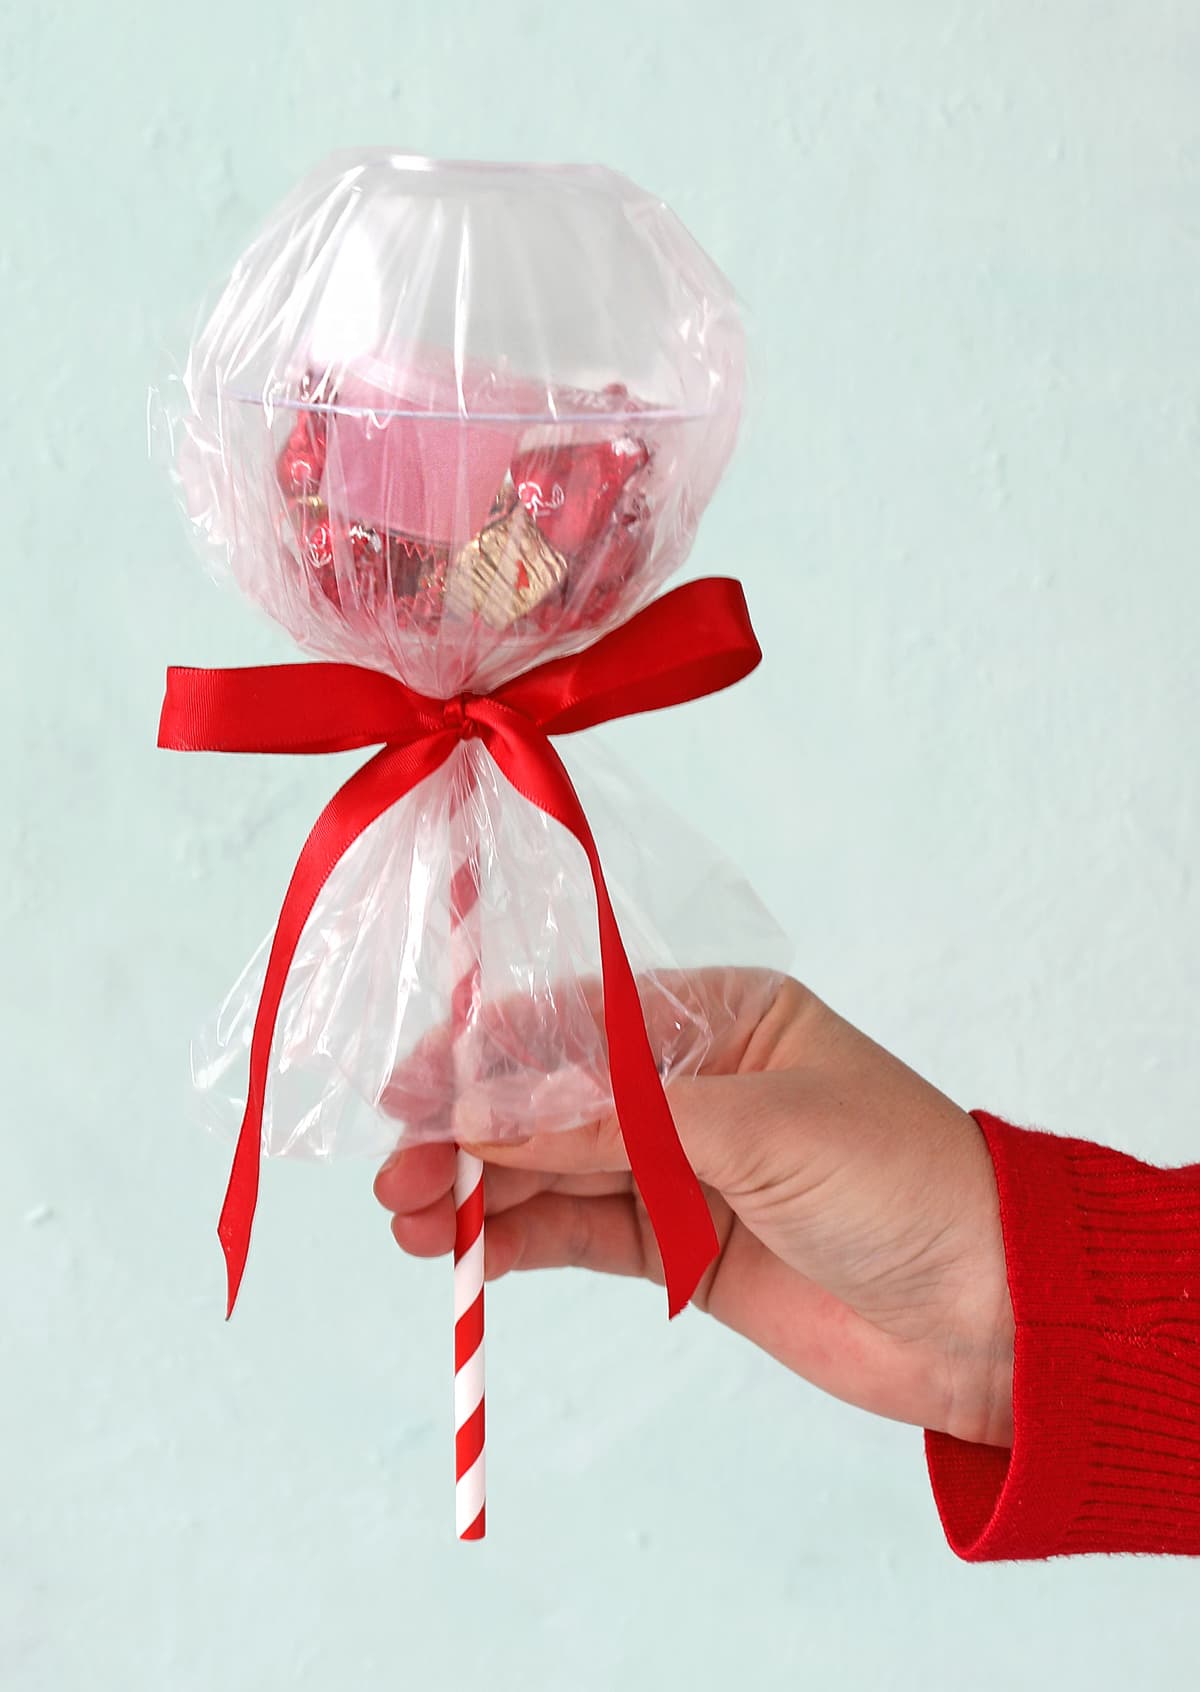
Two practical catches. First, a big plastic sphere full of candy is heavy, so tape the straw to the inside with a strip of clear tape or it pops out the first time someone lifts it. Second, cellophane looks crisp for about a day and then wrinkles. Wrap these the morning you give them, not a week ahead. If they are for kids, tie the ribbon loosely — a tight satin knot is nearly impossible for small hands to undo.
35. Honeycomb Beeswax Candles Tied With Dark Red Ribbon
Beeswax candles have been quietly climbing for three years, and 2026 is the year they hit the mainstream gift table. The appeal is part honeycomb texture, part clean burn, and part story — people want objects with material honesty after a decade of resin and plastic. Hand-rolled candles also photograph beautifully in warm light, which is exactly what Pinterest rewards. Unlike most micro-trends, this one has a genuinely long runway.
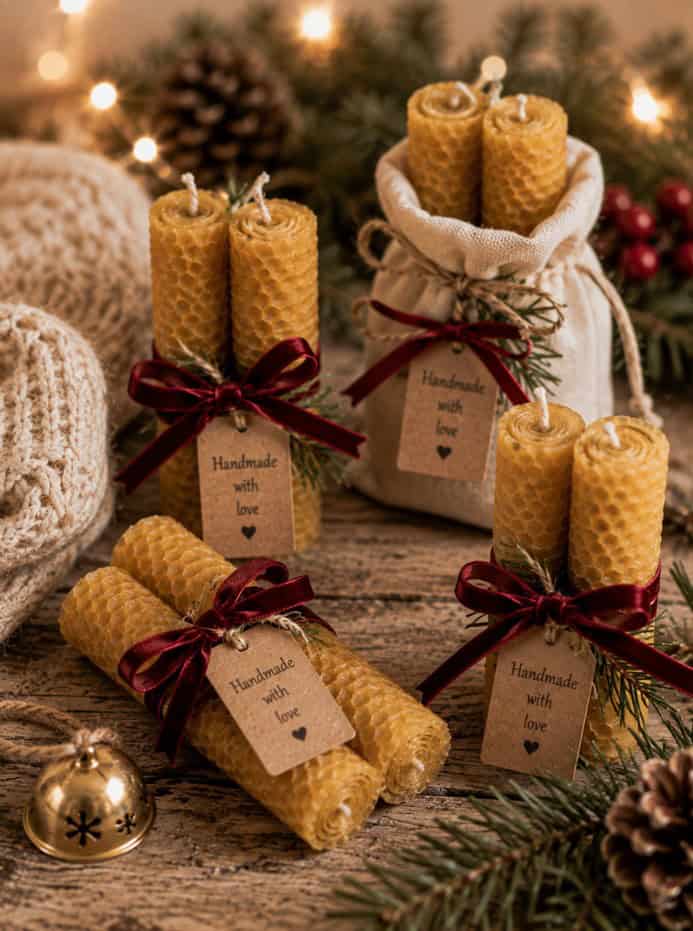
What a set of four handmade gifts actually costs:
- Beeswax sheets, five to six for a pair of candles: $8–$16
- Cotton wick: $3–$6
- Dark red satin ribbon and kraft tags: $5–$10
- Pinecones, pine sprigs, and one brass bell: $6–$14
- Total: $22–$46 for a full set of gifts
Budget alternative: craft-store beeswax sheets on sale plus a spool of wick lands near $12 for four candles. Skip the printed tags and hand-write on strips of kraft paper.
One Dollar Bowl, Thirty-Five Ways to Use It
Start with the simplest version — a clear bowl, a bag of ornaments, ten minutes — and let it tell you what the rest of your holiday styling wants to be. The best projects on this list cost less than a fancy coffee, and they pack into a bin in January and come back out for years. 📌 Save this to Pinterest for later — you’ll want to revisit these ideas.